SAP & Oracle partner and support companies

Loading

Archives March 2025

SAP

SAP PO for Beginners Part – 20 – BPMN 2.0 in a Nutshell

This blog will show you BPMN 2.0 in a nutshell and guide you on how to design a business process model using the BPMN 2.0 graphical representation language.

To put it plainly, underneath is the substance we will be intricate in this instructional exercise:

  • What is BPMN?
  • Need for BPMN in SAP PO
  • Types of shapes in BPMN

1. What is BPMN ?

BPMN 2.0 in a Nutshell: BPMN stands for Business Process Model and Notation. It is a standard developed by the Object Management Group (OMG). The primary goal of BPMN is to provide graphical documentation that is understandable to all business users. Since it is based on flowchart principles, it is straightforward and easy to grasp. BPMN is widely used to standardize the language for describing business processes. It is easy to learn and can be utilized by both IT and business users. Although many symbols are available for various use cases, only a handful are commonly used to represent most processes.

At an undeniable level, BPMN assists partners with figuring out the interaction through a visual portrayal, since graph can make complex cycle more clear.

2. Need for BPMN in SAP PO?

In the event that you have perused the past post, you would realize BPM process. To lay out the BPM cycle in SAP NWDS device, we really want to plan the business cycle utilizing a language called BPMN. Variant of BPMN is 2.0. BPMN2.0. We have two sorts of PO establishment. One is Single Stack Java based and another is double stack ABAP + Java based. In double stack engineering, we also have BPM, however its ccBPM which isn’t similar to NW BPM. Likewise, the language used to make ccBPM process is BPEL (Business Interaction Execution Language) though for NW BPM, its BPMN2.0.

3. Types of shapes in BPMN: BPMN 2.0 in a Nutshell

BPMN is made of specific components or shapes that contains visual language. BPMN has 4 fundamental gatherings of shapes.

– Flow Objects -> Events / Activities / Gateways

– Connecting Objects -> Sequence / Message Flow / Association

– Swimlanes -> Pool / Lane

– Artifacts -> Data / Group / Annotation

1) Flow Objects – Events:

The primary sort of stream object is Occasion. Occasions trigger a beginning/change or finishes an interaction. There are 3 kinds of occasions:

Begin – Each cycle in a BPMN chart should start with starting occasion called Start occasion. Many beginning occasions contain a symbol in the center to characterize the occasions trigger. For e.g., a Beginning occasion that contains the envelope symbol in the center shows that the message shows up and triggers the beginning of a cycle.

Halfway – This component has two circles with some offset.

End – An End occasion implies the finish of a specific cycle or way inside an interaction. At the point when you see an end occasion, you can affirm that there could be no further cycle should be added or will be accessible after that. End occasions have a thick boundary.

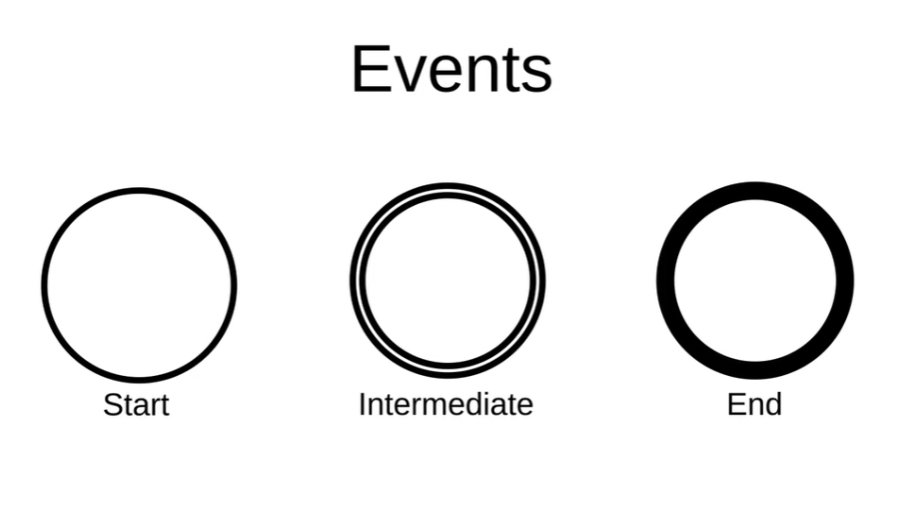
Begin, Halfway and End Occasions can be additionally assigned into a few images. Recall your BPMN graph, regardless of the cycle, will essentially have one beginning occasion and one end occasion.

2) Flow Objects – Activities:

Exercises then again are the structure blocks of BPMN graph. They address a particular undertaking performed by an individual or framework and their shown by square shape with adjusted corners. In exercises, you can add symbols in the action to outwardly show significant traits like message send or get, client undertakings, manual errands and so on.

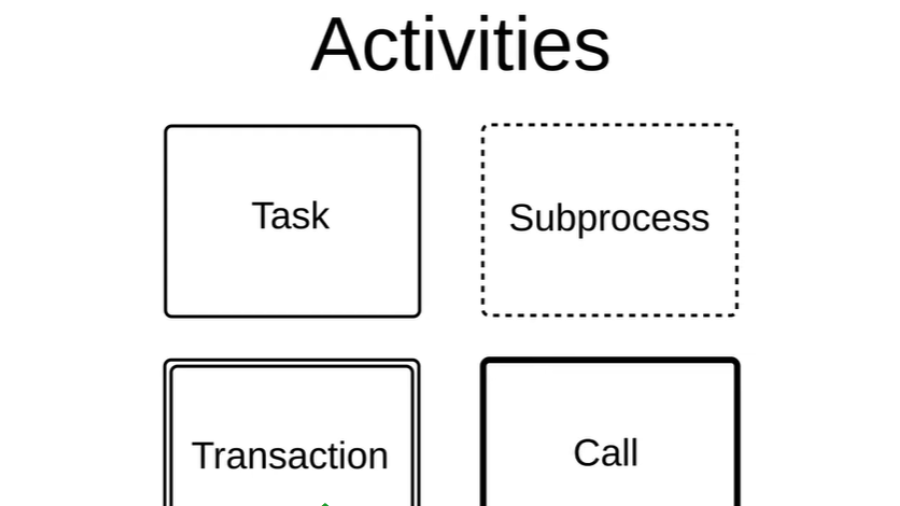
There are 4 main types of activities:

Task – An undertaking is a solitary activity in a cycle. Like Altering the receipt, mailing to business.

Subprocess – A Subprocess make out of different stream objects. Subprocess will come convenient assuming your BPMN graph is tremendous with many BPMN components and you don’t maintain that less significant cycle should mess the chart. In this way, its smarter to put it inside sub-process. A Sub-process has an Or more image in center which signifies that the sub-process holds youngster components inside itself.

Transaction – A transaction activity represents a payment process.

Call – A call movement calls and starts up another cycle and the parent interaction will go on just when the other cycle is done.

3) Flow Objects – Gateways:

The last kind of stream objects are Passages. Entryways are addressed by precious stone shape and goes about as a choice point that concludes the interaction way or stream in light of specific circumstances or occasions. For e.g., in light of the mail content, the door will send the mail body to the beneficiary.

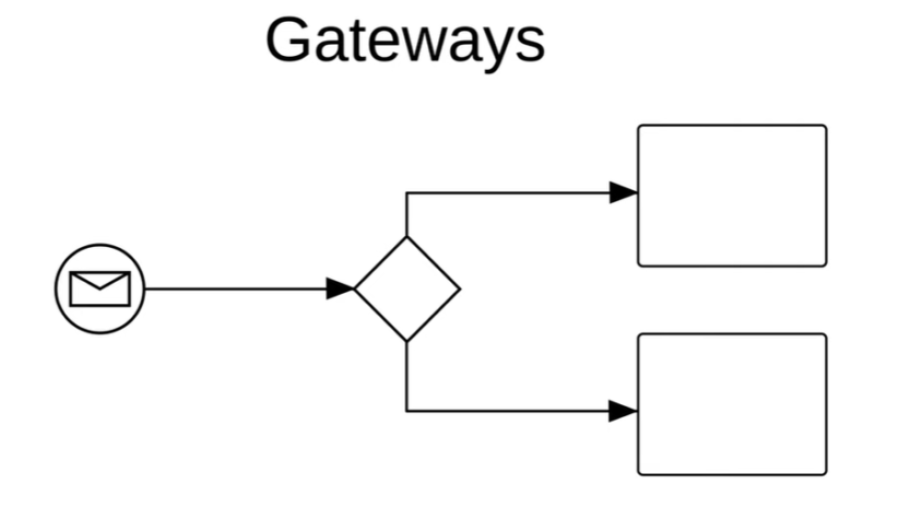
There are a few sorts of doors with a precious stone shape, with various images inside to recognize the kind of Entryway.

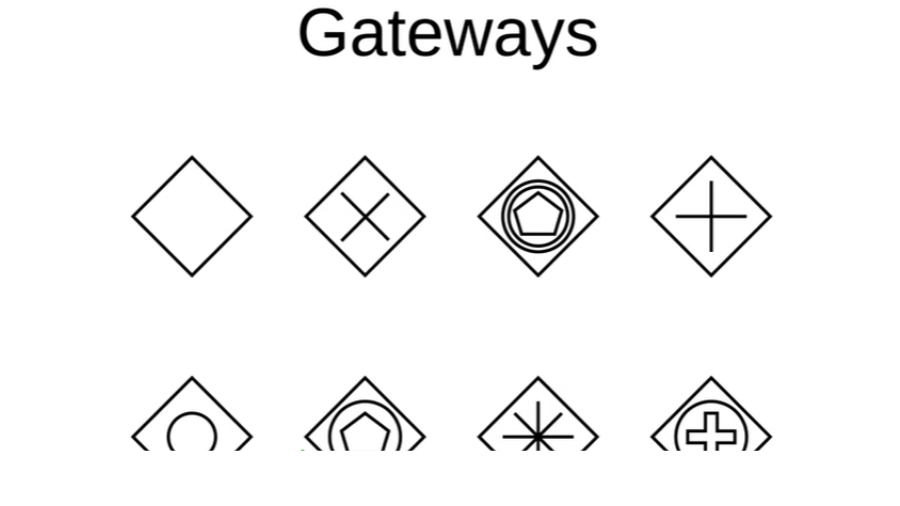
A portion of the principal passages are: Selective, Occasion based, Equal, Comprehensive, Complex choice entryways.

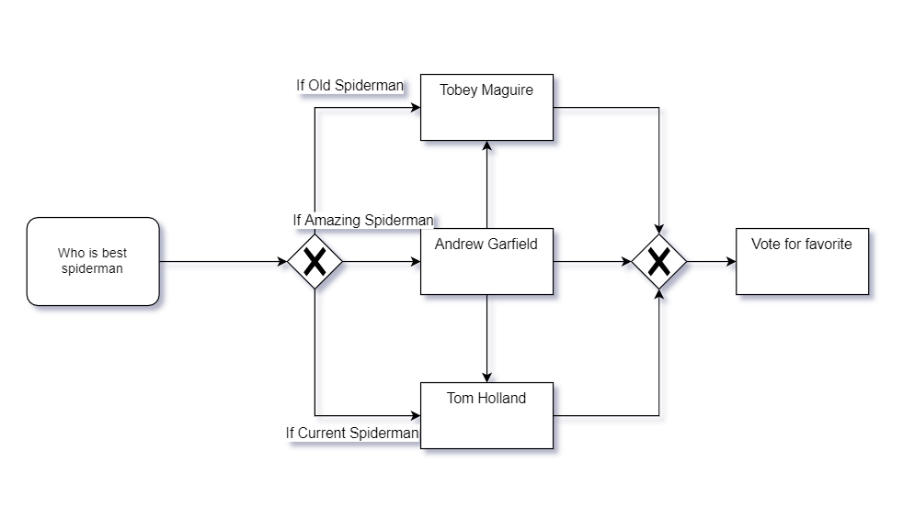
Selective Passage – Jewel Shape with X imprint inside it. Additionally called as XOR entryway. In the underneath BPMN scrap, we have utilized elite passage, where client needs to pick which spiderman they like and in view of that choice, the restrictive entryway will decide and continues with the following assignment, which is Decision in favor of top picks. The contrast among selective and rest of the entryway is, in elite, all friendly arrangement streams are assessed, and any one activity should be picked.

Occasion Based Passage – Occasion based entryway is like Selective door, where just a single branch will be initiated, rest of the branches will get deactivated. In select entryway, a condition articulation is assessed, however in occasion based passage, the condition will be founded on occasions. For e.g., When a client makes a credit demand, it is important to request a few records. In the event that client doesn’t bring the archives till 2 days, we will contact the client mentioning for same nevertheless not gave, then end the cycle. Assuming records got, check it and interaction will end. Here, occasion based entryway will have 2 parts, where first split is hanging tight for 2 days for records and second split is getting reports.

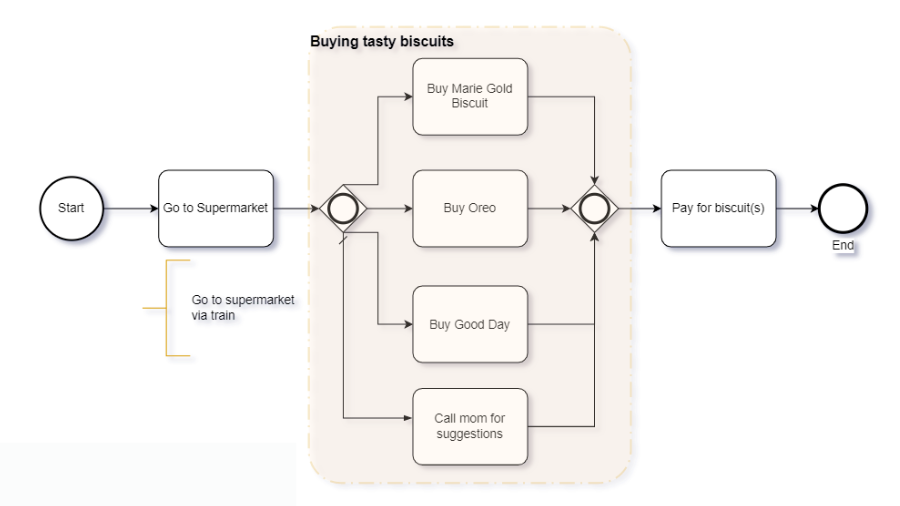
Equal Passage – Precious stone with an or more sign inside it. In equal passage, all branches will get enacted. Like, on the off chance that we utilize equal door in above model, the two branches, trusting that 2 days for client will bring the endlessly archives got branch will get actuated parallelly. On the off chance that there is what is going on, where all split branches ought to be executed, favor equal entryway. Equal door is likewise called AND entryway.

For a legitimate model on equal passage is, purchasing staple things in general store.

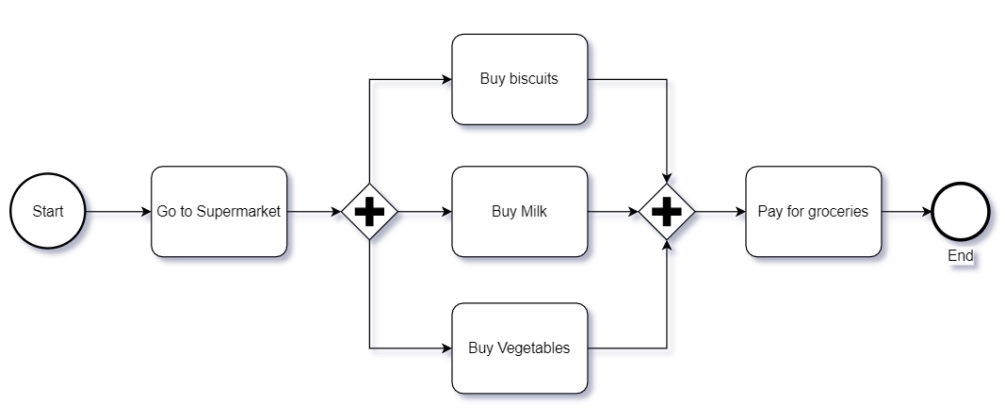
In above general store model, till you purchase all referenced things (milk, bread rolls, food) the door will not execute the following stage of installment. It will stand by till all things are bought.

Comprehensive Door – Circle inside a jewel. Comprehensive Door is likewise called OR entryway. We should straight away go with the model.

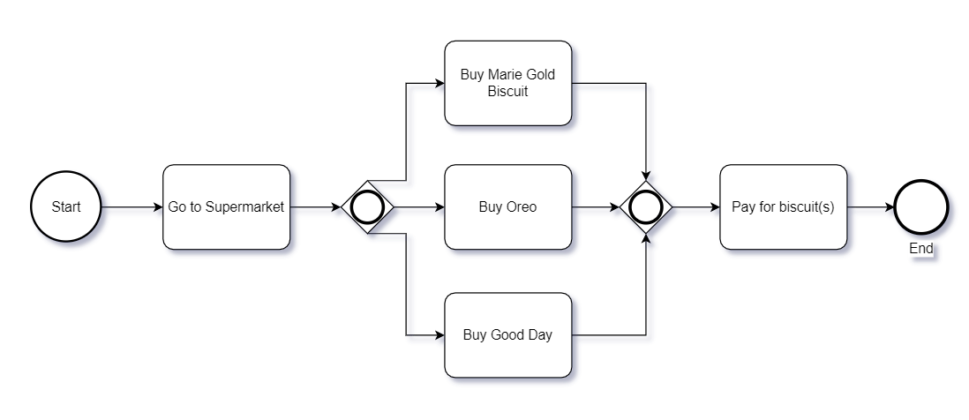
In the above piece, comprehensive passage will pick something like 1 branch to get chosen or all branches. Like, assuming we purchase Marie gold bread roll, OR door will sit tight for the reaction of the other two branch status. On the off chance that Oreo branch is chosen, it will be added and same for good day. Until it gets reaction from all branches, the OR entryway will not get finished. It is generally a decent practice to have a default branch which would execute on the off chance that the bread rolls are not really purchased. For determining default branch, there will be change in bolt, with a strike toward the beginning of bolt.

4) Connecting Objects – Sequence Flow:

Exercises, doors, and curios don’t have a lot of significant worth all alone in the event that they can’t be associated with one another. This is the explanation we are utilizing Associating objects. We will utilize different association objects in view of the transmission. The first is Grouping.

Succession stream interfaces different stream articles like occasions, exercises and passages.

5) Connecting Objects – Message Flow:

A message stream is utilized to show the progression of messages between two members that are ready to send and get them. In BPMN, each pool addresses one member. Trade of data between members can be signified in Message stream connector.

6) Connecting Objects – Association:

An affiliation associates extra data, like a note, to individual components in the process model, for example, stream objects, Swimlanes, and information objects.

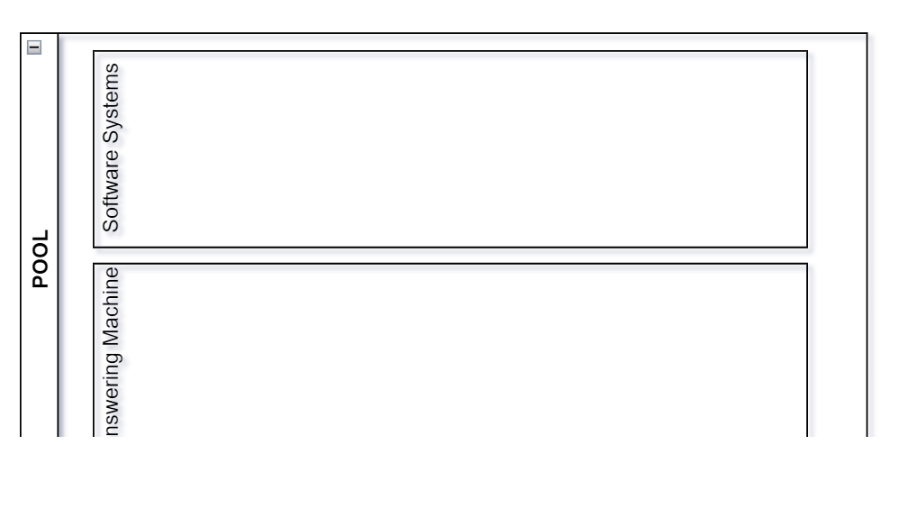
7) Swimlanes – Pools:

Swimlanes are only compartment to bunch the BPM processes. A swimlane addresses a utilitarian element or obligation simultaneously and can be demonstrated either upward or on a level plane contingent upon the direction of the whole BPD. Swimlanes will show us who are responsible for each interaction. In the event that you are having at least one donor, it will result in different swimlanes.

Pool swimlane addresses a cycle member and fills in as a holder for single interaction. Paths can be utilized to sort the division into numerous parts, as in client care administration pool we can have 2 paths, Programming frameworks and Programmed replying mail.

8) Artifacts – Data:

There are numerous data ancient rarities for Information Article. Fundamentally, all data antiquities address information, either information, result or assortment of information/yield. Assuming there are numerous records that is sent as an info, we use Information Assortment and same goes to Result.

You could feel a little uncertain on how this information object situated in BPMN graph. See the underneath piece.

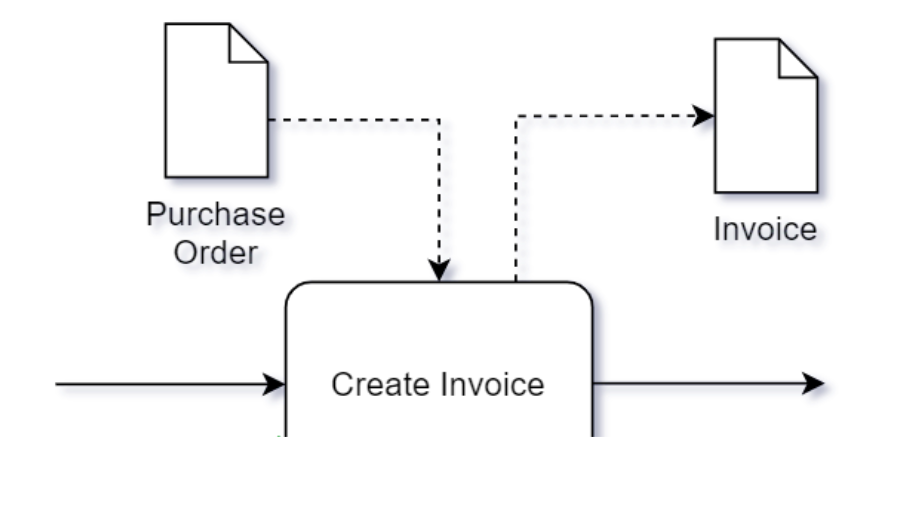
This arrangement of information object doesn’t have an effect in the BPM cycle while executing. It is an extra data to the client that an information that is being utilized and yield record is produced. There are a lot more images like information store, where we can utilize it in the event that we are bringing the information from a data set.

9) Artifacts – Annotation:

Explanations are extra data gave to an undertaking or an action on what’s the errand reason. It is a greater amount of like giving remarks to exercises in BPMN graph.

There are two different ways we can give extra data, one is to explicit movement and another is to gathering of interaction.

In this way, we have finished the nuts and bolts on grasping the BPMN images. In next post, we will test the comprehension with different business experiments.

I trust you were able to learn about this fascinating topic, BPMN 2.0 in a Nutshell If you feel a little unsure or have any questions or suggestions, please leave your comments below.

YOU MAY LIKE THIS

Core Data Services in ABAP for HANA

Understanding the Role of an SAP Application Support Specialist

A Comprehensive Guide to SAP ABAP Training Online

SAP

SAP PO for Beginners Part – 19 – Introduction to NW BPM and NW BRM in SAP PO

This blog will provide an Introduction to NW BPM and NW BRM in SAP PO, offering a general understanding of these concepts in a single stack environment with a relevant business use case.

To put it plainly, underneath is the substance we will be intricate in this instructional exercise:

  • What is NW BPM in SAP PO?
  • Need for NW BPM in SAP PO
  • Real Life example using NW BPM
  • Composite Environment
  • BPM & BPMN
  • What is NW BRM in SAP PO?

1) What is NW BPM in SAP PO?

BPM represents Business Interaction The executives and NW implies NetWeaver which says like BPM runs on SAP NetWeaver Java Based Application server. BPM gives the command over the course of a business application like planning, execution and observing. It permits associations to adjust their business situations and cycles to new business procedures and fulfill the needs of the present business climate constantly.

SAP gave one Extra part called NWBRM, and that implies NetWeaver Business Rules The executives. Process Coordination is a combo item.

SAP PO = SAP PI (AEX) + BPM + BRM

NWBPM is a different layer in PO, where the point of interaction creation or transmission can occur without BPM’s assistance. There may be a few situations where improvement of standard SAP Business Suite processes with web and rule-based process steps.

Frequently for a few client’s standard cycles ought to be upgraded to help a consistent reconciliation of infrequent clients (e.g., directors, outer colleagues, … ) through online UIs. Likewise, portable situations for individual interaction steps are required. Consequently, SAP Interaction Arrangement offers numerous specialized choices. With BPM such necessities can be executed effectively and proficiently, similar to execution of endorsement processes.

2) Need for NW BPM in SAP PO?

BPM is expected in circumstances where the circumstances are not satisfied by basic methodology. There are sure circumstances where we require BPM usefulness:

  • Handling of different messages for example Converging of two documents into one or of single record and sending it to numerous collectors parallelly or successively.
  • Trust that a message will be shown up.
  • Complex business process which includes embedding information into a few framework and getting reaction on specific condition structure every one of the collector.
  • Correspondence between a coordinated and a nonconcurrent framework which is finished with BPM.

3) Real life example using NW BPM:

Envision the business cycle included when you are structure a thing in an eatery. The initial step is that you submit a request, second, passed to kitchen for readiness and afterward once request is prepared, it will be served. Furthermore, finally, you will make installment. In the above use case, we can see that the request data is passed to a few frameworks and individuals and with heaps of coordination, requested thing is conveyed.

Likewise, associations made processes in view of their current administrations and applications. Also, there will be individuals included who will deal with the administrations and the applications. Just to finish one responsibility like convey the arranged thing, organizations could go through or incorporate with various administrations. Organizations would try and make another interaction by consolidating different innovation, data, and applications.

Additionally, we must have clear start to finish process perceivability and quicker completion time to run the cycle. That is the explanation organizations embrace instruments that help such sort of work process devices or BPM apparatuses. So that organizations would have unlimited authority on their administrations.

4) Composite Environment:

How about we check the Composite Climate out. It is a biological system where you join things together. SAP NetWeaver gives composite climate which is Java based climate where we can foster work processes and join various administrations together. CE has apparatuses, servers, and observing dashboards to fabricate and maintain our business cycles and NW BPM is one of them which can be planned, created, conveyed, tried, and executed behind the scenes server is SAP NetWeaver AS. Aside from improvement, it gives start to finish perceivability on the interaction device. The PO is combo item which has AEX, BPM, BRM. So AEX needs to correspondence with NW BPM for it to utilize BPM highlight in the composite climate.

AEX will deal with the network. BPM BRM deals with the running/handling of the cycle. In the above outline, it is apparent that B2B/A2A applications will contact AEX, for availability. Thus, the stream will be SAP ECC – > PO – > BPM – > PO – > outsider. SAP NWDS instrument is utilized for process demonstrating. NWDS is based on top of Obscuration apparatus by upgrading a few highlights to it needs. Composite applications can get to Big business Administration Library.

5) BPM & BPMN:

There are two sorts of cycles: Framework Driven Cycles and Human Driven Cycles. In Framework driven process, there will be no manual mediation required, similar to trade of receipt information from shipper to collector framework. While human driven process, human mediation is expected to finish the interaction, such as booking a flight ticket.

It is critical to comprehend framework driven and human driven, on the grounds that when we foster BPM process, we should have the option to separate it.

At the point when you fabricate communicate with AEX, you really want to assemble some part in AEX, and you want to change back to Composite climate and foster BPM and return to AEX to finish the connection point, as displayed in above outline.

So AEX handles Information change, directing, availability, and informing framework which implies all associations in source and target just occurs from AEX. Likewise, AEX deals with the information transformation yet in addition it can handover the obligation to BPM for information change/handling.

You can arrange in PO, as, when you get the message from shipper framework, it can give that obligation of dealing with the message to BPM. Whenever message is shipped off PO to BPM, BPM will get enacted and it will begin executing the means in view of framework driven or human driven process. When BPM process is finished, the reaction will be shipped off PO and note that BPM doesn’t send the reaction straightforwardly to collector or outsider framework.

Presently for fostering the BPM cycle, you want to learn BPMN language. Variant of BPMN is 2.0. BPMN2.0. BPMN represents Business Interaction Model and Documentation.

As said in past posts, we have two sorts of PO establishment. One is Single Stack Java based and another is double stack ABAP + Java based. In double stack design, we also have BPM, however its ccBPM which isn’t similar to NW BPM. Likewise, the language used to make ccBPM process is BPEL (Business Cycle Execution Language). In this way, in the event that you are moving from Double Stack to Single stack, you should update or re-gain the NW BPM process without any preparation.

Business Cycle Model and Documentation (BPMN) is a graphical portrayal for business process demonstrating that gives a graphical documentation to determining business processes in a Business Interaction Outline (BPD). It isn’t like programming, rather it depends on flowcharting procedure however used to address business process model.

We will have one nitty gritty post on portraying the BPMN2.0 language linguistic structure, occasions, passages, and association graphs. Test BPM stream:

6) What is NW BRM in SAP PO?

NW BRM represents NetWeaver Business Rules The board. BRM is about rules. In BPM, when you have some business rules, you will characterize that in BRM. For example, in the event that you request a thing, we can set a condition on request sum limit and keeping in mind that setting up the thing in eatery kitchen, the planning time shouldn’t surpass 30mins or somewhere in the vicinity. These sorts of rules can be set in NW BRM.

The justification for why the NW BRM is given independently as opposed to remembering it for NW BPM is on the grounds that the business rules could change much of the time, and the expert shouldn’t contact or change the business interaction thus. Thus, SAP has added another part in Composite Climate, so business rules can be adjusted without upsetting BPM.

In this post, we will provide an Introduction to NW BPM and NW BRM in SAP PO and demonstrate how to model a BPM process using the industry-standard BPMN 2.0 language.

YOU MAY LIKE THIS

Cracking the Code: Your Earning Potential as a SAP ABAP Developer with 5 Years of Experience

Application Development Life Cycle in Cloud Computing: A Comprehensive Guide

A Comprehensive Guide to SAP ABAP Training Online

SAP

SAP PO for Beginners Part – 18 – Bridges in SAP PO

This blog will provide a general understanding of bridges in SAP PO with a business use case. Additionally, we will explore the different types of bridges with examples.

To put it plainly, underneath is the substance we will be intricate in this instructional exercise:

  • What is a Bridge in SAP PO?
  • Async-Sync Bridge Scenarios
  • Sync-Async Bridge Scenarios

1. What is a Bridges in SAP PO?

Say, you are sending data from an async framework (Document) to outer framework (Web-administration/RFC – Sync). The beneficiary can return reaction message, however source is offbeat. Subsequently, the association from source side will be shut whenever it is sent, as it is nonconcurrent.

There are two types of bridges:

1. Async – Sync Bridge

2. Sync – Async Bridge

Two answers for these issues:

  1. Utilizing ccBPM/BPM
  2. Utilizing standard connector modules

Using ccBPM/BPM:

Advantage:

  • Complex cycles with various frameworks

Disadvantage:

  • Improvement and testing time.
  • Observing and investigating intense
  • ccBPM not accessible in Single stack establishment, subsequently BPM should be utilized.

Using standard adapter modules:

Advantage:

  • Simple observing and troubleshooting, testing, creating

Disadvantage:

  • Clear comprehension of module boundaries required. Could get confounded.

2. Async – Sync Bridge Scenarios:

Scenario:

Record will be shipped off PI and message change/planning will happen, post that, message will be communicated to RFC which is a simultaneous BAPI made in ECC which returns reaction, and it will be put away in a Document.

Adapters – Sender File, Receiver RFC, and Receiver File

  • Source framework – Async
  • Recipient framework – Sync
  • Thus, sending a solicitation and getting reaction in the source connector/channel will be two free errands.
  • Target framework, as it is sync, will send reaction in which the solicitation came.

Connector modules to be utilized in Shipper Correspondence Channel:

  • RequestResponseBean – Converts Async message to Match up message and moves it to next module chain.
  • ResponseOnewayBean – Converts Sync message to Async message and diverts it to beneficiary.
MODULE NAMETYPEMODULE KEY
AF_Modules/RequestResponseBeanLocal Enterprise BeanReq
CallSAPAdapterLocal Enterprise Beansap
AF_Modules/ResponseOnewayBeanLocal Enterprise BeanResp

Boundaries for RequestResponseBean (in Source CC):

passthrough – Valid (Next module in the chain)/Bogus (PI message handling subsystem) – Default (Misleading)

timeout – Response holding up time (in ms) – Default 300000ms

Parameters for ResponseOnewayBean (in Sender CC):

receiverParty/receiverService – Name of comm. Component/Party – Optional

receiverChannel – Receiver Comm. Channel name – Optional

adapterType (FILE)/adapterNamespace (http://sap.com/xi/XI/System) – type and namespace of connector to associate with beneficiary framework – Discretionary.

HANDLING ERROR SCENARIOS:

receiverChannelOnFault – Communication Channel name to receive error messages

replaceInterfaceOnFault – true -> change interface and namespace

                                                false -> keep original interface provided earlier

interfaceOnFault / interfaceNamespaceOnFault

Steps in processing:

  • Getting async message from source framework – > Module RequestResponseBean

-> module changes the message type from async to adjust by changing the message header.

  • In view of the boundary Passthrough Valid, module passes the message to next module chain, in the event that Misleading, it will skirt the following module chain and straightforwardly goes through informing framework.
  • Next is CALL SAP Connector (standard) module, moving it to PI informing framework.
  • Sending a solicitation to match up correspondence channel.
  • Coordinated call to the outside framework, getting the reaction.
  • Getting reaction from sync correspondence channel.
  • Return reaction to ResponseOnewayBean changing the message type from sync to async and deciding the recipient framework which is set in MODULE Boundaries.
  • Sending reaction to channel.
  • Conveyance of message to source framework as async correspondence.

3. Sync – Async Bridge Scenarios:

Sender – Sync

Receiver – Async

Modules to be used:

RequestOnewayBean – Converts sync messages to async messages

WaitResponseBean – leaves sync comm channel OPEN and waits for the response. Upon receiving response from async system, it will convert it to SYNC and send it to original system. If no response came, then error message is returned.

NotifyResponseBean – this module used instead of standard adapter module in response async sender channel to transfer the response message directly to WaitResponseBean

——————-

WE HAVE AN ISSUE HERE:

Envision that few messages are going through the extension all the while. Along these lines, eventually couple of questions are sitting tight for reactions. Some reaction is coming from the objective framework – yet the way that we know which of forthcoming channels should be utilized to send a particular response?

CORRELATION ID – this is the saviour

It is the identifier/key, which holds the special worth between reaction message and the anticipating demands.

THE SOLUTION SHOULD BE:

While communicating the solicitation message, some novel identifier that ought to be recalled by the solicitation message and check this identifier with the got reaction message.

We can involve MessageID for this, which is extraordinary for each message. For getting this messageID we can help it through another standard module – > DynamicConfigurationBean

Steps in processing:

  • Getting a sync message from outer framework, sending it to RequestOnewayBean which converts message type from sync to async.
  • In the event that passThrough is set to Valid, module passes it to next chain of modules.

Else, module passes it to informing framework.

  • Standard connector module moves it to PI informing framework.
  • Demand moved to async recipient channel
  • Async call to outside framework
  • Async reaction to source comm channel from outside framework
  • Return the reaction to NotifyResponseBean, which sends the async reaction message to WaitResponseBean.
  • WaitResponseBean changes over async reaction message to match up reaction message and sends to source framework.

Parameters for RequestOnewayBean (in Sender CC):

passthrough – True (Next module in the chain) /False (PI message processing subsystem) – Default (False)

Parameters for WaitResponseBean (in Sender CC):

timeout – Response waiting time (in ms) – Default 300000ms

Parameters for NotifyResponseBean (in response Sender CC):

timeout – Response waiting time (in ms) – Default 300000ms

fault – Name of an error message

faultNamespace – Namespace of an error message

Next is solicitation and reaction relationship.

We should send messageID in the solicitation message header and pass it to target framework. In returning the reaction, we should fill the correlationID in the reaction header.

This is the manner by which we can deal with the solicitation and reaction of a sync to async span situation. Trust you enjoyed it. On the off chance that you feel somewhat doubtful, inquiries or ideas for us, kindly put your remarks underneath.

YOU MAY BE INTERESTED IN

ABAP on SAP HANA. Part III. Debugging in ADT

Building Cloud-Native ABAP Applications: A Guide to Modern SAP Development

SAP ABAP future in next coming years

SAP

SAP PO for Beginners Part – 17 – Checklist and Measures to be taken for SAP PO Support Package Upgrade

This blog will assist you in understanding what a support package and patch level mean in the SAP PO environment, along with the checklist and Measures to be taken for SAP PO Support Package Upgrade It covers the key steps required post-upgrade to ensure smooth operation and minimal disruption.

So, below is the content we will elaborate on in this tutorial, including the checklist and measures to be taken for SAP PO Support Package upgrade to ensure a smooth and efficient process.

  • Overview
  • What is a Support Package ?
  • Difference between Support Package and Patch Update
  • What we have planned for our client
  • Planning for SP Upgrade

1. Overview: Checklist and Measures to be taken for SAP PO Support Package Upgrade

In this post, we will explore the checklist and Measures to be taken for SAP PO Support Package Upgrade from a PO developer’s perspective. Additionally, we will also discuss the differences between a support package upgrade and a patch level upgrade, providing a comprehensive understanding of both processes.

2. What is a Support Package ?

At the point when an end client of SAP finds a bug in the SAP item, he reports something very similar to Drain support, SAP engineers really look at something similar and foster a rectification for the equivalent. This revision is shipped off the client as a NOTE.

In the event that the equivalent or comparative bug is accounted for by different clients or end clients, then SAP perceives such bug rectifies them and gathers this multitude of remedies in a single spot and adds a few improvements to the prior rendition of SAP and afterward calls this as a Help PACK.

3. Difference between Support Package and Patch Update:

A Fix contains a fix for a singular Programming Part, which has a place with a particular SP discharge while a Help Bundle Stack (SP) is a significant assortment of bug fixes and element improvements and each SP contains an assortment of all the Product Parts which make up the PI framework.

SAP discharges fixes, as a fix, for every one of the PI Programming Parts consistently. These fixes might be delivered consistently, yet this relies upon the PI discharge, the SP discharge and the particular Programming Part.

The most effective method to check SP and Fix level of your PO framework ?

This has been explained in my below blog link:

4. What we have planned for our client: checklist and Measures to be taken for SAP PO Support Package Upgrade

We are updating the PO stack from SP 10 to SP21 which would bring new highlights and settled bug fixes. The most recent SP discharge as to introduce date is SP22 yet doesn’t prescribe refreshing to approach SP discharge as it’s anything but a steady delivery.

5. Planning for SP Upgrade:

  • Prior to continuing with SP Update, we really want to design the pre and post exercises required subsequent to redesigning. The exercises ought to be recorded down in a sheet and should be explored with client, with consideration of Premise group.
  • There is a compulsory action to be finished after SP Update action. Executing the post SP update Design Wizard according to note ##1444305 Setup Wizard: PI/ESR Backing Bundle Update, is a compulsory post SP update action. Begin the NetWeaver Head and explore to “Arrangement The executives – > Situations – > Design Wizard”. Select in the dropdown list “All design assignments” the undertaking “PI/ESR Backing Bundle Update”.
  • The exercises ought to be ordered into many sub-classes. The sub-classes which I referenced in my arrangement was:

Endeavors (in days)

Setups to be checked

Points of interaction to be tried

New highlights that accompany new SP Overhaul

  • First sub-classification is Exertion Assessment. I have breakdown the subtleties on the endeavors required by Premise + PO + Utilitarian colleagues.

Efforts (in days) involved by the BASIS + PO Consultants

Endeavors engaged with PO NetWeaver Director check

engaged with PO Connector network check

engaged with PO to drain to PO network interminably

Endeavors engaged with PO Connection point testing

For our situation, we are doing PO DB Update additionally, that is the reason I have included it. It’s absolutely Premise work, so we can focus on the other exercises.

  • I have presented another significant segment called; Free time REQUIRED. In view of this main we will actually want to affirm to business and our utilitarian colleagues on when to begin their improvement exercises which includes interface testing.
  • Thus, we want to compute the free time days too. Honestly, the free time that is expected for PO SP Redesign exercises goes from 3-4 days, since there will be issues on post SP Update which requires some investment to determine. Thus, on a more secure side, its in every case better to add support time, with the goal that we can stay away from superfluous strain from business.
  • The following sub-classification we need to investigate is: Setups.
  • This one is significant one, as need might arise to check every single part in PO which incorporates PO SLD, PO NWA, PO ESB and PO ID.
  • PO SLD: We really want to confirm that the business framework and specialized framework made in SLD for SAP PO DEV framework is dynamic and accessible. Its smarter to take the screen captures of them before redesign action starts, as these are significant designs.
  • PO DEV NWA: In NetWeaver Head, there are numerous setups, authentication and keys that should be checked.
  • ECC to PO objective should be checked.
  • Accessibility of IDOC objective and furthermore PING Objective test can be utilized for effective association.
    • ECC to PO objective should be checked.
    • Accessibility of IDOC objective and furthermore PING Objective test can be utilized for effective association.

For key based confirmation in SFTP association, we really want to actually take a look at the introduced testaments in NWA – > Setup – > Security – > Declarations and Keys. In our undertaking, we have 2 SSH key based SFTP verification, where with one party, we got public which we introduced in PO NWA and for another party, we produced public and confidential keys through Clay programming and introduced private key in our PO NWA and gave public key to outsider.

Next setup is for IDOC Inbound network boundaries that should be checked. NWA – > Setup – > Framework – > Application Assets. Whenever there is an endeavor to send IDocs from a source framework to PO, you might see that they are not sent effectively. Around then, you need to investigate three things: SM58 exchange logs, RFC Type HTTP objective availability and InboundRA Asset Connector network boundaries check and its ongoing status. Subsequently, we really want to actually look at the condition of the InboundRA boundary in NWA.

I have made sense of exhaustively in one my blog entry on the most proficient method to design network among ECC and PO. If it’s not too much trouble, actually look at the connection beneath:

Boundaries kept up with for InboundRA boundary.

Next one is the JAVA MAIL CLIENT. We have designed a ready system in SAP PO, where in the event that there is any issue or point of interaction got flopped because of some explanation, then, at that point, the business will receive messages with the bombed interface subtleties. This is called Ready Arrangement or CBMA (Part based Message Cautioning). To accomplish this, we want to arrange that SMTP email ID, have, port in

NWA – > Setup – > Foundation – > Java Framework Properties – > Administration tab – > Quest for “Java Mail Client”.

Underneath boundaries should be checked:

Mail.from

Mail.smtp.host

Mail.smtp.port

Mail.smtp.password

When all checked, explore to the gig booked for setting off messages.

NWA – > Tasks – > Occupations – > Java Scheduler. Check assuming the occupation made is in Dynamic status.

I have made sense of exhaustively in one my blog entry on the most proficient method to design MAIL Cautions. If it’s not too much trouble, really look at the connection beneath:

* Next one is accessibility check. There are various investigating or log following elements gave by SAP group to PO. We really want to affirm whether those elements are accessible and functioning true to form.

Log viewer – It permits you to see all log and follow messages that are created in the entire SAP NetWeaver framework scene. These log records help you to screen and analyze issues.

Way – NWA – > Investigating – > Logs and Follows – > Log Watcher

WS Navigator – In WS guide you can test the webservices and it is utilized to show Web administrations conveyed to a server.

Way – NWA – > SOA – > Specialized Setup – > WS Guide

SOA_Manager – The primary object is to consume/uncover webservices from ABAP motor, for instance in an ECC and you don’t have a PI to convey through Cleanser.

TCODE – SOA_MANAGER in ECC

Troubleshooting wizard – To try not to gather superfluous follows, you should be ready to replicate the specific issue. For instance, on the off chance that you can’t sign on with your username and secret phrase, go to the logon page of the application you need to open before you start the wizard. By doing this, you are ready to duplicate the specific issue – the weak logon, without gathering pointless information.

Way – NWA – > Investigating – > Logs and Follows – > Situation Testing

Locations & traces – Logging and following is fundamental for breaking down issues. The Reconciliation Motor purposes logging and following to log and break down the handling steps of messages. While a message is being handled by the pipeline of the Reconciliation Motor, the situation with the message is logged as a different message form.

Way – NWA – > Investigating – > Logs and Follows – > Log Arrangement

XPI Inspector – Next movement is to check in the event that all clients made in Client The board Motor of SAP PO is accessible. NWA – > Arrangement – > Security – > Personality The board.

URL- http://<host>:<port>/xpi_inspector/index.jsp

* Next movement is to check in the event that all clients made in Client The board Motor of SAP PO is accessible. NWA – > Arrangement – > Security – > Personality The board.

* Then, OData OAuth Login strategy. NWA – > Setup – > Security – > Validation and Single Sign-on. I have designed Essential Secret key login strategy, however you can arrange OAuth rationale strategy moreover. This login strategy might be material for ODATA imported in SAP PO. I have made sense of exhaustively of how an OData can be uncovered and carry out OAuth2.0 system to it without making a connection point. Kindly take a look at the connection beneath:

* All the NWA design checks we have examined. Next is the PO ESR exercises. We really want to check assuming all the product parts we imported in ESR are available.

* PO ID exercises. Business parts and business frameworks should be checked. In the Email Ready design, we would have made a Shopper in Coordination Registry, really take a look at its accessibility. To wrap things up is the Worth Planning bunch.

* PO ECC – This isn’t a PO Expert movement and will be finished by Premise group whenever overhaul is finished. Mounting AL11 envelopes in ECC framework. As it is a piece of PO, we want to really look at its accessibility.

  • Up until this point, we actually look at 2 classes: Exertion’s assessment and Designs to be checked. Presently we really want to continue on toward next classification – > Connection points to be tried.
  • In the event that the Setups TO BE CHECKED movement is appropriately finished, there won’t be a lot of problem in this class. For the connection points to be tried, we want to sort the connection points in view of the connector type. Like In SFTP, I have handpicked a portion of the connection points (don’t bother taking all SFTP points of interaction) and those points of interaction ought to be the business-basic connection points. Same way do it until the end of the connector types.

How I categorized:

  • SFTP
  • SOAP
  • RFC
  • IDOC_AAE
  • HTTP_AAE
  • REST
  • EDI
  • FILE

In your undertaking, you probably won’t have created communicates with all of the above connector types. For our situation, we had no RFC interface fabricated, so we made one test interface Being developed framework, RFC <-> Cleanser Webservice coordinated interface.

So we can affirm that all connector types are functioning true to form.

  • Next Class is, Elements. Highlights that are getting presented in the NEW Help Bundle can be checked on the web and those accessibility checks ought to likewise should be finished after overhaul is finished.

Here are some of the new features available in SP21 compared to SP10. Before upgrading, it’s essential to follow a checklist and Measures to be taken for SAP PO Support Package Upgrade to ensure a smooth transition. This will help in identifying potential risks and preparing the system for the new functionalities while minimizing downtime.

YOU MAY LIKE THIS

ABAP on SAP HANA. Part VI. New Age Open SQL ABAP 740

Bridging the Gap: Integrating ABAP with Other Cloud Services

A to Z of OLE Excel in ABAP 7.4

SAP

SAP PO for Beginners Part – 16 – Brief Overview on XSLT Transformations in SAP PO with Examples

This blog will provide you with an overview on XSLT transformations in SAP PO with examples. It will help you learn and understand the use case of XSLT mapping in SAP PO. We will also explore several examples to illustrate how XSLT transformations work by creating an interface.

To put it plainly, underneath is the substance we will be intricate in this instructional exercise:

  • Overview
  • Creating XSLT Transformation in SAP NWDS
  • Importing XSLT mapping in SAP PI

1. Overview on XSLT Transformations in SAP PO with Examples

This post makes sense of about utilizing XSLT planning in SAP Cycle Coordination for switching a basic contribution over completely to a somewhat complicated yield. It makes sense of the total course of setting up a .xsl document in SAP NWDS programming and afterward bringing in it to PI as a Compress record and test in Activity Planning.

XSLT represents EXtensible Template Language Change. At the point when it is beyond the realm of possibilities to expect to utilize message planning, normally when we really want to make an intricate design from a level message or where collection of hubs and so forth is required, we favor utilizing XSLT planning. XSLT portrays how a XML structure is changed into another XML structure. It is exceptionally easy to utilize a XSLT planning in PI. The XSLT is grown either through NWDS/Obscuration programming and afterward imported as a compress record into ESR.

The transformation of XSL code is managed by the XSLT processor. The XSLT processor takes one or more XML source documents along with the XSL file and processes them to produce a result document. For a comprehensive overview on XSLT Transformations in SAP PO with Examples, it’s important to note that the data/source document must be in XML format.

2. Creating XSLT transformation in SAP NWDS:

Make another Java Task in NWDS. Record – > New – > Java Task. Give a reasonable name and snap FINISH.

Inside it, we want to make source XML record. Right snap on Java Undertaking name – > New – > Other – > XML – > XML record and give a legitimate name to it.

Presently we want to make XSL record which will contain the change rationale.

Right snap on Java Undertaking name – > New – > Other – > XML – > XSL and give a legitimate name to it. Up to this point, we have made info and rationale document. Don’t bother making a result document, as the XSL processor which is worked inside NWDS will naturally change over the information record with rationale in XSL document and make a result XML document.

We can trial and check whether it’s getting made. Open the XML record and right snap on the work area region and pick – > Run As – > XSL Change.

There will be popup to choose XSLT record. Click on Add records to explore through project organizer structure.

On choosing the XSLT record, the XSLT processor actually looks at the XSL rationale and makes a result XML document.

Project folder structure:

We should take a basic model which will give a total thought regarding XSLT:

Leave the Source alone as displayed beneath:

<?xml version="1.0" encoding="UTF-8"?> 
<Person> 
  <FirstName>Subin</FirstName> 
  <LastName>Sudhakaran</LastName> 
  <Gender>Male</Gender> 
  <Address> 
	<Street>Gandhi Street</Street> 
	<Houseno>Flat No. B1</Houseno> 
	<City>Chennai</City> 
  </Address> 
</Person>

Let the desired target be as shown below:

<?xml version="1.0" encoding="UTF-8"?>
  <Title>Male</Title>
  <Name>Subin Sudhakaran</Name>
  <Street>Flat No. B1 Gandhi Street</Street>
  <City>Chennai</City>

Presently as we have the source and the objective with us, we can foster a XSLT planning between them in SAP NWDS.

XSL starter template:

<?xml version="1.0" encoding="UTF-8"?>
<xsl:stylesheet version="1.0" xmlns:xsl="http://www.w3.org/1999/XSL/Transform">
      <xsl:template match="/">
           <!-- TODO: Auto-generated template -->
      </xsl:template>
</xsl:stylesheet>

Presently how about we make sense of the above XSLT starter intricately. Since a XSL template is a XML archive itself, it generally starts with the XML statement: . The following component, , characterizes that this record is a XSLT template archive (alongside the variant number and XSLT namespace ascribes). The component characterizes a layout. The match=”/” trait partners it with the base of the XML source report. The substance inside component characterizes some HTML content to be composed as a result.

Presently how about we start the XSL rationale, where first field in the objective design is the TITLE which is planned to Orientation in source structure. Subsequently the rationale would be:

<Title>
    <xsl:value-of select=”Person/Gender” />
</Title>

Esteem of selector will get the worth of the field from the source XML and the way of the field is given in the select property as a XPATH articulation.

Presently we should continue with next field NAME, where we want to link first name and last name in the source XML with in the middle between.

<Name> 
   <xsl:value-of select="concat(concat(Person/FirstName,' '), Person/LastName)"/> 
</Name>

In the above XSL code, we are utilizing two connect administrators: First concat is for consolidating First Name with space close to it and next one is for joining First Name with space to last name.

Let’s do the same for rest of the fields: Street and City.

<Street>
   <xsl:value-of select="concat(concat(Person/Address/Houseno, ' '), Person/Address/Street)"/>
</Street>
		
<City>
  <xsl:value-of select="Person/Address/City"/>
</City>

Output:

Presently you would have a thought on how the XSLT change functions. We should get into different XSL labels accessible.

  • <xsl:stylesheet> or <xsl:transform> :

or are the root components that proclaim the archive to be a XSL template. Both of the two components can be utilized as root components as they are interchangeable. We have utilized xsl:stylesheet in the above model. The xmlns:xsl=”http://www.w3.org/1999/XSL/Change” focuses to the authority W3C XSLT namespace. Assuming you utilize this namespace, you should likewise incorporate the characteristic version=”1.0″.

  • <xsl:template> :

A XSL template comprises of at least one bunch of decides that are called layouts. A layout contains rules to apply when a predefined hub is coordinated. The worth of the match quality is a XPath articulation. In our model, match=”/” characterizes the entire report.

  • <xsl:value-of> :

Esteem of component is utilized to remove the substance of the predetermined hub. The worth that should be brought ought to be given as XPATH articulation inside the select property.

  • <xsl:for-each> :

JavaScript engineers would have speculated the usecase of this component. Its is utilized to circle through the hub. For instance, for our situation we have just a single individual hub, imagine a scenario where we have numerous individual hubs ?

We really want to show both individual hubs in the result, right ? With the ongoing rationale, on the off chance that you execute with different individual hubs, you will get just a single individual hub (initial one), as we are not circling through it. Thus, how about we circle through the individual hubs and show it in yield.

Input XML:

<?xml version="1.0" encoding="UTF-8"?>
<ns0:MT_XSLT_Source xmlns:ns0="http://XYZ.com/gen">
	<Person>
		<FirstName>Subin</FirstName>
		<LastName>Sudhakaran</LastName>
		<Gender>Male</Gender>
		<Street>Gandhi Street</Street>
		<Houseno>Flat No. B1</Houseno>
		<City>Chennai</City>
	</Person>

	<Person>
		<FirstName>Sudheesh</FirstName>
		<LastName>Sudhakaran</LastName>
		<Gender>Male</Gender>
		<Street>Daniel Street</Street>
		<Houseno>Flat No. B2</Houseno>
		<City>Mysore</City>
	</Person>
</ns0:MT_XSLT_Source>

XSL Logic:

<?xml version="1.0" encoding="UTF-8"?>
<xsl:stylesheet
	version="1.0"
	xmlns:xsl="http://www.w3.org/1999/XSL/Transform"
	xmlns:ns0="http://XYZ.com/gen"
	xmlns:ns1="http://XYZ.com/Test">
	<xsl:template match="/">
	   <ns1:MT_XSLT_Target>
		<xsl:for-each select="ns0:MT_XSLT_Source/Person">
		   <Title>
			<xsl:value-of select="Gender" />
		   </Title>
		   <Name>
		     <xsl:value-of select="concat(concat(FirstName,' '), LastName)" />
		   </Name>
		   <Street>
		     <xsl:value-of select="concat(concat(Houseno, ' '), Street)" />
		   </Street>
   <City>
		     <xsl:value-of select="City" />
		   </City>
		</xsl:for-each>
	   </ns1:MT_XSLT_Target>
       </xsl:template>
</xsl:stylesheet>

Output:

We can likewise channel the result from the XML document by adding a basis to the select trait of component.

Eg: <xsl:for-each select="ns0:MT_XSLT_Source/Person[FirstName=’Subin’]">
  • <xsl:sort> :

Sort component will sort the result XML. We really want to indicate on what premise the arranging ought to occur.

<xsl:sort select=”FirstName”>
  • <xsl:if> :

The component is utilized to set a restrictive test against the substance of the XML document. The worth of the expected test trait contains the articulation to be assessed.

<xsl:if test=”expression”> </xsl:if>

<xsl:if test=”Gender =Male”>

We have investigated the fundamentals of XSLT change. Presently we should perceive how to utilize a XSLT planning in PI.

3. Importing XSLT mapping in SAP PI:

Steps engaged with sending a connection point or arrangement the planning program is:

Source Data Type:

Target Data Type:

I won’t show the screen captures for Message type, administration interfaces as those are fundamental and known. When message types and administration connection points are made, make IMPORTED Chronicles and import the XSL document in it.

For effective import of XSL document into imported chronicles, you want to change over it into Compress or Container record. It’s better and more straightforward to change over the XSL document to Compress record.

Operation Mapping:

That’s all there is to it. This is the methodology to create and deploy XSLT transformations in SAP PI. I hope you enjoyed this overview on XSLT Transformations in SAP PO with Examples. If you have any doubts, questions, or suggestions, please leave your comments below.

YOU MAY LIKE THIS

How to SPLIT Data in FOR LOOP Using Modern ABAP Syntax?

The World of ABAP Consultants: Unlocking the Power of SAP

Calculator in SAP using New ABAP Syntax

SAP

SAP PO for Beginners Part – 15 – Introduction to Java Mapping with Examples in SAP PO – Part – 2

This blog will assist you with Introduction to Java Mapping with Examples in SAP PO, including how to write, validate, and deploy Java Mapping in SAP NWDS software.

So, underneath is the substance we will be intricate in this instructional exercise:

  • Overview
  • JAVA PROGRAM -1 – Extracting Filename through Dynamic Configuration
  • JAVA PROGRAM -2 – How to write parameterized Java Mapping

1. Overview: Introduction to Java Mapping with Examples in SAP PO

This is the continuation of the previous post where we created and tested the Java program in NWDS and ESB. In this post, titled Introduction to Java Mapping with Examples in SAP PO,” we will delve deeper into more complex Java projects and explore additional examples to enhance your understanding of Java mapping within SAP PO.

2. JAVA PROGRAM – 1 – Extracting the Filename through Dynamic Configuration

The beginning advances are same, where we make a Java Venture in NWDS – > Making class. I will involve similar program as we utilized for Following.

Eliminate the follow lines included the past post.

First thing we need to do is, we need to get the occasion of the powerful setup. Thus, for that we will characterize a variable of dynamic setup to hold the example of the dynamic config. Then, we will characterize a string variable to hold our filename. And afterward we will get the unique arrangement. Dynamic arrangement can be removed from TransformationInput.

public DynamicConfiguration DynConfig;

Under transform method:

String Filename = "";
	
DynConfig = arg0.getDynamicConfiguration();

This will get you the occurrence of the powerful arrangement, then we go inside the unique setup and check in the event that its accessible or not. Before that, we will have a check regardless of whether the powerful setup example is there.

if(DynConfig != null) {
throw new StreamTransformationException("Unable to find dynamic configuration");
}

So far:

public DynamicConfiguration DynConfig;
	
public void transform(TransformationInput arg0, TransformationOutput arg1) throws StreamTransformationException {
		
	String Filename = "";
	
	DynConfig = arg0.getDynamicConfiguration();
	
	trace = (AbstractTrace) getTrace();
	
	if(DynConfig == null) {
          throw new StreamTransformationException("Unable to find dynamic configuration");
	}
		
	try {		
          execute(arg0.getInputPayload().getInputStream(), arg1.getOutputPayload().getOutputStream());
	}
        catch(Exception ee) {
	  throw new StreamTransformationException(ee.toString());
	}
}

Besides, we will make a key. A key is fundamentally a namespace and the name of the key of the unique design. So we characterize a key of dynamic design and that is essentially the namespace and the name of the unique setup.

DynamicConfigurationKey key = DynamicConfigurationKey.create("http://sap.com/xi/XI/System/File", Filename);

So now we write the code to extract the data. We will add it inside try catch block.

try {		
  Filename = DynConfig.get(key);		
}catch(Exception ee) {
  throw new StreamTransformationException("Unable to Read the Dynamic Configuration for File Parameter");
}

We will have an IF ELSE proclamation to check assuming filename has some worth in it, which will be added through Unique Arrangement. To do as such, we will add data follow like underneath:

if(Filename != null && !Filename.equals("")) {
	trace.addInfo("Filename found from Dynamic Configuration: " + Filename);
}else {
	trace.addInfo("Filename not found in Dynamic Configuration");
}

You may be pondering, what will be the information put away in Filename. Since the key has the namespace of http://sap.com/xi/XI/Framework/Record, the filename of the document put in SFTP/FTP area will be removed and put away in Filename variable.

GitHub Repo:

3. JAVA PROGRAM – 2 – How to write Parameterized Java Mapping:

Compose a Java Program to peruse the boundaries planned in ESB. For that we want to know how to peruse the boundaries that you characterize in the Activity planning which we will find in last part. In the first place, we will see the java program.

In this Java Program we won’t run the program in XI framework, subsequently we are eliminating the execute technique totally and furthermore principal strategy since we won’t run the Java program locally in the NWDS programming.

In this way, we will compose all our code inside Change technique.

First thing we need to do is perused the boundaries: PARAM1, PARAM2, PARAM3. This is similar name we need to characterize in Activity Planning. While executing in activity planning, we will populate values through restricting.

We will compose all inside the attempt block.

try {
  String Parameter1 = arg0.getInputParameters().getString("PARAM1");
  String Parameter2 = arg0.getInputParameters().getString("PARAM2");
  String Parameter3 = arg0.getInputParameters().getString("PARAM3");
}

Now we need to write the parameters in output. First we need to get the output string.

OutputStream out = (OutputStream) arg1.getOutputPayload().getOutputStream();

Now write the parameter values to output screen.

out.write(("PARAM1 = " + Parameter1 + "\r\n").getBytes());
out.write(("PARAM2 = " + Parameter2 + "\r\n").getBytes());
out.write(("PARAM3 = " + Parameter3 + "\r\n").getBytes());

That is all there is to it. Simple one.

Presently we will investigate the design to be finished in ESB.

Complete source code:

public void transform(TransformationInput arg0, TransformationOutput arg1) throws StreamTransformationException {
		
	try {
	  String Parameter1 = arg0.getInputParameters().getString("PARAM1");
	  String Parameter2 = arg0.getInputParameters().getString("PARAM2");
	  String Parameter3 = arg0.getInputParameters().getString("PARAM3");
			
	  OutputStream out = (OutputStream) arg1.getOutputPayload().getOutputStream();
			
	  out.write(("PARAM1 = " + Parameter1 + "\r\n").getBytes());
	  out.write(("PARAM2 = " + Parameter2 + "\r\n").getBytes());
	  out.write(("PARAM3 = " + Parameter3 + "\r\n").getBytes());
			
	  out.flush();
	}
		
	catch(Exception ee) {
	  throw new StreamTransformationException("Error while reading the parameterized mapping".concat(ee.getMessage()));
	}
		
}

Github repo:

ESB Configuration:

Make the Container document and import it in IMPORTED Files.

Make some example Information type and Message type in ESR and import the message types to OUTBOUND and INBOUND assistance interfaces.

Make Activity Planning and import the outbound help interface as SOURCE MESSAGE and inbound help interface as TARGET MESSAGE.

IMPORTED ARCHIVE:

Structure:

Import the Java Planning into activity planning.

Presently it is the right time to characterize the boundaries.

Click on the Boundaries button which will spring up the boundaries area, where we really want to characterize those 3 boundaries as displayed underneath:

Once characterized, click on the BINDING button.

Map every one of the three boundaries to the PARAMETER NAME.

On fruitful restricting, you will see the red shaded mark in the boundaries area which implies that the limiting is effective.

When done save and actuate the Activity Planning. After that explore to the TEST tab to see the IMPORT Boundaries appearing.

Go to boundaries tab.

Enter the boundary worth and tap on Change to see the result.

This is how the defined Java mapping works. I hope you enjoyed this introduction to Java mapping with examples in SAP PO. If you have any doubts, questions, or suggestions, please feel free to leave your comments below.

YOU MAY BE INTERESTED IN

Just 3 Changes to Improve the SAP ABAP Performance by 95 Percent

OData in SAP ABAP: Streamlining Data Exchange and Integration

Applying Enterprise Integration Patterns in SAP ABAP

SAP

SAP PO for Beginners Part – 14 – Introduction to Java Mapping with Examples in SAP PO – Part – 1

This blog will serve as an introduction to Java Mapping with Examples in SAP PO, helping you learn how to write, validate, and export Java mappings using SAP NWDS software.

So, underneath is the substance we will be intricate in this instructional exercise:

  • Overview
  • JAVA PROGRAM -1 – Copy the contents from input to output file
  • Import Java Mapping libraries
  • Write a simple Java Program on copy the contents from input to output file
  • Compile Java Program
  • Extracting as JAR file
  • Import JAR file and test run Operation Mapping
  • JAVA PROGRAM -2 – Copy the contents from input to output by reading line-by-line
  • JAVA PROGRAM – 3 – Adding traces to java program on copying contents

1. Overview:

Here, we will foster java programs in NWDS programming, approve it and product it as a Container record for bringing in it in ESR vault as a Java Planning document in Activity Planning. Java Planning is a Java based program that is written in NWDS Manager with Java Planning Libraries and afterward transferred in the ESR. Java Planning is elective way to deal with composing Graphical Message Planning/XSLT Planning.

We should get everything rolling.

2. JAVA PROGRAM – 1 – Copy the contents from input to output file:

Prior to continuing with the production of Java Undertaking, one need to arrangement NWDS programming with the JAVA JDK document. Allude to the arrangement present on NWDS on PI:

Click on Document – > NEW – > Java Task

Give a substantial Undertaking name. Under JRE, select “Use project explicit JRE – JDK 1.8” and click on Straightaway and FINISH.

You can see under the work area; new envelope will be made with project name as organizer name.

Within it contains two primary envelopes, Src and Container organizer which holds the source code and receptacle organizer contains the class document once you characterize new class.

To make another class, Right snap on the venture name – > New – > Class

Class name will be same as undertaking name. Tick “public static void primary”. When done, this is the manner by which starter format seems to be.

3. Import Java Mapping libraries

Whenever you have made the Java Task, subsequent stage is to add the Java Planning Libraries to your venture. For that, right snap on the .java document – > Fabricate Way – > Arrange Assemble Way

Under libraries tab – > click on Add Outside Containers button and import the java planning library records. Click on Apply and Save.

For our sap java planning point of view, we are including those Container records. Once imported, you can see those records in the venture sheet – > Referred to libraries.

4. Write a simple Java program on copy the contents from input to output file

Presently we will compose a basic Java Program which will peruse the items in the information document or from the info field and duplicate for what it’s worth to yield record or result field.

First thing we need to do is, broaden the class Conceptual change. This class is the expansion of the planning program that you as of now have is important for graphical planning. As you are utilizing dynamic strategy, we really want to abrogate the change technique.

@Override
public void transform(TransformationInput arg0, TransformationOutput arg1) throws StreamTransformationException {
	try{
	  execute(arg0.getInputPayload().getInputStream(),arg1.getOutputPayload().getOutputStream());
	}
       catch(Exception ee){

          throw new StreamTransformationException(ee.toString());
	}
}

The principal strategy that will be executed by PI is the change technique at runtime. This change technique will call the execute as displayed in the code above. We should characterize the execute public technique.

The explanation EXCEUTE technique is added is for In reverse Similarity. If you have any desire to run this code in XI framework, then execute is the technique which it anticipates. Thus, we are including it. It’s in every case great to compose the code in attempt and catch block to get the exemptions and showing it in logs.

public void execute(InputStream in, OutputStream out) throws StreamTransformationException {
	try{
	   int buffer;  
           // variable for holding the copied contents
	   while((buffer = in.read()) != -1) { 
           // checking if chars reached end of line
	   out.write(buffer);
	   }
	out.flush();
	}

        catch(Exception ee)
       {
         throw new StreamTransformationException(ee.toString());
       }
}

Then, we will focus on adding contents in principal technique.

public static void main(String[] args) {
	try{
	   FileInputStream fin = new FileInputStream("inputFile.txt");
	   FileOutputStream fout = new FileOutputStream("outputFile.txt");
			
	   JM_FirstJavaMapping instance = new JM_FirstJavaMapping();
	   instance.execute(fin, fout);
// passing the input file as IN to execute method and performing operations in execute method. Same way output filename is also passed for writing the copied contents.
	}
        catch(Exception ee)
        {
	  ee.printStackTrace();
	}
}

IMPORT STATEMENTS OF LIBRARIES/PACKAGES:

import java.io.FileInputStream;
import java.io.FileOutputStream;
import java.io.InputStream;
import java.io.OutputStream;

import com.sap.aii.mapping.api.AbstractTransformation;
import com.sap.aii.mapping.api.StreamTransformationException;
import com.sap.aii.mapping.api.TransformationInput;
import com.sap.aii.mapping.api.TransformationOutput;

5. Compile Java Program:

While in Java document, in the menu bar, click on Run – > Run. Remember to put the inputFile.txt with some example contents put on it.

As we haven’t referenced the way of the document where it is situated in the java code, it will default get set in the work area organizer.

Java Program is working fine.

GITHUB REPO:

6. Exporting as JAR file:

For transferring the .container document to Drain PO ESB, we really want to get the .container record. In the container envelope, you can see the class record. Right snap on it – > 7zip – > Add to “JM_First… 7z”. It will get packed. Change the augmentation from .Flash to .Container.

If necessary, you can duplicate the .java document and spot it in .Compress record and afterward change the expansion to .Container

7. Import JAR file and test run Operation mapping:

Make a new namespace and under it, make IMPORTED Documents.

Give the imported document name same as Class Name. Import the record.

We will make test information type with one field and check whether the items in the information field gets replicated to yield field.

Data type:

Message Type:

SI – Outbound:

SI – Inbound:

Message Mapping:

NA. No need of message planning as we are utilizing Java planning for the change.

Operation Mapping:

Testing:

Operation Mapping -> Test tab

JAVA PROGRAM – 2 – Copy the contents from input to output by reading line-by-line:

Scenario:

Compose a Java Program on perusing the items in the record line by line and duplicate it to the result document.

The distinction between prior program and that’s what this program is, in program 1, the code will duplicate the items without perusing line by line and gluing it in yield document. However, in this program 2, we can peruse the items line by line, so that assuming there is any change required in the approaching lines, it tends to be done which is unimaginable in Program 1.

The change technique and the primary strategy will be the equivalent on the grounds that change strategy just calls the execute strategy by passing contentions and void strategy makes another article and passes it to execute strategy.

Execute method:

public void execute(InputStream in, OutputStream out) throws StreamTransformationException{
	try {
	   StringBuffer sourcePayload = new StringBuffer();
	   BufferedReader docInput = new BufferedReader(new InputStreamReader(in));			
			
	   String inputLine = "";
			
	   while( (inputLine = docInput.readLine() ) != null ) 
           {
	      sourcePayload.append(inputLine + "\r\n");
	   }
			
	   out.write( new String(sourcePayload).getBytes("UTF-8") );
	   out.flush();			
			
        }catch(Exception ee) 
        {
	   throw new StreamTransformationException(ee.toString());
	}		
}

Same way, place an info document and incorporate the java program to check whether its functioning true to form.

GITHUB REPO:

JAVA PROGRAM – 3 – Adding traces to java program on copying contents:

Scenario:

In this program we will figure out how to compose data, troubleshoot, and cautioning messages from Java planning, such as following the execution of the java program. Follow is only the review logs that we can see when the code is executed at runtime in ESB/AEX.

There are three sorts of follows:

Data

Troubleshoot

Caution

We will utilize a similar existing Java Program-2 which peruses the document line by line and add follows to it.

Make another Java Undertaking and class. Add Outside Containers. Duplicate the current Java Program and glue it in recently made Java document. Supplant the Class name.

Adding traces to Java Program:

GITHUB REPO:

Import the Container record to Activity planning and Actuate it.

Activity Planning – > Test tab – > Glue an example test lines of string type and change it to see the hints of the result.

Trust you loved it. Assuming you feel somewhat skeptical, questions or ideas for us, kindly put your remarks underneath.

YOU MAY LIKE THIS

SPTA Parallel Processing Framework in ABAP

Power of Parallel Cursor in SAP ABAP

SAP ABAP CRM Tips

SAP

SAP PO for Beginners Part – 13 – How to register and test WSDL files in Service Registry

In this post, we will discuss the steps to be followed on how to register and test WSDL files in Service Registry provided by SAP PO. Additionally, we will also test the hosted WSDL file to ensure proper functionality.

To put it plainly, underneath is the substance we will be intricate in this instructional exercise:

  • Overview
  • What is Service Registry
  • Accessing Service Registry
  • Publishing Service in Service Registry
  • Testing WSDL Service in Service Registry

1. Overview:

Here, we will dive deep into the Service Registry, and I will show you how to register and test WSDL files in Service Registry by importing the WSDL of your interface. This allows others to easily discover your service. It simplifies the process, so in the future, if someone needs to trigger a PO_CREATE, they don’t need to contact you. Instead, they can go to the Service Registry, find the available services, and directly use it to trigger a message to the AEX system or PO system.

We should begin.

2. What is Service Registry ?

Administration library is a UDDI based storehouse which contain undertaking administrations and related metadata. In basic terms, it is where you can store data about what administrations is on the which framework. It assumes a significant part in your administration situated design (SOA) procedure and gives a system to enroll, distribute, and find web administrations. The administrations distributed in the Help Library are ordered and classified in a way that works with finding them without any problem. Prior to posting the assistance under help library, you ought to have the connection point created and prepared. Distribute the connection point in help library, then, at that point, send the outsider the WSDL detail like WSDL URL, actual WSDL record and username/secret key. Not all connection points can be facilitated in Help Vault, just HTTP, Cleanser, XI and WS connector types can be enlisted.

Offices that we can-do in-Administration Vault:

  • Publish an existing web service in your SAP landscape, including its metadata and endpoint.
  • Classify and categorize the published service.
  • Query and search existing published web services.
  • Export and import the data contained in the Service Registry.

3. Accessing Service Registry:

Explore to PO Landing page http://:/dir/begin/index.jsp and under the endeavors administration store area, click on the Assistance Library connect.

On clicking Administration Vault, administration library window shows up with three primary choices under Assistance Definitions tab. Search, Peruse and Distribute.

4. Publishing Service in Service Registry:

There are two different ways to publish the service:

  1. Integration Directory menu
  2. Manual registration in Service Registry

We will investigate the Choice 2 exhaustively in this post which is the most favored approach to facilitating the assistance.

I would utilize Cleanser Intermediary to Cleanser Webservice simultaneous connection point which I have made sense of exhaustively on Part #11.

Initial step is to download the WSDL record, to do as such, explore to Incorporation registry and double tap on the ICO to open it. In the Reconciliation Design menu bar, select Showcase WSDL as displayed beneath.

WSDL will get displayed.

No need of saving the WSDL document, we simply need the WSDL URL which you can find in the above featured segment. Click on the Duplicate WSDL URL TO Support choice toward the finish to duplicate the URL.

Presently go to Administration Library device. As said, there are three choices: search peruse and distribute. To start with, we will distribute the help and quest for it.

Click on Distribute connect. It will incite to enter the WSDL URL which we got it from Reconciliation Index.

Glue it and snap on Straightaway.

On clicking Straightaway, you will be approached to confirm yourself with username and secret word. Give it to continuing further.

Following stage is the Assistance subtleties segment where administration vault will detect and approve the URL and bring its metadata data like port sort name and namespace. That is all there is to it. Don’t bother tapping on Straightaway. It is only for data reason.

Thus, click on FINISH and you will see the condition of the help as CONFIGURED.

Presently it is the right time to Distribute. Click on Distribute.

On effective distribute, you will getting a help definition key.

Presently you can attempt to look for the distributed help by tapping on SEARCH connect. As we have done it the initial time, it’s showing just a single help which we did now.

Presently you can find your connection point name, namespace and the endpoint where you can track down the WSDL. With this data, you can set off/test the connection point from administration vault itself or from Cleanser UI apparatus by clicking that URL and download the WSDL record and import it in Cleanser UI device.

Prior to moving to testing the connection point, click on the WSDL URL to check whether the WSDL is appearing.

5. Testing WSDL Service in Service Registry:

In this segment, we will perceive how to test a WSDL administration through WS Pilot device. How about we get everything rolling to test the help.

Explore to Administration Library landing page. Track down the distributed assistance via looking for a similar under SEARCH connect. In the subtleties area, click on ENDPOINTS tab where you will see the HTTP and HTTPS port.

Click on TEST button which will explore to WS Guide instrument. WS Guide is explicitly utilized for testing web administrations.

In the WS Guide window, you could confront what is happening like me, where prior to testing in WS Pilot device, one need to whitelist the host in the gave URL in the mistake message (middleware settings).

To whitelist the host, explore to the middleware settings URL:

http://:/nwa/middleware-settings

Under WS Pilot tab, enter the host name and snap on SAVE. On tapping the SAVE button, framework will permit the webservices which contains that host for testing in WS Guide device.

Once finished, again click on TEST from administration vault page. Presently you will not get that mistake.

The point of interaction subtleties will be shown. Click on Straightaway.

On clicking Straightaway, you will see the info structure.

Possibly you can physically fill the test information or import the record as XML/TXT through IMPORT – > TEST Information choice as displayed underneath.

On fruitful import, you will see the information filled like underneath and click Straightaway.

On clicking Straightaway, you will see the reaction under the Outcome area.

That’s all there is to it. We’ve covered the publishing and testing part in the Service Library. If you have any doubts, questions, or suggestions regarding how to register and test WSDL files in Service Registry, please leave your comments below. Happy learning!

YOU MAY BE INTERESTED IN

Create and Consume Business Add-in(BAdI) in ABAP

Do all ABAPers know Fixed Point Arithmetic?

SAP ABAP Tips

SAP

SAP PO for Beginners Part – 12 – Interface Development – B2B EDI Inbound to XML Proxy to ECC

In this post, SAP PO for Beginners Part – 12 – Interface Development – B2B EDI Inbound to XML Proxy to ECC,” we will discuss and convert EDI format inbound documents to XML and pass them to an ABAP proxy by developing an interface from scratch.

In short, below is the content we will be elaborate in this tutorial: Interface Development – B2B EDI Inbound to XML Proxy to ECC

  • Overview
  • Scenario
  • Objects involved in Interface Development
  • Build Enterprise Service Repository Objects
  • Build Communication Channels
  • Build Integrated Configuration (ICO)
  • Testing the Interface

1. Overview:

Assume there is a business requirement where the vendor will place invoice records in SFTP in EDI format, which SAP PO needs to pick up and process. The EDI messages are then communicated to the EDI separator connector to split bulk EDI messages into single transaction sets, as one EDI document can contain multiple sales orders, invoices, delivery notifications, etc., which completes one ICO. Subsequently, it will be passed to another ICO of the sender EDI separator channel, which will convert individual EDI messages to XML. This process is detailed in SAP PO for Beginners Part – 12 – Interface Development – B2B EDI Inbound to XML Proxy to ECC.

2. Scenario:

3. Objects involved in Interface Development:

As said, there are 2 ICOs to be created. For first ICO, we will pick the document from SFTP, so the shipper correspondence channel is of connector type SFTP (not going to cover the SFTP channel config, as I take care of it in past areas) and the recipient correspondence channel will be of connector type EDI Separator.

For second ICO, the shipper correspondence channel would be of connector type EDI Separator and the collector correspondence channel will be of connector type Cleanser with message convention as XI 3.0.

In second ICO, we will import message planning, in light of the fact that through shipper EDI connector, the EDI record will be changed over completely to XML and passed to message planning for getting the ideal construction to pass the information to ECC through ABAP Intermediary.

We should make information objects for the inbound XML information. In this model we won’t make information type and message type, rather we are utilizing the Outer Definitions given by the merchant. Outside Definitions are like pre-characterized field structures which you can simply import and use it in Message planning.

4. Build ESR Objects:

Prior to continuing with the formation of Correspondence channels, we should begin with the result structure creation.

External Definitions:

Click on Make NEW – > Outside Definitions

Select the class as XSD from the dropdown and import the XSD document.

For getting the import XSD document, explore to the underneath way:

http://:/b2bic (For this to be accessible, B2B add on should be introduced by Premise group)

Select the choice, EDI Content Administrator and select the dropdown in the arrangement ANSI X12 and pick XSD Generator.

For producing XSD record, pick the suitable exchange set as 810 and adaptation to 5040 (for our situation). Once finished, click on START.

Framework will produce the xsd record, save it and import it in outer definition as displayed beneath.

External Definition:

Click on SAVE & ACTIVATE.

Service Interface:

Create two service interfaces.

The file is passed from SFTP to P – Outbound Service Interface – 1

PI to ECC – Inbound Service Interface – 2

Choose the Mode as ASYNCHRONOUS

Outbound Service Interface:

Inbound Service Interface:

Message Mapping:

Import a similar outside definition into source and target area, as we will be passing the information for all intents and purposes to ECC.

Operation Mapping:

Import both the outbound and inbound assistance interfaces. Once imported, click on READ Tasks button which would peruse the outside definitions put away in assistance interfaces.

When done, select the sort of planning and import the message planning made.

Click on SAVE & ACTIVATE.

ESR Items creation done. We should begin with the Joining Items advancement.

5. Build Communication Channels:

FIRST ICO:

Sender Communication Channel:

Open the Reconciliation Catalog – > Snap on Make New symbol and pick Correspondence Channel.

Give the channel a reasonable channel name and tap on Make. Pick Connector type as SFTP and pick Shipper Radio button.

Click on SAVE and Actuate.

Receiver Communication Channel:

Click and Make New – > Correspondence Channel – > Pick Collector radio button and connector type as EDI Separator with Message Convention as Electronic Report Exchange.

Note: For getting the EDI Separator connector which wouldn’t be in standard PO 7.5 establishment, B2B add on establishment should be finished.

  • BASIS team installs B2B cockpit
    • Make sure NWA-> Components Info, b2b components are installed
    • Download and extract ZIP files of B2B Cockpit/toolkit/EDI mapping runtime
    • Import toolkit/mapping kit extracted files in ID
    • For installing EDI runtime content, there will be many .b2b seed file, import the required file. For e.g.: for EDI ANSI X12 format, required runtime is *X12.b2b file
    • http://<host>:<port>/b2bic -> EDI content Manager. Select required format and choose to import in dropdown
    • Verify imported components by selecting format -> Editor > Message Editor
    • Verify in ID whether EDI adapter is visible
    • If these B2B adapters are still not available, request BASIS team to register the adapters using JSPM

Click on SAVE & ACTIVATE.

SECOND ICO:

Sender Communication Channel:

Open the Combination Catalog – > Snap on Make New symbol and pick Correspondence Channel.

Give the channel a reasonable channel name and tap on Make. Pick Connector type as EDI Separator and pick Shipper Radio button.

Source EDI separator will change over individual EDI messages to XML. For changing over the EDI design payload to XML, add the underneath module in the source channel.

Under module tab,

localejbs/X12ConverterModule – Nearby Venture Bean – 1

This ought to be the first and afterward the SAP call connector ought to come. Request is significant.

Since it is a receipt record of EDI 810, we want to determine the exchange set identifier code as 810 and rest all as *.

Click on SAVE & ACTIVATE.

Receiver Communication Channel:

Open the Coordination Catalog – > Snap on Make New symbol and pick Correspondence Channel.

Give the channel a reasonable channel name and tap on Make. Pick Connector type as Cleanser with message convention as XI 3.0 and pick Collector Radio button.

Click on SAVE and Initiate.

6. Build Integrated Configuration (ICO):

Click on NEW – > Coordinated Setup (make ICOs).

Give the Coordinated setup name and namespace. It ought to be indistinguishable from the ESR Outbound Help Point of interaction name and namespace.

Import the shipper divert and in next tab, select the business part under which the collector correspondence channel is made.

Import the Activity planning (for first ICO, no activity planning exists) from ESR. Activity planning will consequently show in the event that you have offered right Support Connection point name and namespace while characterizing Coordinated design name and namespace.

Import the recipient correspondence channel.

Click on SAVE and Initiate.

That is finished. We have made EDI to intermediary interface without any preparation. We should test it.

7. Testing the Interface:

SFTP, I have transferred an example EDI 810 document.

first ICO, no planning happens. In the event that EDI document contains various receipt sets, it will be parted separately.

second ICO source channel, the module we added for change to XML.

Also, planned to the ECC structure through message planning and went to ECC through intermediary.

SXI_MONITOR:

We have successfully developed and tested the Interface Development – B2B EDI Inbound to XML Proxy to ECC interface. Hope you found it helpful. If you have any doubts, questions, or suggestions for us, please feel free to leave your comments below.

YOU MAY BE INTERESTED IN:

Do all ABAPers know Fixed Point Arithmetic?

Understanding IDoc Status in SAP SD: A Comprehensive Guide

SAP ABAP CRM Tips

SAP

SAP PO for Beginners Part – 11 – Synchronous Interface Development – SOAP Proxy to SOAP Webservice

In this post, SAP PO for Beginners Part – 11 – Synchronous Interface Development – SOAP Proxy to SOAP Webservice,” we will guide you through creating a mediator to SOAP web service interface without any initial setup. This will be an ad hoc interface, triggered as needed from ECC, where configuration will take place and be sent to the target web service.

Thus, under is the substance we will be mind boggling in this educational activity:

Outline
Situation
Objects associated with Connection point Advancement
Fabricate Undertaking Administration Store Items
Assemble Correspondence Channels
Assemble Coordinated Setup (ICO)
Testing the Point of interaction

1. Overview:

Imagine a scenario where there is a business requirement to send the XML payload through ABAP Proxy and communicate the same to the recipient web service. You would also need to handle the response from the web service, as it is a synchronous interface. In SAP PO for Beginners Part – 11 – Synchronous Interface Development – SOAP Proxy to SOAP Webservice, we will cover how to effectively manage this process, ensuring smooth communication between the systems.

2. Scenario:

3. Objects involved in Interface Development:

In the first place, we should make information objects for the solicitation and for the reaction. In this model we won’t make information type and message type, rather we are utilizing the Outside Definitions given by the merchant. Outside Definitions are like pre-characterized field structures which you can simply import and use it in Message planning.

There will be 2 Message mappings that must be made. Solicitation to reaction and reaction to ECC yield structure.

Second, we will make a source correspondence channel of connector type Cleanser with Message Convention as XI 3.0, for ECC association. For Cleanser Intermediary association from ECC to PI, I have proactively posted a blog on it To some extent 4 of my “SAP PO for novices” series.

Third, a recipient correspondence channel of connector type Cleanser with Message Convention as Cleanser 1.1.

At last, we will make an ICO and import the shipper, recipient, and activity planning.

4. Build ESR Objects:

Prior to continuing with the making of Correspondence channels, how about we start with the result structure creation.

External Definitions:

Click on Make NEW – > Outer Definitions

Select the classification as WSDL from the dropdown and import the WSDL document. Click on SAVE and Initiate.

Service Interface:

Make two assistance interfaces. The justification behind two help connection points is:

The document is passed from ECC to PI and the reaction from PI to ECC – Outbound Assistance Point of interaction – 1

PI to Web administration and webservice to PI – Inbound Assistance Connection point – 2

Pick the Mode as Simultaneous

Outbound Assistance Connection point:

Inbound Service Interface:

Message Mapping:

Import same message types in source and target region and perform adjusted arranging. If the objective webservice contains username token (username and secret expression for security), add those fields in the objective XSD and import it in message arranging.

The username and secret key the recipient webservice can be different for every client. Like, the outsider would have arrangement different username and secret phrase for dev, QA and Push. What’s more, in the event that you offer a consistent benefit to username and secret word in DEV and on moving ESR objects to QA, you will not have the option to change the certifications in QA as it is unmodifiable.

At these kinds of cases, esteem planning comes into picture.

You should make esteem planning in Joining catalog, yet before that you want to import the standard worth planning capability in the graphical planning region and give source and target outline (simply an irregular worth to relate with diagram you make in Mix registry. Against the construction just, you will appoint username and secret phrase).

On double tapping the worth planning capability, you will be provoked to enter source office, pattern, and target organization construction. Enter an important string, so in future it will be engaging. Up until this point, you haven’t entered any accreditations. With this office pattern, you will dole out this in esteem planning bunch made in ID and referencing the certifications.

Click on SAVE & ACTIVATE.

Value Mapping:

Map the objective office and construction and guide the accreditations in the worth region. At planning runtime, framework will pick the planned certifications. By this way you can have the certifications put away in one spot and can change it in every client.

Solicitation to Reaction planning is finished, next is the webservice reaction to ECC yield structure planning.

In this way, make another message planning and import the necessary WSDL documents at the source and target.

Operation Mapping:

Import both the outbound and inbound help interfaces. Once imported, click on READ Tasks button which would peruse the message types put away in help interfaces.

When done, select the kind of planning and import the message planning made.

Moreover, in the solicitation and reaction we have imported XSL planning record in light of the fact that while sending the solicitation payload to webservice, it just acknowledges Cleanser Envelope payload body, thus while outbound we add Cleanser design to payload and keeping in mind that reaction, we eliminate it, since ECC doesn’t comprehend Cleanser structure.

In the reaction tab, import first the XSL eliminating document and afterward the message planning.

Click on SAVE & ACTIVATE.

ESR Items creation done. We should begin with the Incorporation Items advancement.

5. Build Communication Channels:

Sender Communication Channel:

Open the Joining Catalog – > Snap on Make New symbol and pick Correspondence Channel.

Give the channel a reasonable channel name and namespace and tap on Make. Pick Connector type as Cleanser and Source Radio button.

Message Convention – XI 3.0

That is all there is to it. No extra configs in channel. Click on SAVE and ACTIVATE.

Receiver Communication Channel:

Click and Make New – > Correspondence Channel – > Pick Recipient radio button and connector type as Cleanser with Message Convention as Cleanser 1.1.

Under the Association Boundaries, enter the Objective Webservice URL. As we are adding Cleanser envelope through planning, actually take a look at the choice – Don’t utilize Cleanser Envelope.

Click on SAVE & ACTIVATE.

6. Build Integrated Configuration (ICO):

Click on NEW – > Incorporated Design.

Give the Incorporated design name and namespace. It ought to be indistinguishable from the ESR Outbound Assistance Connection point name and namespace.

Import the source direct and in next tab, select the business part under which the beneficiary correspondence channel is made.

Determine beneficiary condition if any.

Import the Activity planning from ESR. Activity planning will naturally show assuming that you have offered right Support Connection point name and namespace while characterizing Coordinated arrangement name and namespace.

Import the recipient correspondence channel.

Click on SAVE and Enact.

That is finished. We have made Cleanser Intermediary to Cleanser Webservice interface without any preparation. How about we test it.

7. Testing the Interface:

For testing a simultaneous connection point, you can either do it in Cleanser UI or from PI Send Test message wizard or illuminating functionals to set off the exchange.

I will do it from PI Send Test Message Wizard.

I have the XML payload. Explore to the Send Test Message wizard, PI Landing page – > Arrangement and Checking – > Testing tab – > Send Test Message.

Select the Incorporated arrangement you made. Pick the Nature of Administration as Best Exertion. Glue the payload. Click on SEND once finished.

Note: For Simultaneous connection point, you ought to set off from the shipper framework, for this situation ECC. For testing reason, I’m setting off from PI.

1 – PI to Webservice

2 – Webservice to PI to ECC

Both are effective.

To see the effective planning, explore to the message and snap on OPEN MESSAGE button. Under the payload choice you can see the various variants of the payload.

0 – addresses the before-planning variant

2 – addresses the subsequent to planning rendition

That concludes SAP PO for Beginners Part – 11 – Synchronous Interface Development – SOAP Proxy to SOAP Webservice. I hope you found it informative and engaging. If you have any doubts, questions, or suggestions, please feel free to leave your comments below.

YOU MAY BE INTERESTED IN

ABAP for SAP HANA. ALV Report On SAP HANA – Opportunities And Challenges

OData in SAP ABAP: Streamlining Data Exchange and Integration

ABAP on SAP HANA: ATC – ABAP Test Cockpit Setup & Exemption Process

× How can I help you?