One of our readers left us a question: “I was expecting and am still looking for a way to add an address—customer/vendor—to the Adobe Form using the ADRNR number, similar to how SMARTFORMS handled this. I thought it was managed very well in SMARTFORMS with all the options like country code, postal code, etc. Isn’t there a way to handle this in the Adobe tool as well?” In “SAP Adobe Interactive Form Tutorial Part VII Printing Address in Adobe Form,” we will explore how to achieve this in the Adobe tool with similar flexibility.
Our Response: Adobe Structure should be a move up to what we as of now have in SMARTFORMS. Consequently it requirements to acquire the elements of SMARTFORMS. Indeed, Adobe is adequately shrewd to deal with it and we would show you precisely the way that it tends to be accomplished.
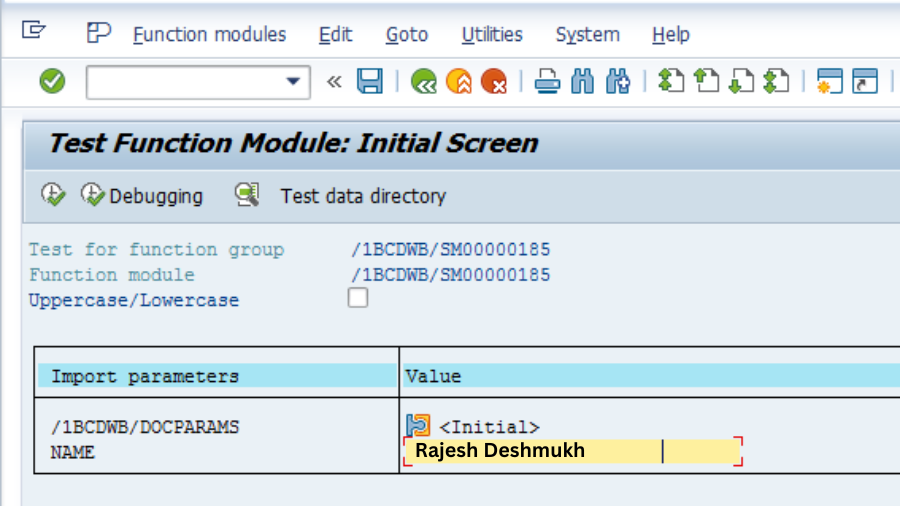
Transaction Code: SFP. Enter the Interface name and Create (Interface is mandatory for Adobe form).
Click the short portrayal and Save.
Enter the Bundle name and Save.
Let us add our own custom Parameter Name. Select the Import choice under Structure Connection point (left side) and press the Make button (right side) to add a Bringing in Boundary.
IV_ADDRESS_TYPE TYPE CHAR1
IV_ADDRNUMBER   TYPE AD_ADDRNUM
IV_PERSNUMBER   TYPE AD_PERSNUM
IV_LAND1        TYPE LAND1
Save, Check and Activate the Interface.
Go to back SFP Exchange primary screen. Make the Form.
Press on make button. Give the short portrayal and Connection point name which you have made before.
Enter the Bundle name and Save. Go to Context.
Right snap on the YRAM_ADOBE_FORM7 under the Unique circumstance and make an “Address“.
Double Click on Address and enter the below details.
Save. Go to Layout.
Go to Data View. Drag and Drop the ADDRESS Context.
Increment/Change the size of the Location to account for different lines and eliminate the subtitle.
Save and Activate.
Now, let us go and create the Driver Program.
*&---------------------------------------------------------------------* *======================================================================* * YRAM_ADOBE_FORM_PROGRAM7 * *======================================================================* * Project : SAP Adobe Forms Tutorial * * Author : Varad (www.elearningsolutions.co.in) * * Description : Printing the Address in Adobe form * *======================================================================* REPORT yram_adobe_form_program7.
*======================================================================* * Selection Screen *======================================================================* PARAMETERS : p_atype TYPE char1, p_adrnr TYPE ad_addrnum, p_pernr TYPE ad_persnum, p_land1 TYPE land1.
*======================================================================* * Data Objects *======================================================================*
DATA: gv_fm_name TYPE rs38l_fnam, " FM Name gs_fp_docparams TYPE sfpdocparams, gs_fp_outputparams TYPE sfpoutputparams.
*======================================================================* * Constants *======================================================================* CONSTANTS : gv_form_name TYPE fpname VALUE 'YRAM_ADOBE_FORM7'.
*======================================================================* * START of Calling the Form *======================================================================* *&---------------------------------------------------------------------* **&&~~ Form Processing: Call Form - Open * CALL FUNCTION 'FP_JOB_OPEN' CHANGING ie_outputparams = gs_fp_outputparams EXCEPTIONS cancel = 1 usage_error = 2 system_error = 3 internal_error = 4 OTHERS = 5. IF sy-subrc <> 0. " Suitable Error Handling ENDIF. *&---------------------------------------------------------------------* **&&~~ Get the Function module name based on Form Name * CALL FUNCTION 'FP_FUNCTION_MODULE_NAME' EXPORTING i_name = gv_form_name IMPORTING e_funcname = gv_fm_name. IF sy-subrc <> 0. " Suitable Error Handling ENDIF.
*&---------------------------------------------------------------------* **&&~~ Take the FM name by executing the form - by using Pattern- **&&~~ call that FM and replace the FM Name by gv_fm_name **&&~~ Call the Generated FM CALL FUNCTION gv_fm_name “ '/1BCDWB/SM00000204' EXPORTING /1bcdwb/docparams = gs_fp_docparams iv_address_type = P_atype iv_addrnumber = p_adrnr iv_persnumber = p_pernr iv_land1 = p_land1 * IMPORTING * /1BCDWB/FORMOUTPUT = EXCEPTIONS usage_error = 1 system_error = 2 internal_error = 3 OTHERS = 4. IF sy-subrc <> 0. * Implement suitable error handling here ENDIF.
*&---------------------------------------------------------------------* *&---- Close the spool job CALL FUNCTION 'FP_JOB_CLOSE' EXCEPTIONS usage_error = 1 system_error = 2 internal_error = 3 OTHERS = 4. IF sy-subrc <> 0. * <error handling> ENDIF.
Allow us to test this Adobe improvement to check our Location populated utilizing simply the Location Number.Run Program : YRAM_ADOBE_FORM_PROGRAM7.
Press on Print Preview. Please design your Form better than this.
This is the confirmation from ADRC (Address) table.
The Location is printed accurately.
I trust that next time you need to print an address in your Adobe form, you’ll know exactly what to do after following the SAP Adobe Interactive Form Tutorial Part VII: Printing Address in Adobe Form. This guide will help streamline the process for you.
Today, we will explore another frequently used feature of any printing technology (SAPScript, Smartform, and Adobe). Just like displaying the standard texts maintained in the SO10 t-code is a very common requirement in forms, displaying the texts maintained in the text modules in the SMARTFORMS t-code is another common business need. In this SAP Adobe Interactive Form Tutorial Part VI, Displaying Text Module Texts in Adobe Forms, we will walk you through how to achieve this efficiently.
Allow us to figure out how to show text modules in SAP Adobe Structures.
Transaction Code: SFP. Enter the Interface name and Create (Interface is mandatory for Adobe form).
Enter the expected short portrayal and Save. Click the Bundle name and Save.
Allow us to add our own custom Boundary Name. Select the Import choice under Structure Point of interaction (left side) and press the Make button (right side) to add a Bringing in Boundary.
IV_LANGU TYPE SY-LANGU Save, Check and Activate the Interface.
Go to back SFP Transaction main screen. Create the Form.
Press on make button. Give the short depiction and Connection point name which you have made before.
Enter the Bundle name and Save.
Drag IV_LANG Field from Interface to Context.
Go to context Right click on the YRAM_ADOBE_FORM6 under the Context and create a Text.
Select the drop down.
You can see 3 options: 1. Text Module 2. Include Text 3. Dynamic Text
Text Module: Text modules can be made in exchange SMARTFORMS.
Go to Transaction: SMARTFORMS.
Press On Make and enter the necessary text – you can utilize existing text modules moreover.
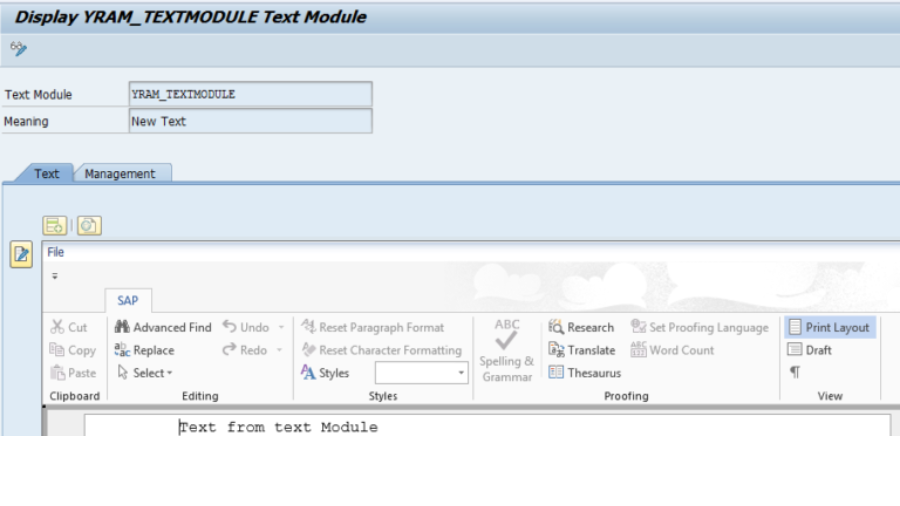
Save in a Bundle. Back. Return to your SFP Context. Select the TEXT and double tap. Change the Text Type to Text Module and hit Enter. Enter the subtleties like underneath: Name: TEXT_FROM_TEXT_MODULE Text Name: ‘YRAM_TEXTMODULE’ Text Language: IV_LANGU No error if text not available = Check the box.
Save.
Go to design. Simplified the “TEXT_FROM_THE_TEXT_MODULE” Field to the Layout.
Increment the size of the showcase field according to your prerequisite. Do we have to likewise say, you can change the Subtitle ‘TEXT_FROM_TEXT_MODULE’ too? We are getting apathetic today. We will keep it all things considered.
Check, Save and Activate.
You can approve the result, by executing the Structure independent. However, preferably, it ought to be tried from a driver program. Kindly check the driver program from past articles in the series. We have not composed it for you this time. Treat it as a hand-on home work for you.
Execute
Press on Print review. Whatever was saved in the Text Module is printed.
I trust this information helps you in some real-world projects. Hardcoding data that can change is not a good approach in any printing method. That’s why Text Modules and Standard Texts hold their own importance. In “SAP Adobe Interactive Form Tutorial Part VI Displaying Text Module Texts in Adobe forms,” we will explore how to effectively display text modules in Adobe forms, ensuring flexibility and reducing the need for hardcoded values.
oday, we will learn how to incorporate a logo into an Adobe Form output in “SAP Adobe Interactive Form Tutorial Part V: Images, Graphics, and Logo in Adobe Forms.”
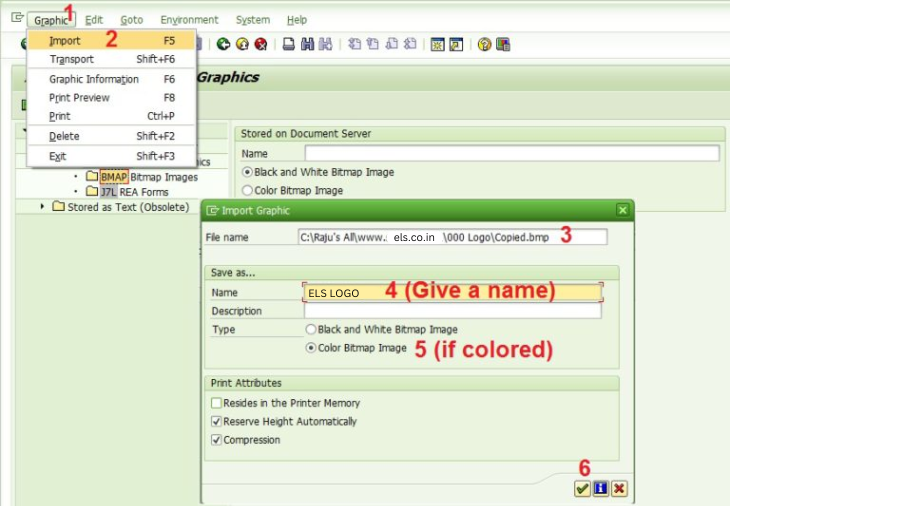
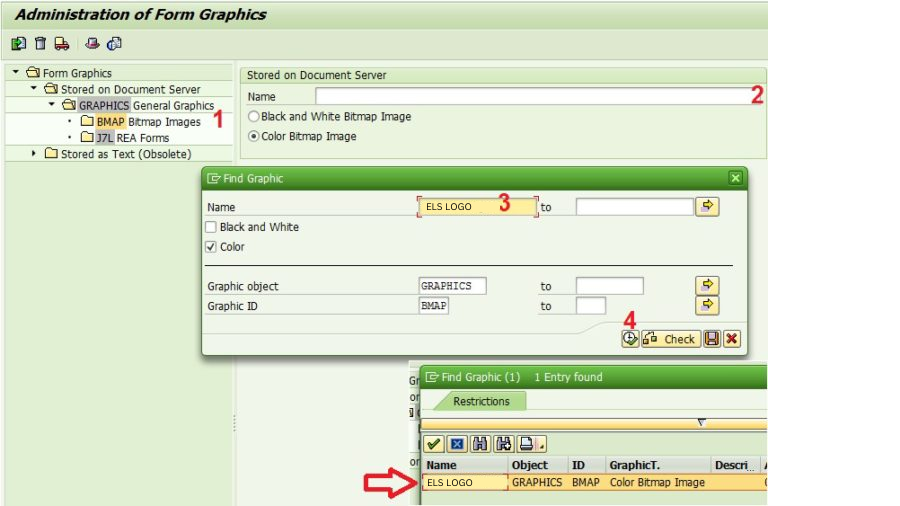
Pre-requisite: We need to upload the required logo or image as shown below in T-code SE78, similar to the process we follow for Smartforms.
When you transfer the image to SAP from your PC or local machine, please remember to validate it in T-code SE78. This step ensures that the logo or image is properly stored in the SAP system. For more detailed steps, you can refer to “SAP Form Tutorial Part V: Images, Graphics, and Logo in Adobe Forms“ to understand how to work with images and graphics in Adobe Forms.
Prepare the Form Interface
Transaction Code: SFP. Enter the interface name and create (interface is mandatory for Adobe Form). In this SAP Adobe Interactive Form Tutorial Part V: Images, Graphics, and Logo in Adobe Forms, we will explore how to incorporate visual elements such as images, graphics, and logos into your Adobe Forms to enhance the user experience and provide a polished look to your outputs.
Enter the short description and Save.
Enter the Package name and Save.
Allow us to add our own custom Boundary Name for the picture/logo. Select the Import choice under Structure Connection point (left side) and press the Make button (right side) to add a Bringing in Boundary.
Please note: IV_LOGO is of type XSTRING (Data Type). Save, Check and Enact the Connection point.
Design the Form Layout Go to back SFP Exchange principal screen. Make the structure.
Press on make button. Give the short depiction and point of interaction name that you have made before.
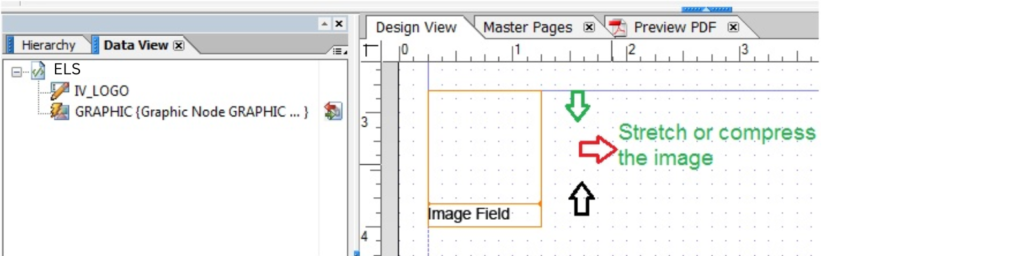
Enter the bundle name and save. Drag IV_LOGO from the point of interaction that we made before and drop them to the setting region.
Right-click on the YRAM_ADOBE_FORM5 under the specific circumstance and create a graphic.
Important step: Change the Graphic type from Graphic Reference to Graphic content
Hit return key/enter key.
Select Yes option.
Enter Field as IV_LOGO (or whatever name you have given above) And MIMEType as ‘IMAGE/BMP’.
Save.
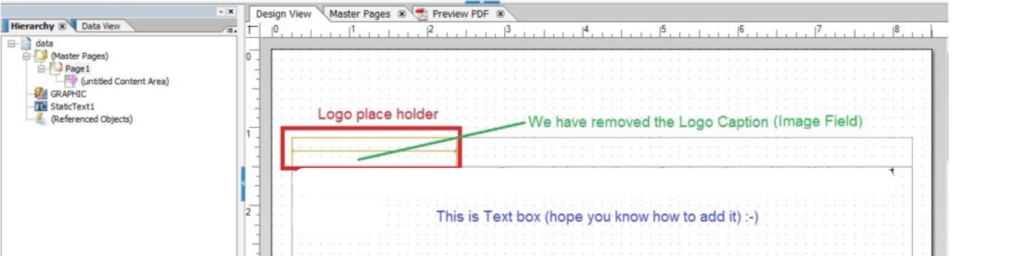
Go to Design. Pick the Information View Tab. Simplified the Realistic on the design.
You can expand or accumulate your logo as per your need. You ought to dispense with the logo engraving for instance the default Picture Field text. This Image Field text is a respectable spot to make the motto out of the association/logo if you have any. Else we can leave it clear.
We have added one more text component beneath the logo for showing reason.
Check, Save and Actuate. Our Design with a Realistic and Structure Point of interaction is finished. Did you notice, we have two components in our format. The logo field and the realistic substance. It tends to be contrasted with the variable name and the real satisfied.
Driver Program to call the Adobe Form You can use the below code as a reference to plug and play for printing the logo.
*&---------------------------------------------------------------------*
*======================================================================*
* YRAM_ADOBE_FORM_PROGRAM5 *
*======================================================================*
* Project : SAP Adobe Forms Tutorial *
* Author : Varad (www.elearningsolutions.co.in) *
* Description : Printing a logo in the adobe form *
*======================================================================*
REPORT yram_adobe_form_program5.

*======================================================================*
* Selection Screen
*======================================================================*
PARAMETERS : p_logo TYPE rstxt-tdname.
*======================================================================*
* Data Objects
*======================================================================*

DATA: gv_fm_name TYPE rs38l_fnam, " FM Name
gs_fp_docparams TYPE sfpdocparams,
gs_fp_outputparams TYPE sfpoutputparams,
gv_name TYPE tdobname,
gv_logo TYPE xstring ,
gv_bmp TYPE xstring.
*======================================================================*
* Constants
*======================================================================*
CONSTANTS : gc_btype TYPE tdbtype VALUE 'BCOL',
gc_id TYPE tdidgr VALUE 'BMAP',
gc_object TYPE tdobjectgr VALUE 'GRAPHICS',
gv_form_name TYPE fpname VALUE 'YRAM_ADOBE_FORM5'.

*======================================================================*
* START of Calling the Form
*======================================================================*
*&---------------------------------------------------------------------*
**&&~~ Form Processing: Call Form - Open
*
CALL FUNCTION 'FP_JOB_OPEN'
CHANGING
ie_outputparams = gs_fp_outputparams
EXCEPTIONS
cancel = 1
usage_error = 2
system_error = 3
internal_error = 4
OTHERS = 5.
IF sy-subrc <> 0.
" Suitable Error Handling
ENDIF.
*&---------------------------------------------------------------------*
**&&~~ Get the Function module name based on Form Name
*
CALL FUNCTION 'FP_FUNCTION_MODULE_NAME'
EXPORTING
i_name = gv_form_name
IMPORTING
e_funcname = gv_fm_name.
IF sy-subrc <> 0.
" Suitable Error Handling
ENDIF.

*  Passing the logo name
gv_name = p_logo.

*  Get the image/logo graphic information
CALL METHOD cl_ssf_xsf_utilities=>get_bds_graphic_as_bmp
EXPORTING
p_object = gc_object " GRAPHICS
p_name = gv_name " Name of the Logo
p_id = gc_id " BMAP
p_btype = gc_btype " BCOL for color, 'BMON' for Black & White
RECEIVING
p_bmp = gv_bmp
EXCEPTIONS
not_found = 1
internal_error = 2
OTHERS = 3.

gv_logo = gv_bmp.

*&---------------------------------------------------------------------*
**&&~~ Take the FM name by execuing the form - by using Pattern-
**&&~~ call that FM and replace the FM Name by gv_fm_name
**&&~~ Call the Generated FM
CALL FUNCTION gv_fm_name
EXPORTING
/1bcdwb/docparams = gs_fp_docparams
* iv_name = p_name
* iv_flag = p_flag
iv_logo = gv_logo
EXCEPTIONS
usage_error = 1
system_error = 2
internal_error = 3
OTHERS = 4.
IF sy-subrc <> 0.
* Implement suitable error handling here
ENDIF.
*&---------------------------------------------------------------------*

*&---------------------------------------------------------------------*
*&---- Close the spool job
CALL FUNCTION 'FP_JOB_CLOSE'
EXCEPTIONS
usage_error = 1
system_error = 2
internal_error = 3
OTHERS = 4.
IF sy-subrc <> 0.
* <error handling>
ENDIF.
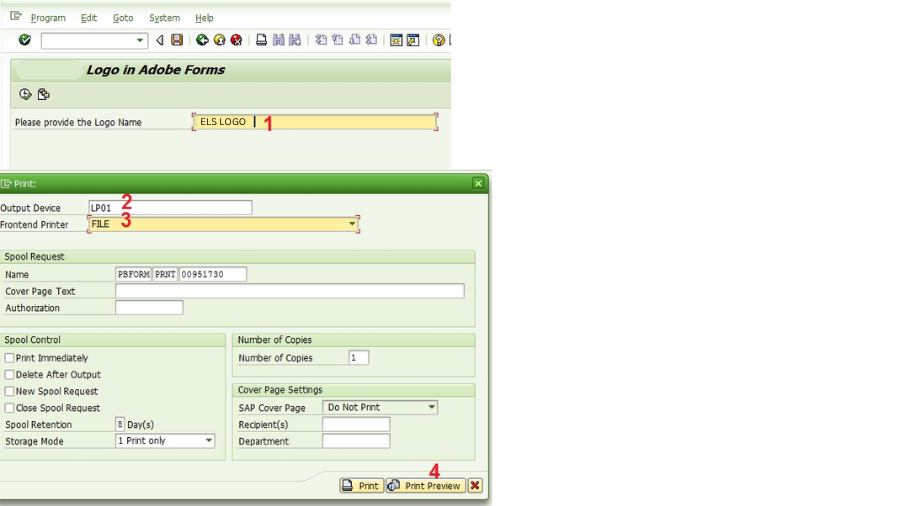
Let us Test our baby Execute Program : YRAM_ADOBE_FORM_PROGRAM5
Give the picture/logo name which we transferred in SE78 or some other logo name which is now accessible in SAP framework. We would use ELS Logo.
If it’s not too much trouble, actually take a look at the program above. The logo property is powerfully acquired from the picture name and took care of to the SAP Adobe Structure. You can include any picture you need from your SAP Adobe Interactive framework. The program would deal with it consequently to acquire the mark of the picture and pass it accurately to the Adobe Structure.
Press on Print see and view the result with your picture.
SAP ABAP SAP UI5 SAP HANA SAP FIORI As of now, we have learned the basics of SAP Adobe Forms. We learned how to create our first Adobe layout and trigger it from the Driver program, played with static and dynamic tables. We also made our hands dirty dealing with Date, Time and Floating Fields. always believe in presenting the small tweaks and tips which are useful in real project scenarios. In the same line of our thought process, let us start another really useful feature of Adobe forms which every Adobe Programmer should know.
Conditions (IF-ENDIF, CASEs, WHILE etc) are an integral part of our programs and in fact any programming language. After all, everything is not in black and white. There would be exceptions and developers would be asked to handle those exceptions. For example, all employees of your client have to print the time zone as GMT – 6 in the form signature they print from their office. So, 98% of your clients would use GMT – 6 hours as their time but there would be 2 % users who live in another state and they use time as GMT – 7 hours. So for those particular users, you need to put special logic so that their signature would show GMT – 7. Here you have to handle the conditions and print the values according to the conditions.
For demonstration purpose: Say, in your driver program you have identified the employee’s time zone and you have set the flag v_regular_employee = ‘X’ or blank depending where they work from.
PS: There might be many ways to achieve the above scenario. We have kept it simple for the sake of clarity.
I think, we have provided enough teaser for our today’s tutorial. Let’s watch the full movie now.
We assume that you have been following our series step by step. That is the reason we have specified the Part number in each tutorial title so that you can study and learn systematically, part by part. If you are a novice in the field of Adobe forms and you have not checked our earlier series, we would suggest you pause here. Go back to our earlier tutorials and refresh your Adobe skills. At least know the t-codes and Form, Interface, Context and Driver program concepts.
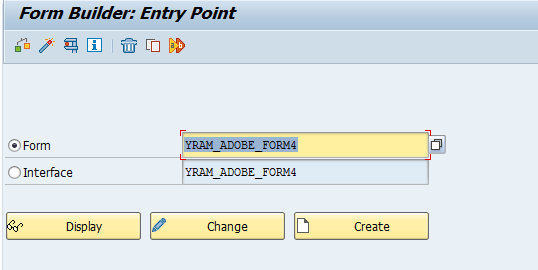
Transaction Code: SFP.
Enter the Interface name and Create (Interface is mandatory for Adobe form).
Enter the short description and Save.
sap adobe form for beginners
Enter the Package name and Save.
Step by Step tutorial on SAP Adobe Form
Let us add our own custom Parameter Name. Select the Import option under Form Interface (left side) and press the Create button (right side) to add an Importing Parameter.
Tutorial on SAP Adobe Form
IV_NAME is of type NAME1 (Data Element). IV_FLAG is of type CHAR1. Save, Check and Activate the Interface.
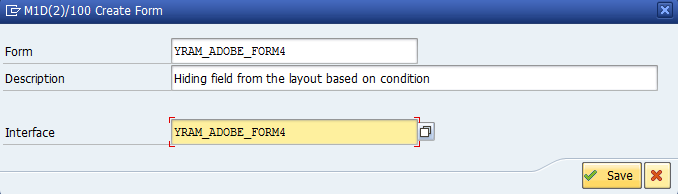
Go to back SFP Transaction main screen. Create the form.
Adobe Forms for Beginners
Press on create button Provide the short description and Interface name which you have created earlier.
Step by step to Adobe Form
Enter the Package name and Save.
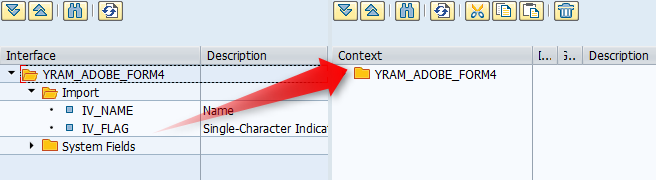
Drag IV_NAME and IV_FLAG from Interface which we created earlier and drop them to the Context area.
drag from interface to layout
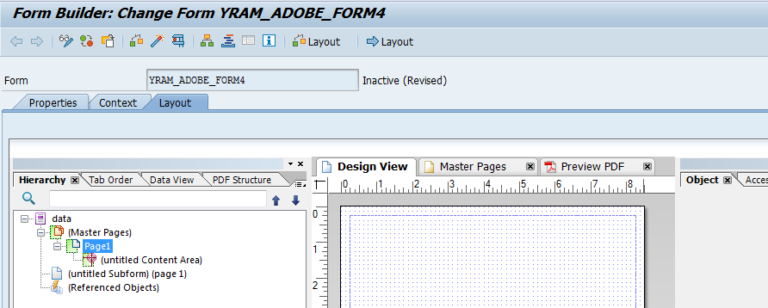
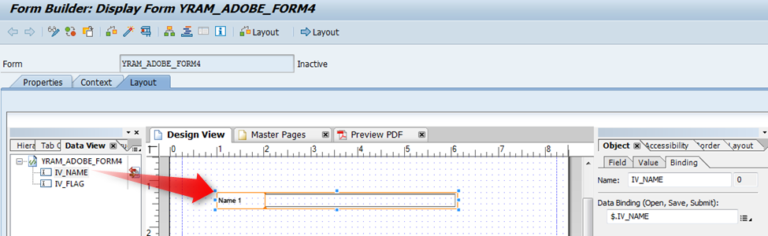
Go to Layout
Go to Data View and Drag and drop the field IV_NAME.
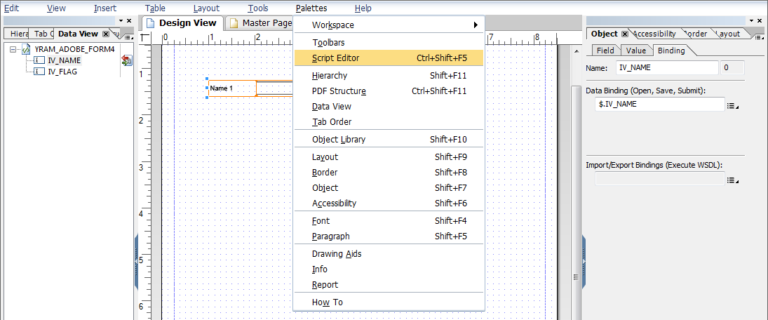
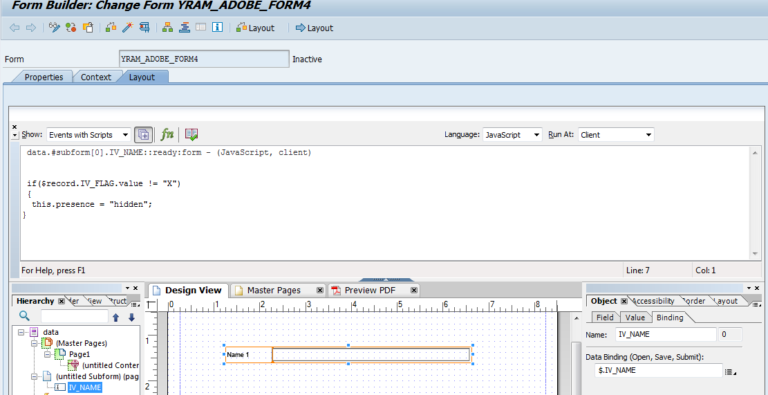
Select the field IV_NAME and go to Palettes->Script Editor.
You will see below screen.
Javascript in SAP Adobe Form
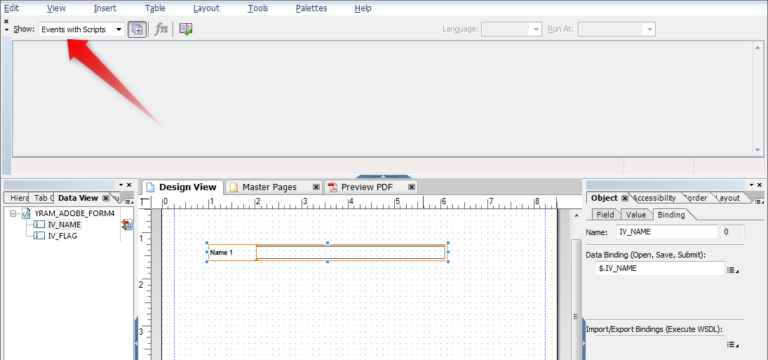
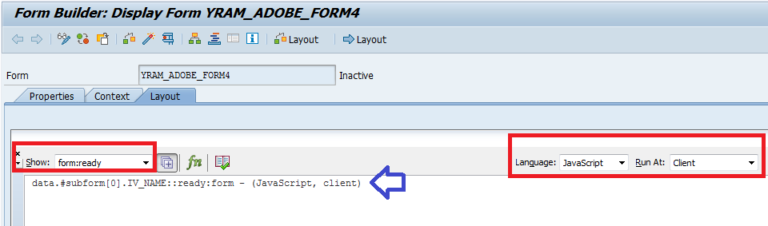
Go to Show option and select form: ready from the drop down list.
Javascript in SAP ABAP
Here you will get a chance to write Javascript or Form Calc Code.
We will go with Javascript for now. Lucky ABAPer!!
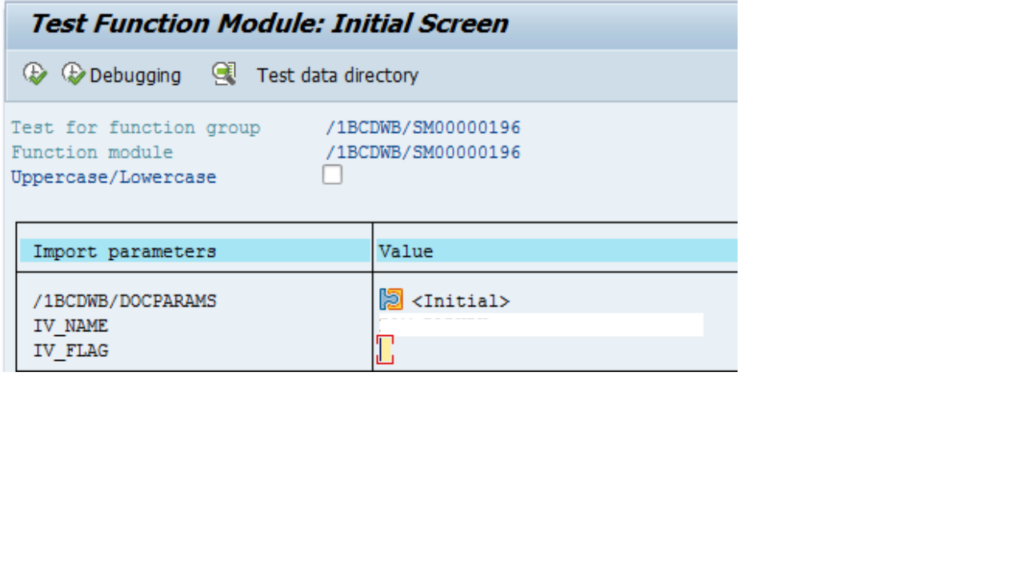
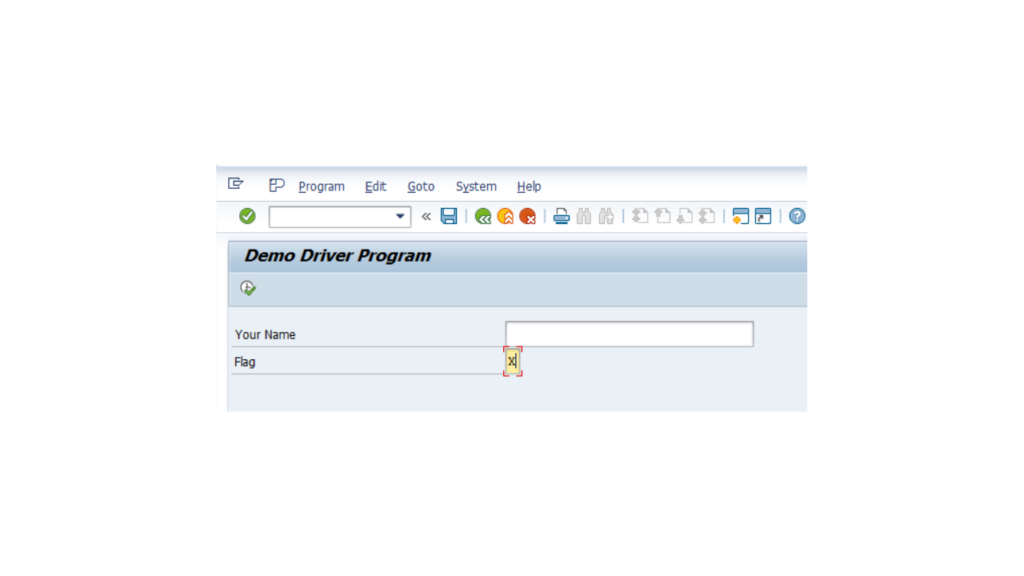
Execute the Form or Press F8 which is at the top of your screen. Enter values against IV_NAME and IV_FLAG.
stand alone test of Adobe Form
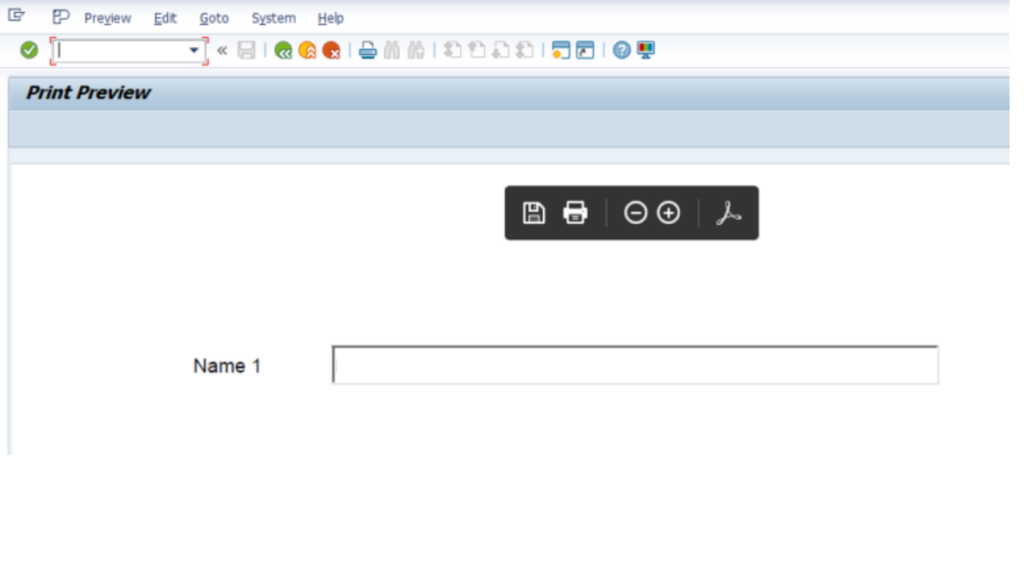
Press F8. Press on Print Preview button.
How to use Javascript in Adobe Form Since the script to hide the elements did not get triggered as we passed IV_FLAG = X. Therefore the elements are not hidden in the output.
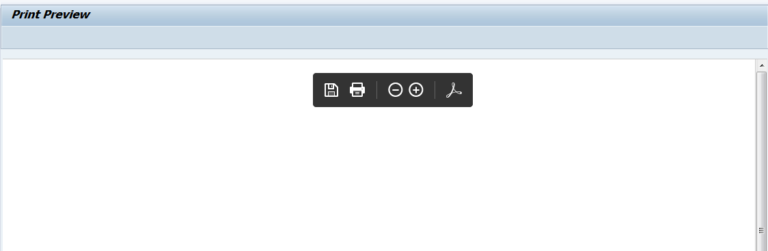
Case 2 : When IV_FLAG = ‘ ’.
Press F8. Enter values against IV_NAME and pass blank value to IV_FLAG.
Press F8. Press on Print Preview button.
This time the Javascript code gets triggered to hide the element. So the Output is a blank page this time.
You can call the above Form from driver program and get the same output. Please check the below-working code.
Selection Screen of the Program:
Try this short hands on Adobe Form and Driver program in your system and have fun.
START of Calling the Form ====================================================================== &——————————————————————— **&& Form Processing: Call Form – Open * CALL FUNCTION ‘FP_JOB_OPEN’ CHANGING ie_outputparams = gs_fp_outputparams EXCEPTIONS cancel = 1 usage_error = 2 system_error = 3 internal_error = 4 OTHERS = 5. IF sy-subrc <> 0. ” Suitable Error Handling ENDIF. &——————————————————————— **&& Get the Function module name based on Form Name * CALL FUNCTION ‘FP_FUNCTION_MODULE_NAME’ EXPORTING i_name = gv_form_name IMPORTING e_funcname = gv_fm_name. IF sy-subrc <> 0. ” Suitable Error Handling ENDIF. &——————————————————————— **&& Take the FM name by execuing the form – by using Pattern- **&& call that FM and replace the FM Name by gv_fm_name **&&~~ Call the Generated FM CALL FUNCTION gv_fm_name EXPORTING /1bcdwb/docparams = gs_fp_docparams iv_name = p_name iv_flag = p_flag EXCEPTIONS usage_error = 1 system_error = 2 internal_error = 3 OTHERS = 4. IF sy-subrc <> 0.
Implement suitable error handling here ENDIF. &———————————————————————
&——————————————————————— *&—- Close the spool job CALL FUNCTION ‘FP_JOB_CLOSE’ EXCEPTIONS usage_error = 1 system_error = 2 internal_error = 3 OTHERS = 4. IF sy-subrc <> 0.
We have previously explored simple layouts and tables individually. In “SAP Adobe Interactive Form Tutorial. Part III. Date Time and Floating Fields, we will delve into essential elements like Date, Time, and various system fields, including Floating Fields (dynamic/changing). While these concepts are fundamental, they remain somewhat elusive until explicitly explained. Let’s embark on this brief journey to uncover these crucial aspects of Interactive Adobe Forms.
Exchange Code: SFP. Trust at this point you have embraced this t-code very much like SAPScript and Smartforms ( and can recall it even in your fantasies).
Make sure to create the interface (which is essential for Adobe forms). Although the tutorial is titled “SAP Adobe Interactive Form Tutorial. Part II. Date Time and Floating Fields,” the interface is the backbone of any interactive Adobe form. The integration of Date Time and Floating Fields is covered extensively in this part to ensure a comprehensive understanding.
Enter the short description and Save.
Enter the Package name and Save.
Let us add our own custom Parameter Name. Select the Import option under Form Interface (left side) and press the Create button (right side) to add an Importing Parameter.
NAME is of type NAME1 (Data Element). Save, Check, Activate the Interface.
Go to back SFP Transaction main screen. Now is the time to create the Form.
Hit Make and give the short depiction and Interface name which you have made previously.
Enter the Package name and Save.
Drag NAME from Connection point to the Context area. Trust you recall that, we made sense of the term Setting in past posts. Basically recollect it as the Worldwide/Top Incorporate whose factors are apparent/accessible to the entire application. If we have any desire to show a few fields in the Adobe from the Connection point, then, at that point, the field must be there in the Setting region.
Intuitive the DATE and TIME fields to Setting. These are framework created factors.
Presently the time has come to play in our Format Region. You can plan your format as perfectly as could be expected and as intricate you need. Be that as it may, for our learning, we will Keep It Basic and Sweet(KISS).
i. A practical example of “How to use a Floating Field in Adobe?”.
Go to Layout
Insert a Standard text field.
Grow/Stretch (as you do in ms paint) the message field limits with the goal that you can compose a sentence in it.
Enter the underneath text or any line you need. In any case, pick single word which you need to keep as drifting field. Drifting means, it very well may be printed anything according to the limiting. It relies upon the runtime worth of the bound variable.
For our model, we maintain that NAME should be dynamic. Select the text (NAME), Right-click on it and pick it as Drifting Field. The word NAME changes to {TextField}.
Do I have to let you that know if you see anything in wavy supports in Adobe Structure, they are Drifting Field?
Bind the drifting field with NAME field which we hauled to the Setting region.
The Field {Text Field} will have dynamic length (most extreme up to bound NAME field from setting). It would extend and gather in size as per your feedback. Name “Smash” is just 3 person, yet name “Wolfeschlegelsteinhausenbergerdorff” has in excess of 30 characters, however your {TextField} would in any case acknowledge it. All things considered, that is the utilization of a Drifting Field.
ii. How to work with Date and Time in Adobe?
Go to Data view:
Intuitive Date and Time fields to Design.
—————————————————————————————–
Ram’s Tip 1: Choosing the right Date/Time Pattern (format).
Select the Date Field and Press on Examples.
You can change the date design, By Choosing the Date Example under the select sort.
You can choose the example in view of country, under Area, by choosing the expected country.
We can likewise organize the Time utilizing similar advances referenced above for the Date field.
Ram’s Tip 2: Know the standard system fields in Adobe.
In Adobe Forms, the beneath are the framework fields accessible.
—————————————————————————————–
Check, Save and Activate.
Stand Alone Test of Adobe Form in T-code SFP:
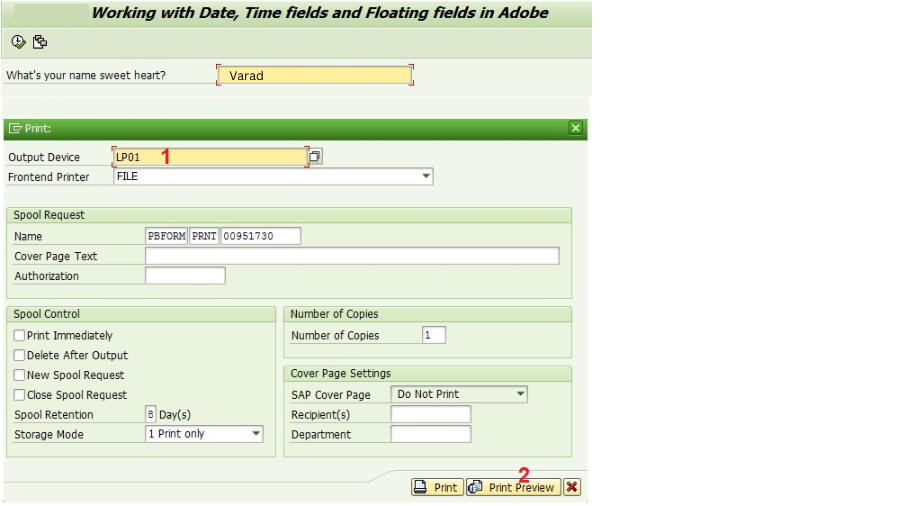
Press F8 or raise a ruckus around town button on the highest point of your Adobe Structure. Pass your worth to NAME Field.
Press F8 (Execute). Give you neighborhood printer name and hit Print See
You will get your Date, Time and Floater Fields (dynamic runtime esteem) printed.
Allow us to call the Structure from our Driver Program.
Do we need to show the output again?Trust us, it would be precisely as above in the independent test.
Ideally, at this point, you know how to compose a driver program to call your Adobe structure. Do you actually require it? Alright. Check the functioning driver program underneath. Try to appropriately deal with the special cases.
*&---------------------------------------------------------------------*
*======================================================================*
* YRAM_ADOBE_FORM_PROGRAM3 *
*======================================================================*
* Project : SAP Adobe Forms Tutorial *
* Author : Varad (www.elearningsolutions.co.in) *
* Description : Driver Program for Printing Floating Field, Date & Time *
*======================================================================*
REPORT yram_adobe_form_program3.

* Selection Screen
PARAMETERS: p_name TYPE name1.

**&&~~ Data Objects
DATA: gv_fm_name TYPE rs38l_fnam, " FM Name
gs_fp_docparams TYPE sfpdocparams,
gs_fp_outputparams TYPE sfpoutputparams.

CONSTANTS : gv_form_name TYPE fpname VALUE 'YRAM_ADOBE_FORM3'.

*======================================================================*
* START of Calling the Form
*======================================================================*
*&---------------------------------------------------------------------*
**&&~~ Form Processing: Call Form - Open
*
CALL FUNCTION 'FP_JOB_OPEN'
CHANGING
ie_outputparams = gs_fp_outputparams
EXCEPTIONS
cancel = 1
usage_error = 2
system_error = 3
internal_error = 4
OTHERS = 5.
IF sy-subrc <> 0.
" Suitable Error Handling
ENDIF.
*&---------------------------------------------------------------------*
**&&~~ Get the Function module name based on Form Name
*
CALL FUNCTION 'FP_FUNCTION_MODULE_NAME'
EXPORTING
i_name = gv_form_name
IMPORTING
e_funcname = gv_fm_name.
IF sy-subrc <> 0.
" Suitable Error Handling
ENDIF.
*&---------------------------------------------------------------------*
**&&~~ Take the FM name by execuing the form - by using Pattern-
**&&~~ call that FM and replace the FM Name by gv_fm_name
**&&~~ Call the Generated FM
CALL FUNCTION gv_fm_name "'/1BCDWB/SM00000176'
EXPORTING
/1bcdwb/docparams = gs_fp_docparams
name = p_name
EXCEPTIONS
usage_error = 1
system_error = 2
internal_error = 3
OTHERS = 4.
IF sy-subrc <> 0.
* Implement suitable error handling here
ENDIF.
*&---------------------------------------------------------------------*

*&---------------------------------------------------------------------*
*&---- Close the spool job
CALL FUNCTION 'FP_JOB_CLOSE'
EXCEPTIONS
usage_error = 1
system_error = 2
internal_error = 3
OTHERS = 4.
IF sy-subrc <> 0.
* <error handling>
ENDIF.
This post might seem straightforward, but trust us, if there’s no one to guide you in your team, even finding the Floating Field option in Adobe can be time-consuming. Not to mention configuring the date and time according to the end user’s preferences. Someone needs to show you for the first time, and then you can do it on your own. In “SAP Adobe Interactive Form Tutorial. Part III. Date Time and Floating Fields,“ we’ll cover these aspects in detail.
In SAP Adobe Interactive Form Tutorial. Part I, we demonstrated the steps to create our basic form and the driver program. One of our readers requested the configuration steps for the driver program and Adobe form. In SAP Adobe Interactive Form Tutorial. Part II. Tables in Adobe Form, we will cover how to set up tables within the Adobe form and configure the driver program accordingly.
Question from our peruser: Might u at any point if it’s not too much trouble, make sense of where we will arrange the driver program and related adobe structure name, to set off in any exchange? Reply: Go to t-code NACE==>Select any application. For instance : V3 ==> Proceed “Result type” button ==> Select any result type. For Instance : RD00 ==> Go ahead “Handling Schedules” ==> here we can arrange Medium/Program/Structure Routine/Structure/PDF-SmartForm Structure.
Under PDF-Smartform Structure, we can arrange the adobe structure.
In PP Module – we can arrange in OPK8 Exchange.
In the previous part of the “SAP Adobe Interactive Form Tutorial. Part I,“ we explored how to display a variable. In real-world scenarios, it’s rare to have a requirement where only a single field needs to be displayed. Today, in “SAP Adobe Interactive Form Tutorial. Part II. Tables in Adobe Form,” we will learn how to create tables in Adobe Forms. Generally, there are two methods for creating tables in Adobe Forms.
1. Normal Table Method using Table Object 2. Create Table using Sub Forms in Adobe
Table Object Method: Benefits: It is basic and simple. At the point when we have not many fields which can squeeze into the single line in the design, we can utilize this The originator realizes that you are working with tables. Creator permits choosing lines or segments, to resize a section at the same time. We have a really look at box to rehash the table header on each page
Hindrances: On the off chance that we deactivate the fields in the specific circumstance, it will be hard to utilize if necessary in the structure anyplace. For instance in Content manager ( to have some contingent printing and so on) Challenging to deal with when we need to print the settled tables Restriction when we need to print non-standard tables
SubForm Strategy: What is Subform? The subform is essential for the structure which is utilized for sorting out the various components like info fields, tables, messages present body pages and seldom ace pages. At the end of the day, Subform is only a gathering of components. To bunch specific components on the design we can utilize subform and wrap them into it.
Benefits: Utilizing subforms gives us greater adaptability while spreading out tables. At the point when we need to print different columns of table, subform is more valuable We can revise cells in subform (Print any place we need ) It is extremely helpful when we are printing settled tables in the structure.
There are no much impediments, in light of the fact that inside, tables are dealt with as subform structures. We can undoubtedly take a look at this on the off chance that we take a gander at the XML wellspring of the format in Planner. In the event that we believe that the header should be rehashed in the event of page breaks we need to utilize “Flood Pioneers” (rather than the advantageous really take a look at box in the event that we are utilizing tables). We want to set them on the “Pagination” tab of the article range).
So contingent upon what we need to accomplish we could need to utilize subforms rather than a table. Yet, for standard tables, the suggestion is to straightforwardly utilize the table item. Follow the KIS procedure. Keep It Straightforward (KIS).
I’m certain in the event that you have not worked in Tables previously, the above benefits and weaknesses could have most certainly befuddled you. Sit back and relax. Disregard the above correlation. We will complete an involved with bit by bit guide and when you wrap up making the tables utilizing both the strategies referenced, the image would be clear.
In this instructional exercise, our point is to show Client Information from Client Expert Table KNA1 utilizing both the techniques. We should Adobe.
Building the Interface which would be common for both methods.
Transaction Code: SFP.
Enter the Interface name and Create (Interface is mandatory for Adobe form).
the short description and Save.
the Package name and Save.
Allow us to add our own custom Boundary Name. Select the Import choice under Structure Connection point (left side) and press the Make button (right side) to add a Bringing in Boundary
Bringing in Boundary IT_KNA1 is of type CCRCTT_KNA1. CCRCTT_KNA1 is a table sort of KNA1. In Adobe structure interface/Capability module you want to utilize Table Sort Boundaries to pass table information to the structure from your program. (In Capability module, Tables boundary is old).
Save, Check, Actuate the Connection point.
Go to back SFP Exchange fundamental screen. Make the structure.
Press on create button
Give the short portrayal and Connection point name which you have made before.
Enter the Bundle name and Save.
Drag IT_KNA1 from Connection point which we made before to the Specific situation.
Method 1: Create Table in Adobe Form using Table Object
You ought to deactivate the fields from the Table which are not expected to print since there are many fields in the table, it won’t fit in the structure.
Select the fields which are not expected to be shown.
Right click and select deactivate.
Then it looks like below.
We have only 6 active fields.
Go to layout tab
Embed a text variable to make them head on the structure.
Change the text as required.
You can change the text style and size of the text in the obvious area above.———————————————————————————————— Ram’s Tip 1: In the event that you don’t find Text style toolbar naturally, you can enact it as displayed underneath.
Go to Palettes -> Press on Font.
————————————————————————————————
Now go to Data view.
Select IT_KNA1, Drag and drop it into the layout.
You can change the section level or width, by intuitive choice. If you have any desire to be exceptionally exact, you can likewise go to the properties in the right hand side and change the width and level.
Save, Check, Activate the form.
Kindly note: On the off chance that you have information in the IT_KNA1 table more than 1-page size, it wouldn’t stream to the following page. You need to do the accompanying two exercises to see all information.
The subform must be Flowed.
Select IT_KNA1 And check the check box ‘Allow Page Breaks within Content’.
————————————————————————————————————————
Begin of Update on 27th February 2017
A few clients in certain nations would like the table to have the line Design from Right to Left.
As a matter of course, correcting Rows is Left.
Be that as it may, in the event that you need your columns from Right to Left, pick the format from the Table properties.
————————————————————————————————————————
Execute the Driver program: YRAM_ADOBE_FORM_PROGRAM2. The code scrap is given toward the end.
The result would show the table with the Client Expert information.
Method 2: Create Table using Sub Forms
By utilizing this strategy, we can show the fields in any request and the fields in numerous columns of lines.
Go to layout
Each structure will have Expert page and Body page as a matter of course (Untitled Subform) (page1).
In Straightforward definition, we can utilize Expert page to print the header information and Body page for printing the thing information.
The substance region is utilized for printing the information in Body page. We can change the length or width of the substance region in Expert page.
We are keeping the header in Expert page
———————————————————————————————— Ram’s Tip 3: Anytime of your turn of events, to see the fundamental result of your structure, you simply have to tap on See PDF Tab. ————————————————————————————————
Go to configuration view
To print the Table information the Subform mustbe FLOWED.
This is a vital stage. We want to embed the SubForm.
You can change the level or width of the window in Design tab. You can likewise drag and change.
This Subform can be utilized as the header. If it’s not too much trouble, note Untitled SubForm has been renamed as Header in the left hand side.
Change the header structure content to Streamed, and Stream course to Western text, so that fields will be shown next to each other.
Select your header Subform go to insert -> 0 – Standard -> Text field.
You want to change the properties of the text field for better presentation and appearance.
Select the TextField1. Change the appearance from Indented box – > Strong box.
Change the position from left -> none.
Value entered from user entered from -> Read-only.
Select the Border as the solid color.
Presently, you can reuse this TextField1.
Reorder the TextField1 in Header sub from. (For this situation glue multiple times since we want 5 fields to show)
You can Change the name of the field.
You can pass hard coded text to these fields.
You can change the depiction and An incentive for every one of the excess fields.
We have made the Header column. Presently, the time has come to print the thing information of the table.
Create one more Subform and name it as Items.
Change the thing Subform content to Streamed, and Stream course to Western text, so that fields will be shown next to each other.
Duplicate the five fields Client No, Nation, Name, Road, and Phone and glue under things subform.
Eliminate the default values for every one of the fields.
Tie the information table, i.e IT_KNA1 to the Things Subform.
Restricting is a vital piece of Adobe. Ensure you tie the information accurately.
Bind the fields as: CustomerNo to KUNNR, Country to LAND1, Name to NAME1 Street to STRAS Telephone to TELF1
You should check the checkbox Rehash Subform for every information thing.
Run the Driver Program: YRAM_ADOBE_FORM_PROGRAM2
The result ought to be same.
In both the Techniques above, we utilized the underneath driver program to call the Adobe Structure. Snap it in your advancement SAP framework and test your recently made tables in the Adobe.
*&---------------------------------------------------------------------*
*======================================================================*
* YRAM_ADOBE_FORM_PROGRAM2 *
*======================================================================*
* Project : SAP Adobe Forms Tutorial *
* Author : Varad (www.elearningsolutions.co.in) *
* Description : Driver Program for Printing the Customer data *
*======================================================================*
REPORT yram_adobe_form_program2.

**&&~~ Data Objects
DATA: gv_fm_name TYPE rs38l_fnam, " FM Name
gs_fp_docparams TYPE sfpdocparams,
gs_fp_outputparams TYPE sfpoutputparams,
gt_kna1 TYPE STANDARD TABLE OF kna1.

CONSTANTS : gv_form_name TYPE fpname VALUE 'YRAM_ADOBE_FORM2'.

*======================================================================*
* START of TREATMENT *
*======================================================================*
START-OF-SELECTION.
SELECT * FROM kna1 INTO TABLE gt_kna1 UP TO 50 ROWS.
*&---------------------------------------------------------------------*
**&&~~ Form Processing: Call Form - Open
*
CALL FUNCTION 'FP_JOB_OPEN'
CHANGING
ie_outputparams = gs_fp_outputparams
EXCEPTIONS
cancel = 1
usage_error = 2
system_error = 3
internal_error = 4
OTHERS = 5.
IF sy-subrc <> 0.
" Suitable Error Handling
ENDIF.
*&---------------------------------------------------------------------*
**&&~~ Get the Function module name based on Form Name
*
CALL FUNCTION 'FP_FUNCTION_MODULE_NAME'
EXPORTING
i_name = gv_form_name
IMPORTING
e_funcname = gv_fm_name.
IF sy-subrc <> 0.
" Suitable Error Handling
ENDIF.
*&---------------------------------------------------------------------*
**&&~~ Take the FM name by execuing the form - by using Pattern-
**&&~~ call that FM and replace the FM Name by gv_fm_name
*
**&&~~ Call the Generated FM
CALL FUNCTION gv_fm_name "'/1BCDWB/SM00000176'
EXPORTING
/1bcdwb/docparams = gs_fp_docparams
it_kna1 = gt_kna1
EXCEPTIONS
usage_error = 1
system_error = 2
internal_error = 3
OTHERS = 4.
IF sy-subrc <> 0.
* Implement suitable error handling here
ENDIF.
*&---------------------------------------------------------------------*
**&&~~ Form Processing: Call Form - Open
*
CALL FUNCTION 'FP_JOB_CLOSE'.
IF sy-subrc <> 0.
* Implement suitable error handling here
ENDIF.
*&---------------------------------------------------------------------*
*&---- Close the spool job
CALL FUNCTION 'FP_JOB_CLOSE'
EXCEPTIONS
usage_error = 1
system_error = 2
internal_error = 3
OTHERS = 4.
IF sy-subrc <> 0.
* <error handling>
ENDIF.
*&---------------------------------------------------------------------*
Do you have anything to add to this article? Have you encountered any issues while using Adobe Forms? Would you like to share any real-world project requirements or solutions? Feel free to share your thoughts. Please leave your comments in the section below and let us know how “SAP Adobe Interactive Form Tutorial. Part II. Tables in Adobe Form“ has helped you or if you have additional insights to offer.
Spice of this part:Many of us ABAPers may not realize that Adobe Forms can be tested independently in transaction SE37, much like Smart Forms. This tip might not be found in every “SAP Adobe Interactive Form Tutorial. Part I. First Adobe Forms“ you come across.
So clasp your safety belts and prepare for this delightful excursion on SAP Adobe Structure with our experience Pilot, Slam Daruru.
Tutorial 1: Our First Adobe Form
Pre-requisites: Adobe life cycle designer in your system and it should be configured in the Sever as well.
Transaction code: SFP. In the previous article, we told a trick to remember this. Smart Form PDF.
Enter the Point of interaction and Make (Point of interaction is required for Adobe structure).
What are the uses of Form Interface?
In the structure interface, you determine the information that is traded with the application program (like tables, structures, workspaces).
Under Worldwide Definitions, you characterize your own fields, factors and so on.
The framework fields contain information with a predefined meaning (like the date).
Give the Depiction and Press on Save.
Give the Bundle name and Save.
Really look at the Connection point properties. Examine the left side and the right half of the board. Check the Boundary Name which was created consequently.
Allow us to add our own custom Boundary Name. Select the Import choice under Structure Point of interaction (left side) and press the Make button (right side) to add a Bringing in Boundary IV_TEXT.
For this instructional exercise, IV_TEXT is of type CHAR30 and actually look at the discretionary Banner.
Check, Save and Initiate the Structure Point of interaction.
Return or go to t-code SFP once more. This time we want to make the Structure.
Ideally, we don’t have to educate you again to Press on Make button.
Give the Portrayal of the Structure and the Point of interaction name which we made before.
Enter the Bundle name and Save.
This is the main look of our Structure. Left side we have the Connection point and right side the Specific situation.
Extend the Import Boundary and Simplified the expected variable to Setting
What is the significance of the Context in Form Builder?
In the unique circumstance (otherwise called the structure setting), you determine which information is replicated from the connection point to the structure. You can likewise remember this information as a hub for a pecking order structure. In this pecking order, you can likewise conclude the structure rationale by determining conditions for handling the hubs.
The setting capability in Structure Developer is the connection that ties the point of interaction to the design. You develop the structure setting from the current connection point.
In the event that the above clarification is excessively unclear for you. Disregard it.
Essentially recollect Setting as information announcement at the Worldwide Region, might be very much like TOP Incorporate program.
To put it plainly, assuming you need your boundaries i.e inner tables, workspaces or variable and so forth to be passed from your driver program to Connect and afterward to the Structure then you want to characterize that interior table, workspaces or factors at the Setting of the Structure. Does it appear to be legit? Or on the other hand did I befuddle you more?
Anything characterized in Setting of the Structure is accessible in the Structure to be shown or controlled. Assuming you characterized a variable in the Structure Connection point yet didn’t make it in the Unique situation, then that Point of interaction variable could never be accessible in the Structure.
Basic simplified the boundaries from Connection point to the Structure Setting (as displayed in the figure underneath). All the limiting between Connection point boundaries and Structure setting would happen naturally.
On the off chance that you could do without alternate routes (simplified) or on the other hand assuming you need the setting boundary name to be not quite the same as that in Structure Connection point, then, at that point, you really want to determine the Information Field in the properties of the Setting component without help from anyone else. For instance, if you need to make a setting P_TEXT however you need to tie it with IV_TEXT, then, at that point, the Information Field ought to be IV_TEXT as displayed underneath.
Tip: Simplified from Connection point to the Unique circumstance and afterward change the name/portrayal of the Setting component. This will save your time and you don’t have to unequivocally keep up with the properties.
Allow us to actually look at the Format Tab.
Left side we have Progressive system, Tab Request, Information View and so on and Right side we have Plan, Mater and PDF Review choices.
Let us picked Information View and Simplified the Field which we need to print on the structure to Configuration view. You can put this recorded anyplace in the design. For our model, we have only one component IV_TEXT. The explanation being basic. We made only one component in the Unique circumstance. You can add several additional background information components and they would be accessible here to be passed to the design. In next posts, we will add greater intricacy to our necessity and you would have the option to perceive how we can deal with numerous components.
You can change the Inscription from IV_TEXT to required subtitle. For instance: Text. Click on the component and change the properties of the Article on the right hand side.
Check, Save and Initiate the Structure.
Stand Alone Testing of Adobe Form by using Interface:
To see yield for test reason even before your calling project or driver program is prepared, you can press F8 and again F8 and input a worth to the Connection point and really take a look at the result.
note: Ideally, at this point you have understood that like Smartform, Adobe structure additionally produces a capability module in the back end.
Execute (F8)
Press on Print review button. Check the info boundary is effectively passed from connection point to the design.
Like SAP Script and Smartform, Adobe Form also need a Driver Program. Forms have no utility if they are alone. They need a partner to be complete. Let us take a look at the other side of the coin.
If you have worked in Smartform earlier, you would find no difference. We just need to pass the data to the Form using the Interface parameters. And debugging is also similar as Smartform.
*&---------------------------------------------------------------------*
*======================================================================*
*                     YRAM_ADOBE_FORM_PROGRAM1                           *
*======================================================================*
* Project     : SAP Adobe Forms Tutorial                               *
* Author      : Varad                                *
* Description : Driver Program to Print Adobe form                     *
*======================================================================*
REPORT yram_adobe_form_program1.

TABLES : apb_lpd_otr_keys.

**&&~~ Data Objects
DATA: gv_fm_name         TYPE rs38l_fnam,      " FM Name
      gs_fp_docparams    TYPE sfpdocparams,
      gs_fp_outputparams TYPE sfpoutputparams.

CONSTANTS : gv_form_name TYPE fpname VALUE 'YRAM_ADOBE_FORM1'.

**&&~~ Selection Screen
*
PARAMETERS : p_text TYPE char30.
*&---------------------------------------------------------------------*
**&&~~ Form Processing: Call Form - Open
*
CALL FUNCTION 'FP_JOB_OPEN'
  CHANGING
    ie_outputparams = gs_fp_outputparams
  EXCEPTIONS
    cancel          = 1
    usage_error     = 2
    system_error    = 3
    internal_error  = 4
    OTHERS          = 5.
IF sy-subrc <> 0.
  " Suitable Error Handling
ENDIF.
*&---------------------------------------------------------------------*
**&&~~ Get the Function module name based on Form Name
*
CALL FUNCTION 'FP_FUNCTION_MODULE_NAME'
  EXPORTING
    i_name     = gv_form_name
  IMPORTING
    e_funcname = gv_fm_name.
IF sy-subrc <> 0.
  " Suitable Error Handling
ENDIF.
*&---------------------------------------------------------------------*
**&&~~ Take the FM name by executing the form - by using Pattern-
**&&~~ call that FM and replace the FM Name by gv_fm_name
*
**&&~~ Call the Generated FM
CALL FUNCTION gv_fm_name   "'/1BCDWB/SM00000176'
  EXPORTING
    /1bcdwb/docparams = gs_fp_docparams
    iv_text           = p_text
* IMPORTING
*   /1BCDWB/FORMOUTPUT       =
  EXCEPTIONS
    usage_error       = 1
    system_error      = 2
    internal_error    = 3
    OTHERS            = 4.
IF sy-subrc <> 0.
* Implement suitable error handling here
ENDIF.
*&---------------------------------------------------------------------*
**&&~~ Form Processing: Call Form - Open
*
CALL FUNCTION 'FP_JOB_CLOSE'
* IMPORTING
*   E_RESULT             =
* EXCEPTIONS
*   USAGE_ERROR          = 1
*   SYSTEM_ERROR         = 2
*   INTERNAL_ERROR       = 3
*   OTHERS               = 4
  .
IF sy-subrc <> 0.
* Implement suitable error handling here
ENDIF.
*&---------------------------------END----------------------------------*
Let us test the Output using the Driver Program:
Execute the Driver Program and picked the Print Review choice. The info field is accurately shown in the Structure Format.
Do you have anything to add to this article? Have you faced any issues while using Adobe Forms? Would you like to share any real project requirements or solutions? If so, please feel free to share your thoughts. For more detailed guidance, refer to our “SAP Adobe Interactive Form Tutorial. Part I. First Adobe Forms“. Kindly leave your comments in the section below.
This blog will show you BPMN 2.0 in a nutshelland guide you on how to design a business process model using the BPMN 2.0 graphical representation language.
To put it plainly, underneath is the substance we will be intricate in this instructional exercise:
What is BPMN?
Need for BPMN in SAP PO
Types of shapes in BPMN
1. What is BPMN ?
BPMN 2.0 in a Nutshell: BPMN stands for Business Process Model and Notation. It is a standard developed by the Object Management Group (OMG). The primary goal of BPMN is to provide graphical documentation that is understandable to all business users. Since it is based on flowchart principles, it is straightforward and easy to grasp. BPMN is widely used to standardize the language for describing business processes. It is easy to learn and can be utilized by both IT and business users. Although many symbols are available for various use cases, only a handful are commonly used to represent most processes.
At an undeniable level, BPMN assists partners with figuring out the interaction through a visual portrayal, since graph can make complex cycle more clear.
2. Need for BPMN in SAP PO?
In the event that you have perused the past post, you would realize BPM process. To lay out the BPM cycle in SAP NWDS device, we really want to plan the business cycle utilizing a language called BPMN. Variant of BPMN is 2.0. BPMN2.0. We have two sorts of PO establishment. One is Single Stack Java based and another is double stack ABAP + Java based. In double stack engineering, we also have BPM, however its ccBPM which isn’t similar to NW BPM. Likewise, the language used to make ccBPM process is BPEL (Business Interaction Execution Language) though for NW BPM, its BPMN2.0.
3. Types of shapes in BPMN: BPMN 2.0 in a Nutshell
BPMN is made of specific components or shapes that contains visual language. BPMN has 4 fundamental gatherings of shapes.
– Flow Objects -> Events / Activities / Gateways
– Connecting Objects -> Sequence / Message Flow / Association
– Swimlanes -> Pool / Lane
– Artifacts -> Data / Group / Annotation
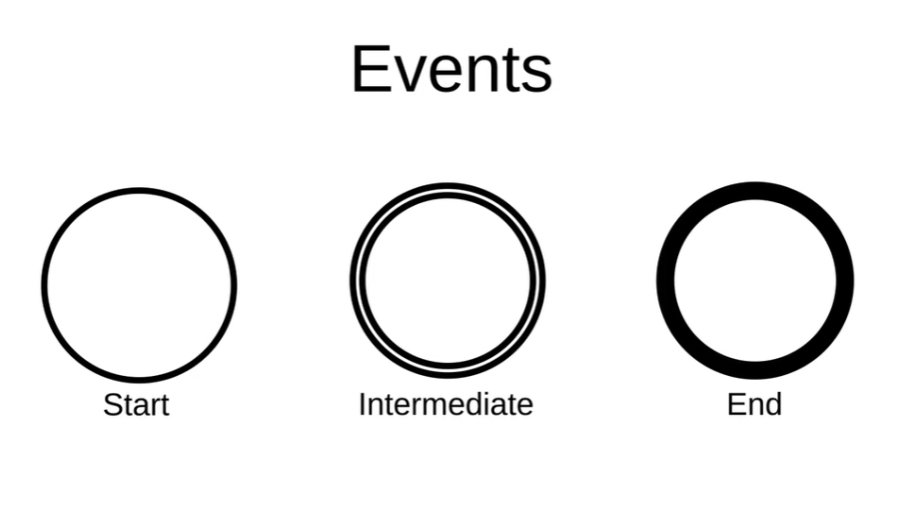
1) Flow Objects – Events:
The primary sort of stream object is Occasion. Occasions trigger a beginning/change or finishes an interaction. There are 3 kinds of occasions:
Begin – Each cycle in a BPMN chart should start with starting occasion called Start occasion. Many beginning occasions contain a symbol in the center to characterize the occasions trigger. For e.g., a Beginning occasion that contains the envelope symbol in the center shows that the message shows up and triggers the beginning of a cycle.
Halfway – This component has two circles with some offset.
End – An End occasion implies the finish of a specific cycle or way inside an interaction. At the point when you see an end occasion, you can affirm that there could be no further cycle should be added or will be accessible after that. End occasions have a thick boundary.
Begin, Halfway and End Occasions can be additionally assigned into a few images. Recall your BPMN graph, regardless of the cycle, will essentially have one beginning occasion and one end occasion.
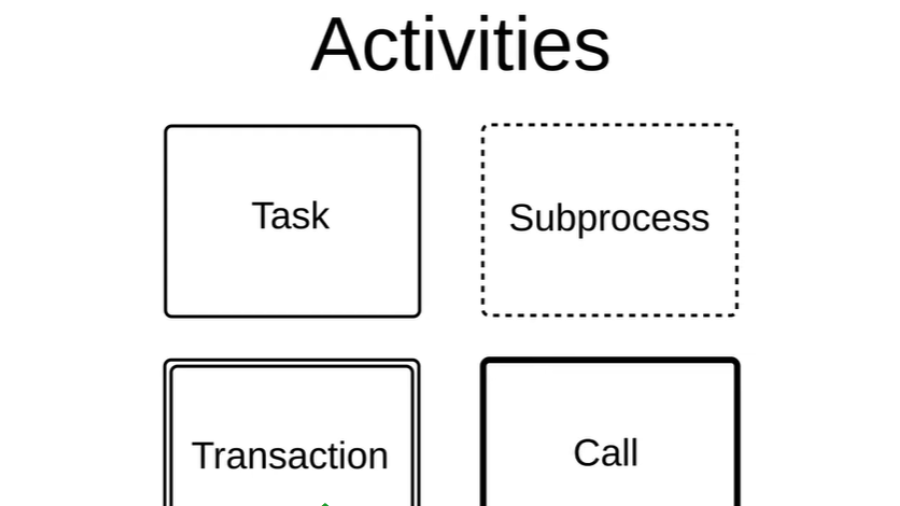
2) Flow Objects – Activities:
Exercises then again are the structure blocks of BPMN graph. They address a particular undertaking performed by an individual or framework and their shown by square shape with adjusted corners. In exercises, you can add symbols in the action to outwardly show significant traits like message send or get, client undertakings, manual errands and so on.
There are 4 main types of activities:
Task – An undertaking is a solitary activity in a cycle. Like Altering the receipt, mailing to business.
Subprocess – A Subprocess make out of different stream objects. Subprocess will come convenient assuming your BPMN graph is tremendous with many BPMN components and you don’t maintain that less significant cycle should mess the chart. In this way, its smarter to put it inside sub-process. A Sub-process has an Or more image in center which signifies that the sub-process holds youngster components inside itself.
Transaction – A transaction activity represents a payment process.
Call – A call movement calls and starts up another cycle and the parent interaction will go on just when the other cycle is done.
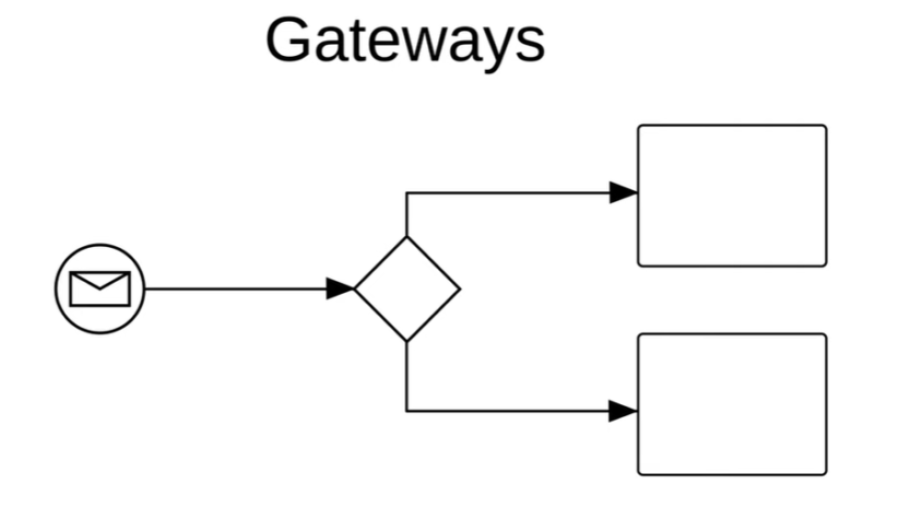
3) Flow Objects – Gateways:
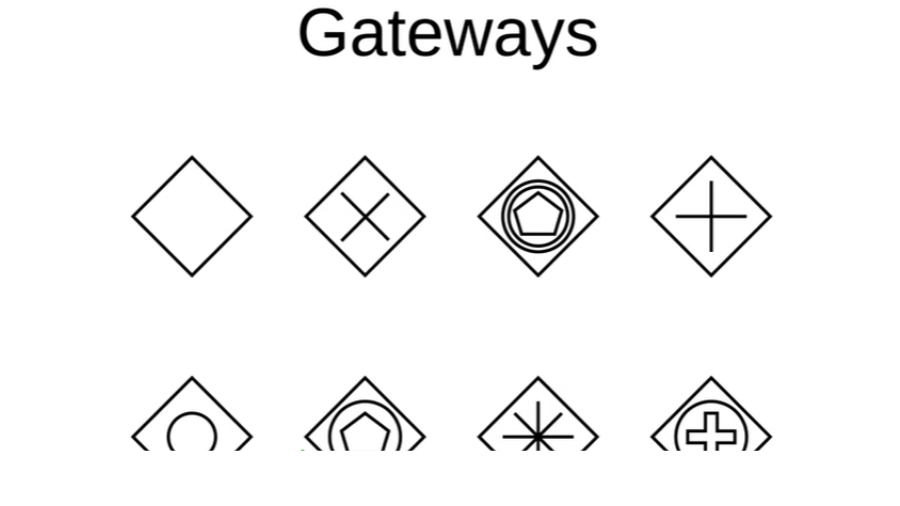
The last kind of stream objects are Passages. Entryways are addressed by precious stone shape and goes about as a choice point that concludes the interaction way or stream in light of specific circumstances or occasions. For e.g., in light of the mail content, the door will send the mail body to the beneficiary.
There are a few sorts of doors with a precious stone shape, with various images inside to recognize the kind of Entryway.
A portion of the principal passages are: Selective, Occasion based, Equal, Comprehensive, Complex choice entryways.
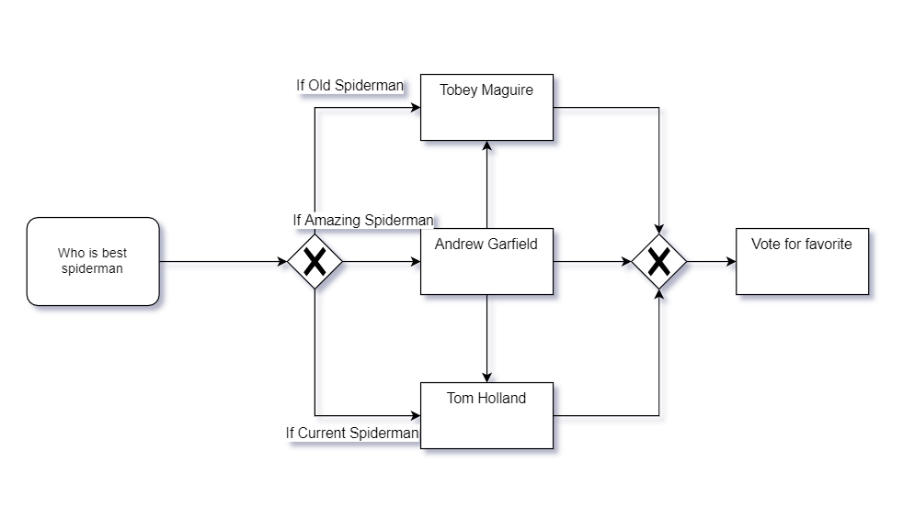
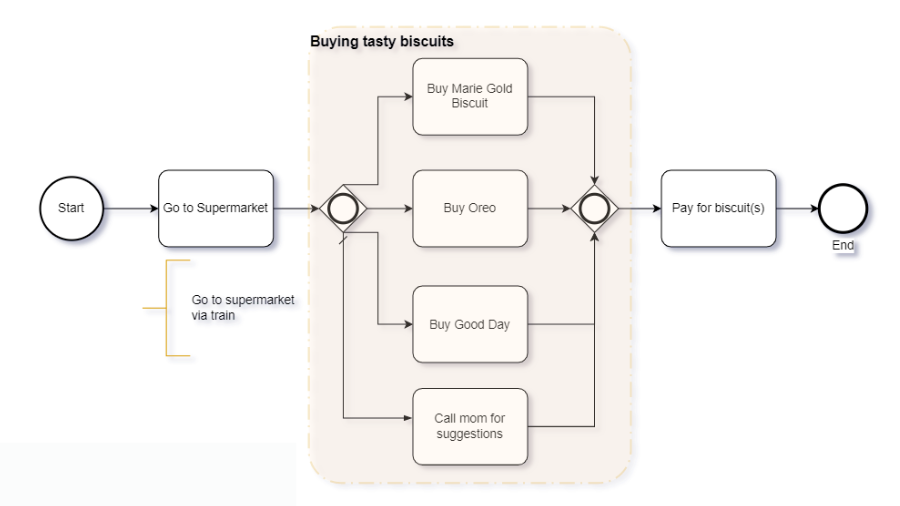
Selective Passage – Jewel Shape with X imprint inside it. Additionally called as XOR entryway. In the underneath BPMN scrap, we have utilized elite passage, where client needs to pick which spiderman they like and in view of that choice, the restrictive entryway will decide and continues with the following assignment, which is Decision in favor of top picks. The contrast among selective and rest of the entryway is, in elite, all friendly arrangement streams are assessed, and any one activity should be picked.
Occasion Based Passage – Occasion based entryway is like Selective door, where just a single branch will be initiated, rest of the branches will get deactivated. In select entryway, a condition articulation is assessed, however in occasion based passage, the condition will be founded on occasions. For e.g., When a client makes a credit demand, it is important to request a few records. In the event that client doesn’t bring the archives till 2 days, we will contact the client mentioning for same nevertheless not gave, then end the cycle. Assuming records got, check it and interaction will end. Here, occasion based entryway will have 2 parts, where first split is hanging tight for 2 days for records and second split is getting reports.
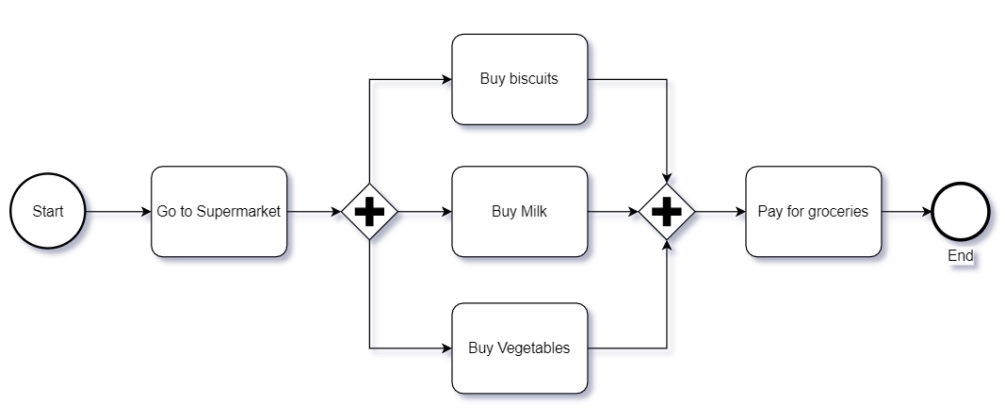
Equal Passage – Precious stone with an or more sign inside it. In equal passage, all branches will get enacted. Like, on the off chance that we utilize equal door in above model, the two branches, trusting that 2 days for client will bring the endlessly archives got branch will get actuated parallelly. On the off chance that there is what is going on, where all split branches ought to be executed, favor equal entryway. Equal door is likewise called AND entryway.
For a legitimate model on equal passage is, purchasing staple things in general store.
In above general store model, till you purchase all referenced things (milk, bread rolls, food) the door will not execute the following stage of installment. It will stand by till all things are bought.
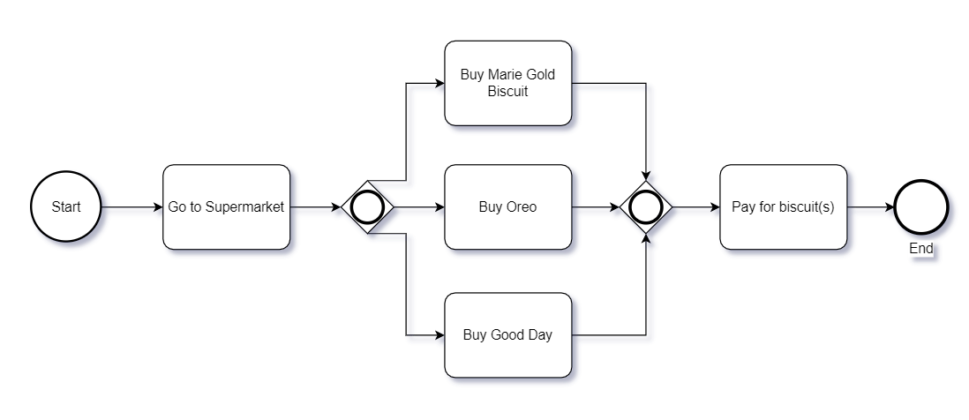
Comprehensive Door – Circle inside a jewel. Comprehensive Door is likewise called OR entryway. We should straight away go with the model.
In the above piece, comprehensive passage will pick something like 1 branch to get chosen or all branches. Like, assuming we purchase Marie gold bread roll, OR door will sit tight for the reaction of the other two branch status. On the off chance that Oreo branch is chosen, it will be added and same for good day. Until it gets reaction from all branches, the OR entryway will not get finished. It is generally a decent practice to have a default branch which would execute on the off chance that the bread rolls are not really purchased. For determining default branch, there will be change in bolt, with a strike toward the beginning of bolt.
4) Connecting Objects – Sequence Flow:
Exercises, doors, and curios don’t have a lot of significant worth all alone in the event that they can’t be associated with one another. This is the explanation we are utilizing Associating objects. We will utilize different association objects in view of the transmission. The first is Grouping.
Succession stream interfaces different stream articles like occasions, exercises and passages.
5) Connecting Objects – Message Flow:
A message stream is utilized to show the progression of messages between two members that are ready to send and get them. In BPMN, each pool addresses one member. Trade of data between members can be signified in Message stream connector.
6) Connecting Objects – Association:
An affiliation associates extra data, like a note, to individual components in the process model, for example, stream objects, Swimlanes, and information objects.
7) Swimlanes – Pools:
Swimlanes are only compartment to bunch the BPM processes. A swimlane addresses a utilitarian element or obligation simultaneously and can be demonstrated either upward or on a level plane contingent upon the direction of the whole BPD. Swimlanes will show us who are responsible for each interaction. In the event that you are having at least one donor, it will result in different swimlanes.
Pool swimlane addresses a cycle member and fills in as a holder for single interaction. Paths can be utilized to sort the division into numerous parts, as in client care administration pool we can have 2 paths, Programming frameworks and Programmed replying mail.
8) Artifacts – Data:
There are numerous data ancient rarities for Information Article. Fundamentally, all data antiquities address information, either information, result or assortment of information/yield. Assuming there are numerous records that is sent as an info, we use Information Assortment and same goes to Result.
You could feel a little uncertain on how this information object situated in BPMN graph. See the underneath piece.
This arrangement of information object doesn’t have an effect in the BPM cycle while executing. It is an extra data to the client that an information that is being utilized and yield record is produced. There are a lot more images like information store, where we can utilize it in the event that we are bringing the information from a data set.
9) Artifacts – Annotation:
Explanations are extra data gave to an undertaking or an action on what’s the errand reason. It is a greater amount of like giving remarks to exercises in BPMN graph.
There are two different ways we can give extra data, one is to explicit movement and another is to gathering of interaction.
In this way, we have finished the nuts and bolts on grasping the BPMN images. In next post, we will test the comprehension with different business experiments.
I trust you were able to learn about this fascinating topic, “BPMN 2.0 in a Nutshell“ If you feel a little unsure or have any questions or suggestions, please leave your comments below.
This blog will provide an Introduction to NW BPM and NW BRM in SAP PO, offering a general understanding of these concepts in a single stack environment with a relevant business use case.
To put it plainly, underneath is the substance we will be intricate in this instructional exercise:
What is NW BPM in SAP PO?
Need for NW BPM in SAP PO
Real Life example using NW BPM
Composite Environment
BPM & BPMN
What is NW BRM in SAP PO?
1) What is NW BPM in SAP PO?
BPM represents Business Interaction The executives and NW implies NetWeaver which says like BPM runs on SAP NetWeaver Java Based Application server. BPM gives the command over the course of a business application like planning, execution and observing. It permits associations to adjust their business situations and cycles to new business procedures and fulfill the needs of the present business climate constantly.
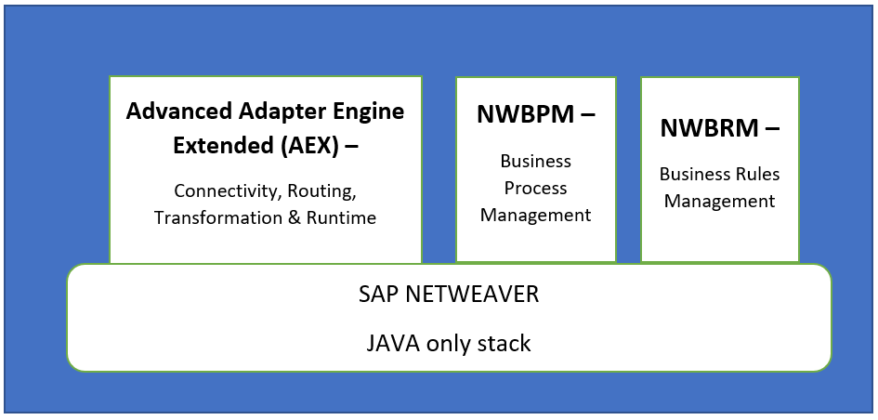
SAP gave one Extra part called NWBRM, and that implies NetWeaver Business Rules The executives. Process Coordination is a combo item.
SAP PO = SAP PI (AEX) + BPM + BRM
NWBPM is a different layer in PO, where the point of interaction creation or transmission can occur without BPM’s assistance. There may be a few situations where improvement of standard SAP Business Suite processes with web and rule-based process steps.
Frequently for a few client’s standard cycles ought to be upgraded to help a consistent reconciliation of infrequent clients (e.g., directors, outer colleagues, … ) through online UIs. Likewise, portable situations for individual interaction steps are required. Consequently, SAP Interaction Arrangement offers numerous specialized choices. With BPM such necessities can be executed effectively and proficiently, similar to execution of endorsement processes.
2) Need for NW BPM in SAP PO?
BPM is expected in circumstances where the circumstances are not satisfied by basic methodology. There are sure circumstances where we require BPM usefulness:
Handling of different messages for example Converging of two documents into one or of single record and sending it to numerous collectors parallelly or successively.
Trust that a message will be shown up.
Complex business process which includes embedding information into a few framework and getting reaction on specific condition structure every one of the collector.
Correspondence between a coordinated and a nonconcurrent framework which is finished with BPM.
3) Real life example using NW BPM:
Envision the business cycle included when you are structure a thing in an eatery. The initial step is that you submit a request, second, passed to kitchen for readiness and afterward once request is prepared, it will be served. Furthermore, finally, you will make installment. In the above use case, we can see that the request data is passed to a few frameworks and individuals and with heaps of coordination, requested thing is conveyed.
Likewise, associations made processes in view of their current administrations and applications. Also, there will be individuals included who will deal with the administrations and the applications. Just to finish one responsibility like convey the arranged thing, organizations could go through or incorporate with various administrations. Organizations would try and make another interaction by consolidating different innovation, data, and applications.
Additionally, we must have clear start to finish process perceivability and quicker completion time to run the cycle. That is the explanation organizations embrace instruments that help such sort of work process devices or BPM apparatuses. So that organizations would have unlimited authority on their administrations.
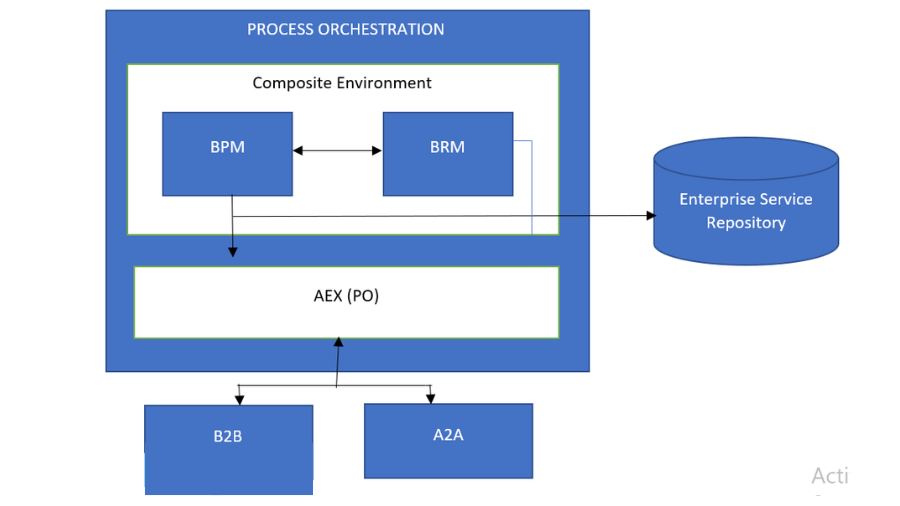
4) Composite Environment:
How about we check the Composite Climate out. It is a biological system where you join things together. SAP NetWeaver gives composite climate which is Java based climate where we can foster work processes and join various administrations together. CE has apparatuses, servers, and observing dashboards to fabricate and maintain our business cycles and NW BPM is one of them which can be planned, created, conveyed, tried, and executed behind the scenes server is SAP NetWeaver AS. Aside from improvement, it gives start to finish perceivability on the interaction device. The PO is combo item which has AEX, BPM, BRM. So AEX needs to correspondence with NW BPM for it to utilize BPM highlight in the composite climate.
AEX will deal with the network. BPM BRM deals with the running/handling of the cycle. In the above outline, it is apparent that B2B/A2A applications will contact AEX, for availability. Thus, the stream will be SAP ECC – > PO – > BPM – > PO – > outsider. SAP NWDS instrument is utilized for process demonstrating. NWDS is based on top of Obscuration apparatus by upgrading a few highlights to it needs. Composite applications can get to Big business Administration Library.
5) BPM & BPMN:
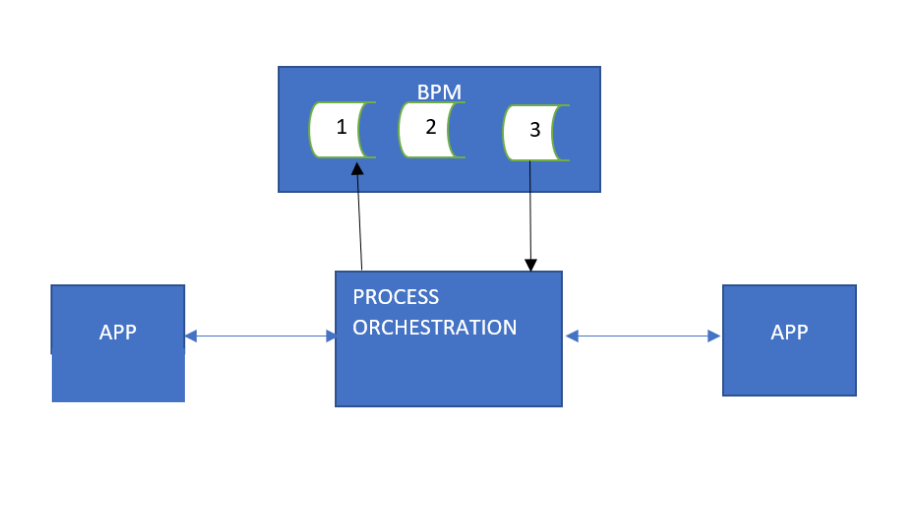
There are two sorts of cycles: Framework Driven Cycles and Human Driven Cycles. In Framework driven process, there will be no manual mediation required, similar to trade of receipt information from shipper to collector framework. While human driven process, human mediation is expected to finish the interaction, such as booking a flight ticket.
It is critical to comprehend framework driven and human driven, on the grounds that when we foster BPM process, we should have the option to separate it.
At the point when you fabricate communicate with AEX, you really want to assemble some part in AEX, and you want to change back to Composite climate and foster BPM and return to AEX to finish the connection point, as displayed in above outline.
So AEX handles Information change, directing, availability, and informing framework which implies all associations in source and target just occurs from AEX. Likewise, AEX deals with the information transformation yet in addition it can handover the obligation to BPM for information change/handling.
You can arrange in PO, as, when you get the message from shipper framework, it can give that obligation of dealing with the message to BPM. Whenever message is shipped off PO to BPM, BPM will get enacted and it will begin executing the means in view of framework driven or human driven process. When BPM process is finished, the reaction will be shipped off PO and note that BPM doesn’t send the reaction straightforwardly to collector or outsider framework.
Presently for fostering the BPM cycle, you want to learn BPMN language. Variant of BPMN is 2.0. BPMN2.0. BPMN represents Business Interaction Model and Documentation.
As said in past posts, we have two sorts of PO establishment. One is Single Stack Java based and another is double stack ABAP + Java based. In double stack design, we also have BPM, however its ccBPM which isn’t similar to NW BPM. Likewise, the language used to make ccBPM process is BPEL (Business Cycle Execution Language). In this way, in the event that you are moving from Double Stack to Single stack, you should update or re-gain the NW BPM process without any preparation.
Business Cycle Model and Documentation (BPMN) is a graphical portrayal for business process demonstrating that gives a graphical documentation to determining business processes in a Business Interaction Outline (BPD). It isn’t like programming, rather it depends on flowcharting procedure however used to address business process model.
We will have one nitty gritty post on portraying the BPMN2.0 language linguistic structure, occasions, passages, and association graphs. Test BPM stream:
6) What is NW BRM in SAP PO?
NW BRM represents NetWeaver Business Rules The board. BRM is about rules. In BPM, when you have some business rules, you will characterize that in BRM. For example, in the event that you request a thing, we can set a condition on request sum limit and keeping in mind that setting up the thing in eatery kitchen, the planning time shouldn’t surpass 30mins or somewhere in the vicinity. These sorts of rules can be set in NW BRM.
The justification for why the NW BRM is given independently as opposed to remembering it for NW BPM is on the grounds that the business rules could change much of the time, and the expert shouldn’t contact or change the business interaction thus. Thus, SAP has added another part in Composite Climate, so business rules can be adjusted without upsetting BPM.
In this post, we will provide an Introduction to NW BPM and NW BRM in SAP PO and demonstrate how to model a BPM process using the industry-standard BPMN 2.0 language.
This blog will provide a general understanding of bridges in SAP PO with a business use case. Additionally, we will explore the different types of bridges with examples.
To put it plainly, underneath is the substance we will be intricate in this instructional exercise:
What is a Bridge in SAP PO?
Async-Sync Bridge Scenarios
Sync-Async Bridge Scenarios
1. What is a Bridges in SAP PO?
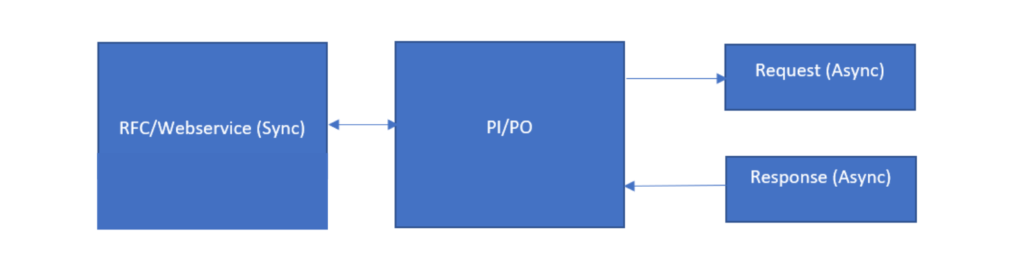
Say, you are sending data from an async framework (Document) to outer framework (Web-administration/RFC – Sync). The beneficiary can return reaction message, however source is offbeat. Subsequently, the association from source side will be shut whenever it is sent, as it is nonconcurrent.
There are two types of bridges:
1. Async – Sync Bridge
2. Sync – Async Bridge
Two answers for these issues:
Utilizing ccBPM/BPM
Utilizing standard connector modules
Using ccBPM/BPM:
Advantage:
Complex cycles with various frameworks
Disadvantage:
Improvement and testing time.
Observing and investigating intense
ccBPM not accessible in Single stack establishment, subsequently BPM should be utilized.
Using standard adapter modules:
Advantage:
Simple observing and troubleshooting, testing, creating
Disadvantage:
Clear comprehension of module boundaries required. Could get confounded.
2. Async – Sync Bridge Scenarios:
Scenario:
Record will be shipped off PI and message change/planning will happen, post that, message will be communicated to RFC which is a simultaneous BAPI made in ECC which returns reaction, and it will be put away in a Document.
Adapters – Sender File, Receiver RFC, and Receiver File
Source framework – Async
Recipient framework – Sync
Thus, sending a solicitation and getting reaction in the source connector/channel will be two free errands.
Target framework, as it is sync, will send reaction in which the solicitation came.
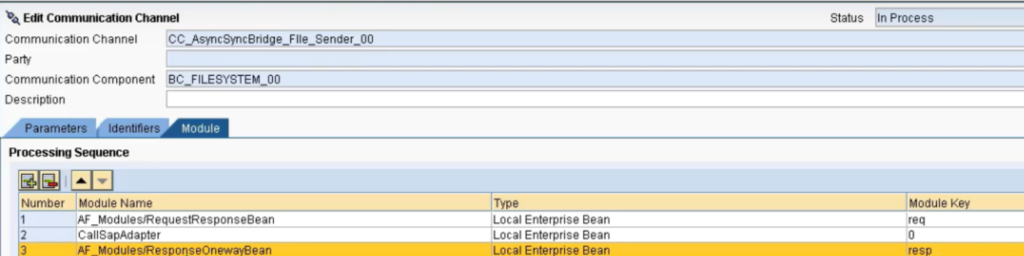
Connector modules to be utilized in Shipper Correspondence Channel:
RequestResponseBean – Converts Async message to Match up message and moves it to next module chain.
ResponseOnewayBean – Converts Sync message to Async message and diverts it to beneficiary.
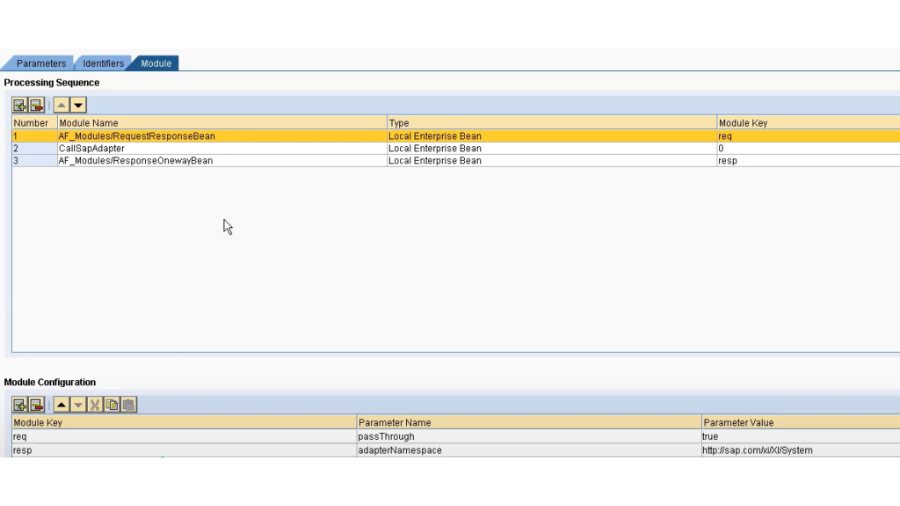
MODULE NAME
TYPE
MODULE KEY
AF_Modules/RequestResponseBean
Local Enterprise Bean
Req
CallSAPAdapter
Local Enterprise Bean
sap
AF_Modules/ResponseOnewayBean
Local Enterprise Bean
Resp
Boundaries for RequestResponseBean (in Source CC):
passthrough – Valid (Next module in the chain)/Bogus (PI message handling subsystem) – Default (Misleading)
timeout – Response holding up time (in ms) – Default 300000ms
Parameters for ResponseOnewayBean (in Sender CC):
receiverParty/receiverService – Name of comm. Component/Party – Optional
receiverChannel – Receiver Comm. Channel name – Optional
adapterType (FILE)/adapterNamespace (http://sap.com/xi/XI/System) – type and namespace of connector to associate with beneficiary framework – Discretionary.
HANDLING ERROR SCENARIOS:
receiverChannelOnFault – Communication Channel name to receive error messages
replaceInterfaceOnFault – true -> change interface and namespace
false -> keep original interface provided earlier
interfaceOnFault / interfaceNamespaceOnFault
Steps in processing:
Getting async message from source framework – > Module RequestResponseBean
-> module changes the message type from async to adjust by changing the message header.
In view of the boundary Passthrough Valid, module passes the message to next module chain, in the event that Misleading, it will skirt the following module chain and straightforwardly goes through informing framework.
Next is CALL SAP Connector (standard) module, moving it to PI informing framework.
Sending a solicitation to match up correspondence channel.
Coordinated call to the outside framework, getting the reaction.
Getting reaction from sync correspondence channel.
Return reaction to ResponseOnewayBean changing the message type from sync to async and deciding the recipient framework which is set in MODULE Boundaries.
Sending reaction to channel.
Conveyance of message to source framework as async correspondence.
3. Sync – Async Bridge Scenarios:
Sender – Sync
Receiver – Async
Modules to be used:
RequestOnewayBean – Converts sync messages to async messages
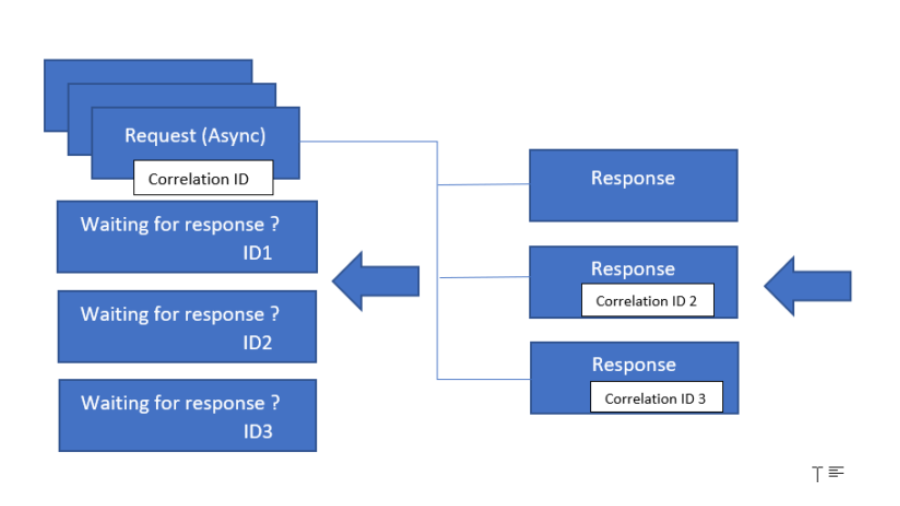
WaitResponseBean – leaves sync comm channel OPEN and waits for the response. Upon receiving response from async system, it will convert it to SYNC and send it to original system. If no response came, then error message is returned.
NotifyResponseBean – this module used instead of standard adapter module in response async sender channel to transfer the response message directly to WaitResponseBean
——————-
WE HAVE AN ISSUE HERE:
Envision that few messages are going through the extension all the while. Along these lines, eventually couple of questions are sitting tight for reactions. Some reaction is coming from the objective framework – yet the way that we know which of forthcoming channels should be utilized to send a particular response?
CORRELATION ID – this is the saviour
It is the identifier/key, which holds the special worth between reaction message and the anticipating demands.
THE SOLUTION SHOULD BE:
While communicating the solicitation message, some novel identifier that ought to be recalled by the solicitation message and check this identifier with the got reaction message.
We can involve MessageID for this, which is extraordinary for each message. For getting this messageID we can help it through another standard module – > DynamicConfigurationBean
Steps in processing:
Getting a sync message from outer framework, sending it to RequestOnewayBean which converts message type from sync to async.
In the event that passThrough is set to Valid, module passes it to next chain of modules.
Else, module passes it to informing framework.
Standard connector module moves it to PI informing framework.
Demand moved to async recipient channel
Async call to outside framework
Async reaction to source comm channel from outside framework
Return the reaction to NotifyResponseBean, which sends the async reaction message to WaitResponseBean.
WaitResponseBean changes over async reaction message to match up reaction message and sends to source framework.
Parameters for RequestOnewayBean (in Sender CC):
passthrough – True (Next module in the chain) /False (PI message processing subsystem) – Default (False)
Parameters for WaitResponseBean (in Sender CC):
timeout – Response waiting time (in ms) – Default 300000ms
Parameters for NotifyResponseBean (in response Sender CC):
timeout – Response waiting time (in ms) – Default 300000ms
fault – Name of an error message
faultNamespace – Namespace of an error message
Next is solicitation and reaction relationship.
We should send messageID in the solicitation message header and pass it to target framework. In returning the reaction, we should fill the correlationID in the reaction header.
This is the manner by which we can deal with the solicitation and reaction of a sync to async span situation. Trust you enjoyed it. On the off chance that you feel somewhat doubtful, inquiries or ideas for us, kindly put your remarks underneath.