SAP Adobe Form How to make the TextField Caption Background Color Different?
When my senior ABAP tutor told me, “If you know R and F of RICEF, you would survive in the SAP world,” I realized the importance of mastering these elements. Regardless of a client’s business needs, they will always require reports for consolidation and analysis of transactions. Additionally, they need to print statements and forms for legal and documentation purposes. Thus, reports and forms hold significant value in SAP. In this context, we present “SAP Adobe Form Tutorial Part XV Different Background Color for Label and Content Text,” where we explore techniques for customizing Adobe Forms to enhance their appearance and functionality.
He needed his result like beneath.
My most memorable response was – Who cares here? Be that as it may, when I attempted to find the response, I was unable to make the foundation tone unique. Furthermore, of late, I have been chipping away at SAP Adobe broadly. That was the incongruity.
Presently I needed the answer for myself, it was auxiliary to help the part. Thus, I began to dig all the more genuinely and got to the arrangement.
Here you go.
Step 1 – Go to Border Tab in the Layout Palette, look for Background Fill at the bottom.
Pick the Style as Strong. What’s more, pick a variety you want. We have picked Red for our prerequisite.
This will make both the Label and the Content area of the Text Field Red as shown above.
Step 2 – Go to Object Tab -> Field ->Appearance -> Custom.
Please note choosing Custom Appearance is the trick.
Step 3 – When you select Custom Appearance, a spring up window would come.
Step 4 – We really want to choose the White Foundation for the Text Content as displayed underneath.
So presently we have filled two distinct tones for the Foundation. Red for the Mark and White for the genuine Substance.
So the two foundation tones are unique.
Opps, you still have Red border on the Content Area!! You do not want it to be Red.
Step 5 – Go to Layout -> Margins and make them 0.
When we set the margin to 0, the red lines vanish. Presently we have met our objective of having the Name foundation not quite the same as the Message (content) foundation.
Really look at the Review PDF to affirm our finding.
This was one of the simplest requirements for us, yet it wasn’t as straightforward as it seemed. When you encounter “SAP Adobe Form Tutorial Part XV Different Background Color for Label and Content Text“ for the first time, it may seem complex, but once you understand it, it becomes quite simple.
Enter the Point of interaction and press on Make (Interface is mandatory for Adobe form)SAP
The portrayal, and press Enter.
Enter the bundle name and save. Beneath Screen shows up.
Press the Make button to add a bringing-in boundary.
Add IV_AUFNR, which is of type AUFNR, and really take a look at the discretionary banner. Check, Save, and Actuate the Structure Connection point.
Back. The structure name and press the Make button.
Enter the portrayal and point of interaction name that we made before.
Enter the bundle name and save. Following screen shows up.
Open the import boundary and simplify the expected variable to Setting.
Then press the Design Tab. The accompanying screen shows up.
Intuitive the field that you needed to print on the structure to the configuration view. You can put this field anywhere in the format.
There will be a toolbar with the name Object Library. If you are not able to find it, go to Palettes -> Object Library.
In the Toolbar, search for Barcodes choice. Grow it.
The following are the various sorts of standardized tags. Generally, we use Code 128C, yet it can change in view of the nation and prerequisite.
Simplified the Code 128C Standardized Identification to your Format.
Go to Data Binding and bind the order number: IV_AUFNR.
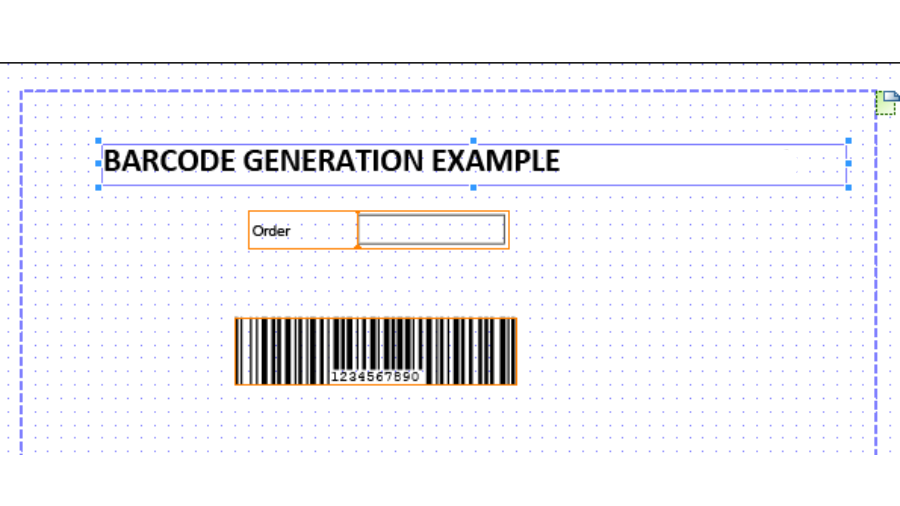
Place a heading (text) on the top (not required): BARCODE GENERATION EXAMPLE
Check, save, and enact the structure. We are finished putting the scanner tag and restricting it to an information source. It is just straightforward. Isn’t it?
Testing Adobe Form Stand-Alone:
To see yield for test reason. Go to SFP and give your structure name. Press F8 and give a worth to bringing in boundaries, very much as you accomplish for capability module and see the result.
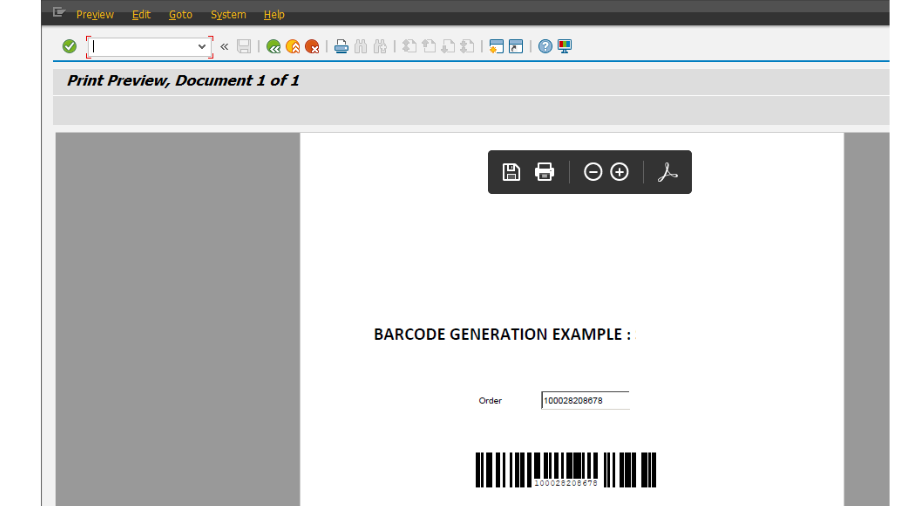
Enter the IV_AUFNR (Request Number). Execute (F8). Press the print review button and see the result.
Check the scanner tag closely. It has the same number as the request number. Your machine can easily recognize it. For a more detailed guide, refer to “SAP Adobe Form Tutorial. Part XIV, How to Generate Barcode in Adobe,“ where we explain how to position tables side by side in your Adobe forms.
Displaying two tables side by side on a SAP Adobe Form is a common requirement, but many of us find it challenging to achieve on the first try. If you search for a solution using keywords such as “SAP Adobe Form Tutorial Part XIII How to Print two Tables Adjacent to each other“ or “Data Overflow Issue in Sub Forms Tables in SAP Adobe Forms,” you will find the following links as the top few search results.
Situation 1 asked by one Client
I have a form with a body page and two tables. The body page’s property is set to ‘Streamed’ with ‘through and through’ as the stream direction, and the checkbox for page break is enabled. In “SAP Adobe Form Tutorial Part XIII How to Print two Tables Adjacent to each other“, we will explore how to configure the form to print these two tables side by side on the same page.
Necessity
The two tables should be printed nearby one another.
Approach followed until now
Since the body page is ‘Streamed’ type, the two tables are set one underneath the other (Tab1 and Tab2). So I attempted to set the Stream bearing of the Body page to ‘Western text’. In any case, this didn’t address the issue as since it is set to ‘western text’, solely after Tab1 is delivered, table Tab2 begins printing itself, which isn’t wanted. Both the tables ought to be printed simultaneously.
I enclosed both the tables by one sub form with ‘Type’ set to ‘Situated’ and set the checkbox for the page break. Presently I organized the tables nearby one another. However, the checkbox for page break for both the tables was handicapped and along these lines in the event that there isn’t adequate room to print the all out records of both the tables, the total tables are moved to another page leaving the past page clear.
Similar Scenario asked by another User
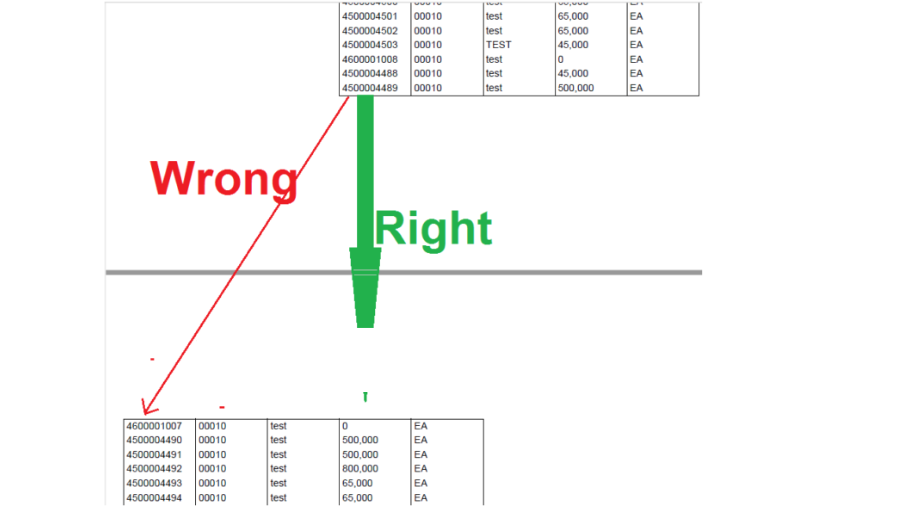
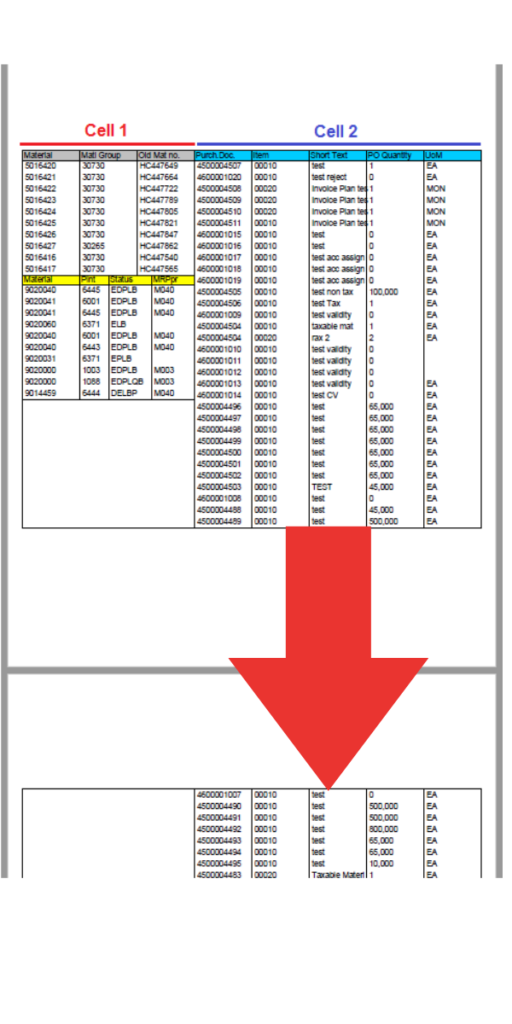
“I generally disapprove of 2 tables lying next to each other – say Table An on the left and Table B on the right. At the point when Table B has a flood of information in the following page. Then the overflown dataset lines of Table B goes to the left on the following page rather than its segment head for example .right of Table A. This happens just when table B is spilling over and Table An on the left excess on Page 1.”
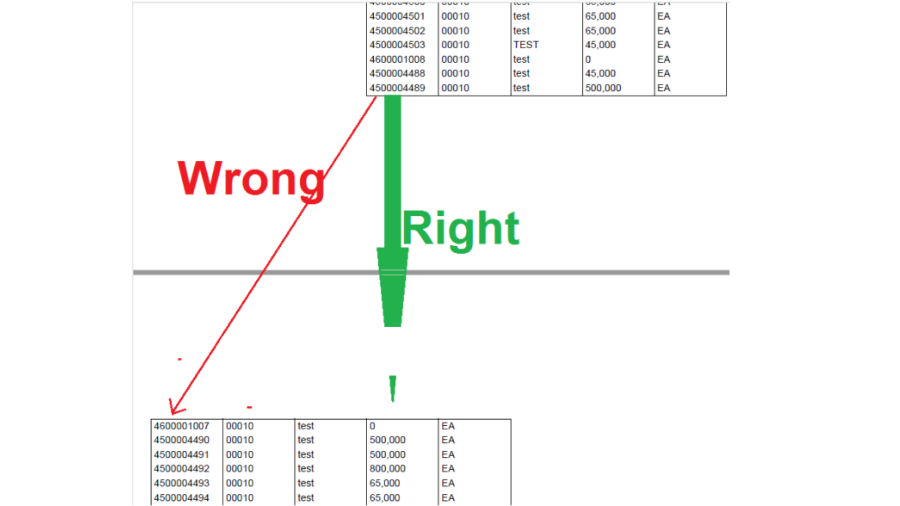
On the off chance that you didn’t comprehend the issue situation, then, at that point, the under two pictures ought to help. Keep an eye on page 2, the right-hand side table is spilling over to page 2 from page 1, yet it has moved to the left as opposed to remaining on the right side.
Trust you figure out the situation now.
There are numerous ideas to accomplish this. Some said to connect every one of the inward tables to one major inside table to be shown. It would work, however that is super unwieldy assuming you have numerous tables.
The other most normal viable arrangement gave is to placed the tables in two different SubForms, make them Streamed with page break and print them together. Allow us to do likewise.
We are not telling you the best way to make the tables and SubForm. We accept, you know it so we are simply showing the Connection point and Structure settings and codes.
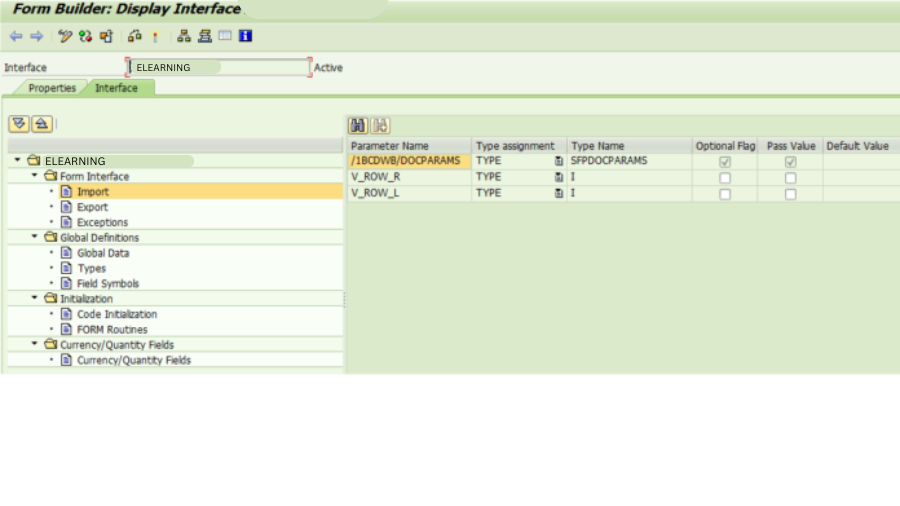
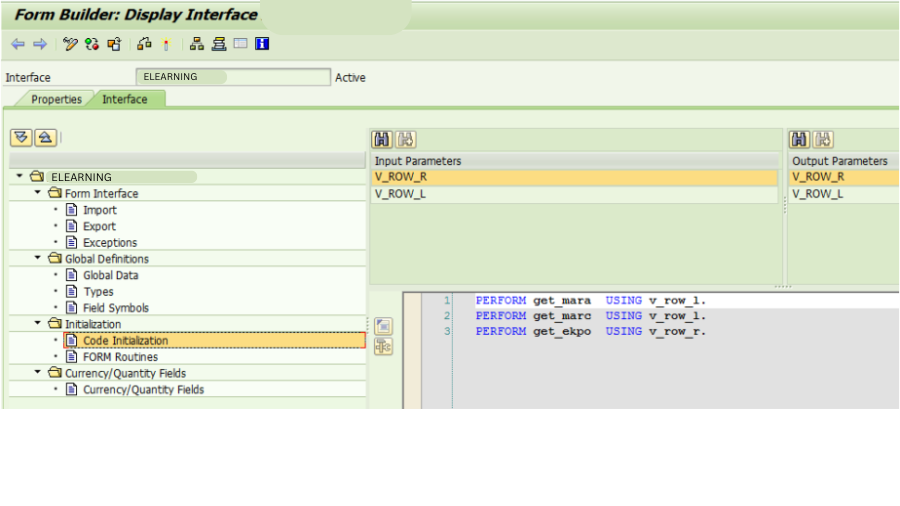
Adobe Form Interface
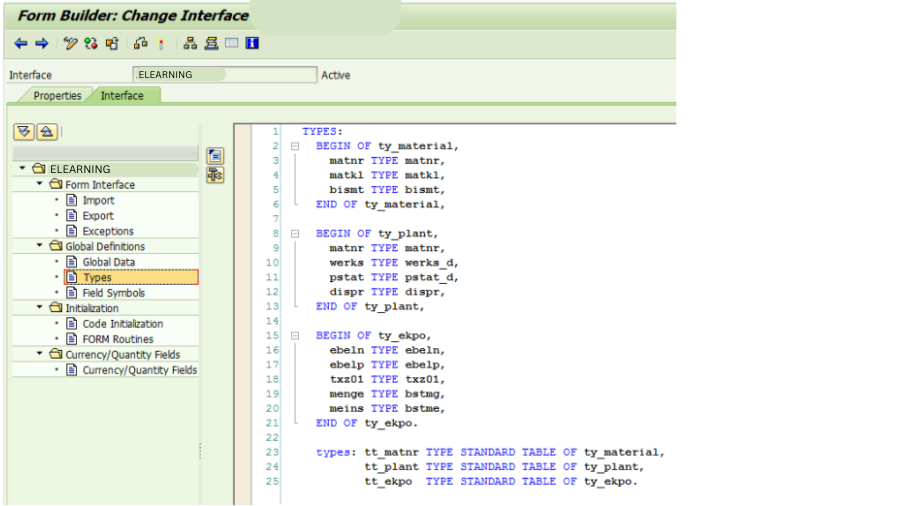
TYPES
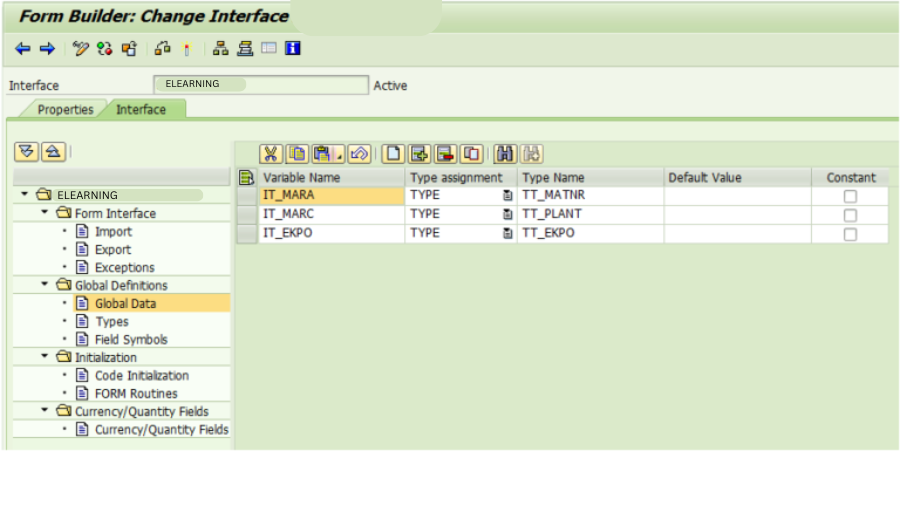
Global Data
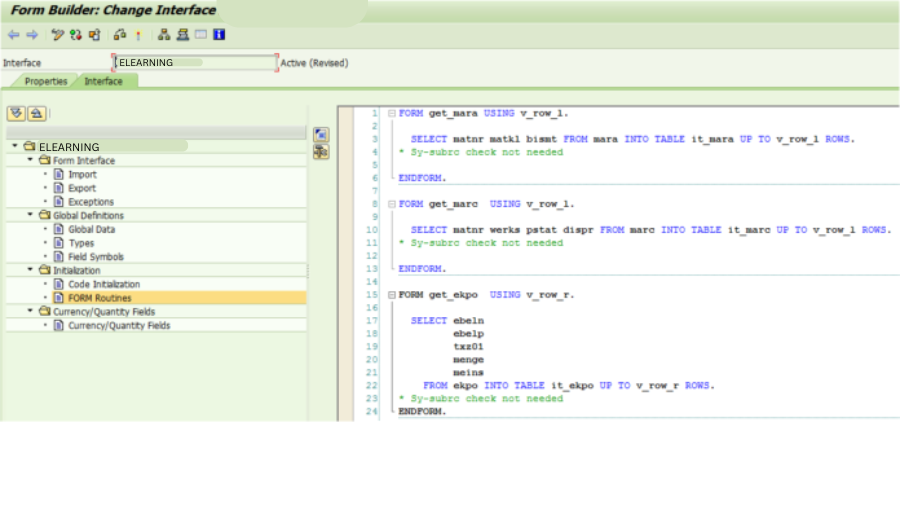
Code Initialization
Form Routines
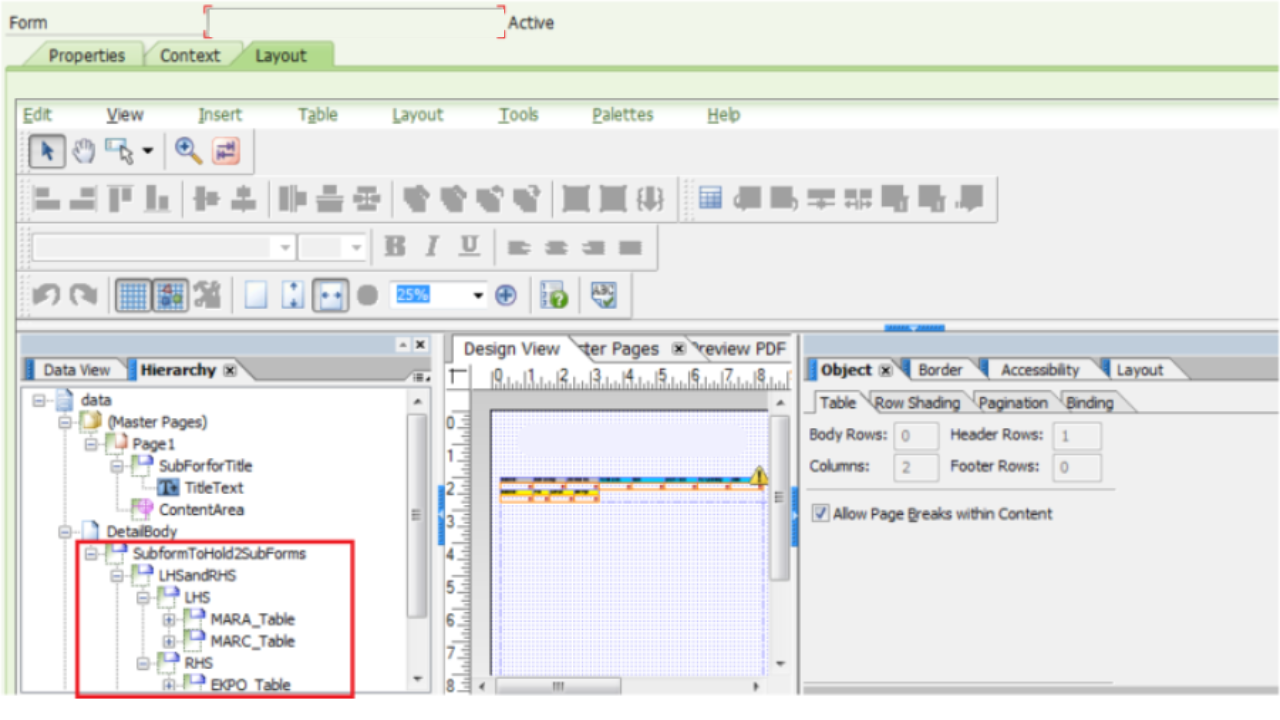
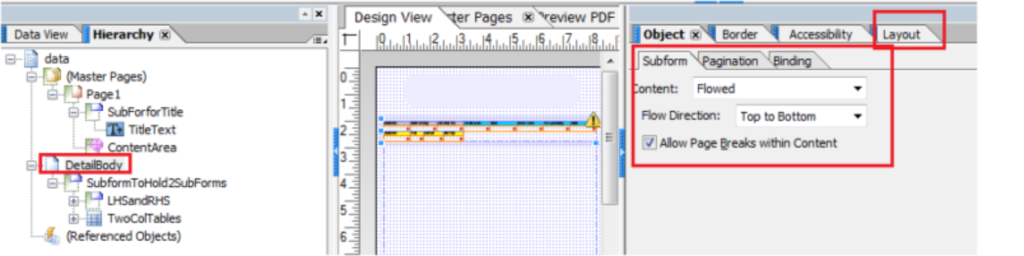
The Form is designed as below.
Two SubForms LHS and RHS are enclosed by one SubForm LHSandRHS. MARA_Table SubForm and MARC_Table SubForm are wrapped inside LHS SubForm. Likewise, EKPO_Table SubForm is wrapped inside RSH SubForm.
The following is the extended perspective on all the Ordered progression Items.
All the SubForms are Items are Streamed with Stream Course Western Text.
Additionally, remember to make the Page DetailBody Content as Streamed and Permit Page Breaks with Content.
We wrote the below Driver Program to test our form.
***---------------------------------------------------------------------* *** Date :19/03/2025 * *** Author :Varad(www.elearningsolutions.co.in) * *** Title :Demo Printing of Tables Side by Side in Adobe with * *** Overflow to next page * ***---------------------------------------------------------------------* REPORT ELEARNING.
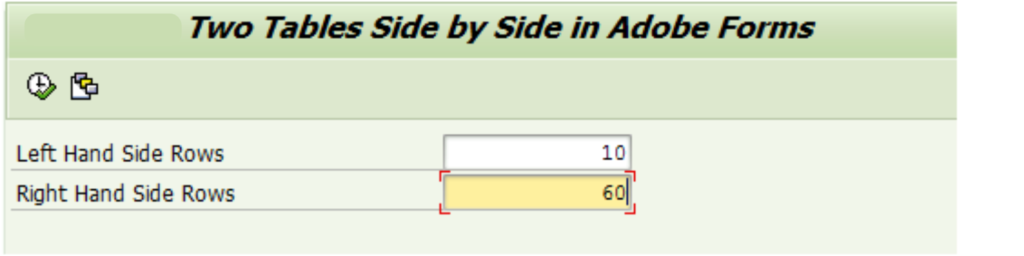
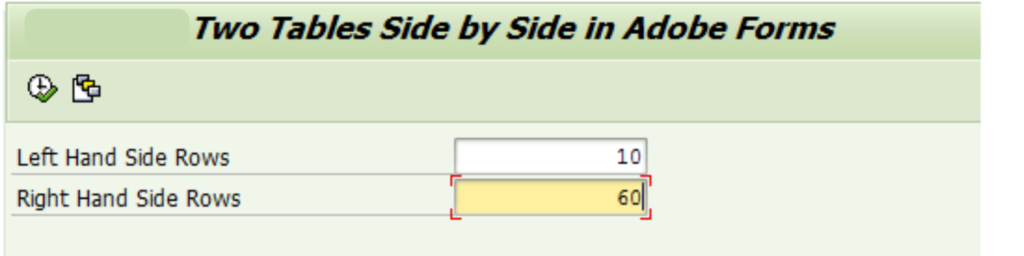
PARAMETERS: p_rowl TYPE i, " Number of Rows p_rowr TYPE i. " Number of Rows
CONSTANTS : gv_form_name TYPE fpname VALUE 'ELEARNING'. **&&~~ Data Objects DATA: gv_fm_name TYPE rs38l_fnam, " FM Name gs_fp_docparams TYPE sfpdocparams, gs_fp_outputparams TYPE sfpoutputparams.
*&---------------------------------------------------------------------* **&&~~ Form Processing: Call Form - Open * CALL FUNCTION 'FP_JOB_OPEN' CHANGING ie_outputparams = gs_fp_outputparams EXCEPTIONS cancel = 1 usage_error = 2 system_error = 3 internal_error = 4 OTHERS = 5. IF sy-subrc <> 0. " Suitable Error Handling ENDIF. *&---------------------------------------------------------------------* **&&~~ Get the Function module name based on Form Name * CALL FUNCTION 'FP_FUNCTION_MODULE_NAME' EXPORTING i_name = gv_form_name IMPORTING e_funcname = gv_fm_name. IF sy-subrc <> 0. " Suitable Error Handling ENDIF. *&---------------------------------------------------------------------* **&&~~ Take the FM name by executing the form - by using Pattern- **&&~~ call that FM and replace the FM Name by gv_fm_name * **&&~~ Call the Generated FM CALL FUNCTION gv_fm_name "'/1BCDWB/SM00000176' EXPORTING /1bcdwb/docparams = gs_fp_docparams v_row_r = p_rowr v_row_l = p_rowl EXCEPTIONS usage_error = 1 system_error = 2 internal_error = 3 OTHERS = 4. IF sy-subrc <> 0.
* Implement suitable error handling here ENDIF. *&---------------------------------------------------------------------* **&&~~ Form Processing: Call Form - Open * CALL FUNCTION 'FP_JOB_CLOSE' * IMPORTING * E_RESULT = EXCEPTIONS usage_error = 1 system_error = 2 internal_error = 3 OTHERS = 4. IF sy-subrc <> 0. * Implement suitable error handling here ENDIF.
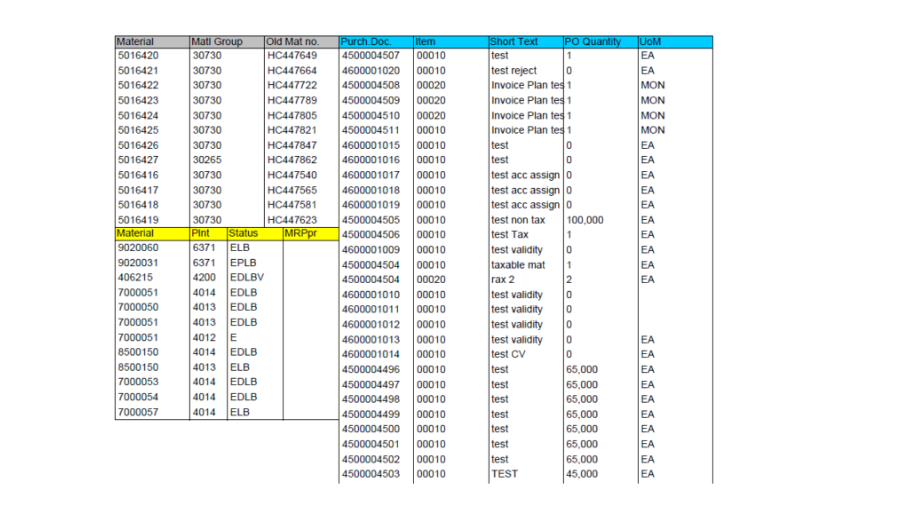
We should test it. To keep the left side table inside the principal page, we give a lower number to choose on the determination screen. Whilright-handt hand side table we pull more columns to drive it to spill over to the following page.
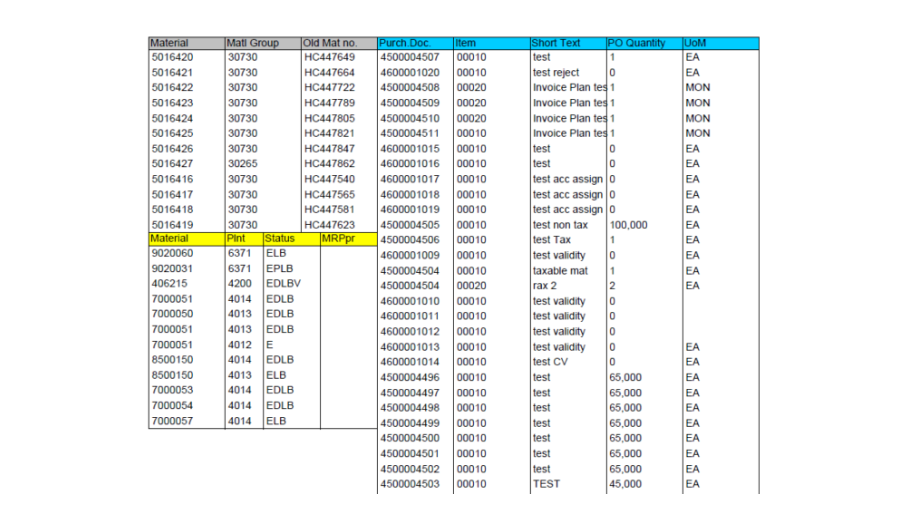
The main page looks great. The left hand side quits developing while the right hand side develops to next page.
However, look, on the following page the right hand side has been moved to the left side. This isn’t the very thing that our end clients need. The Purch Doc segment ought to be lined up with the section from the principal page.
Where did it go wrong? Allow us to check the design and settings once more.
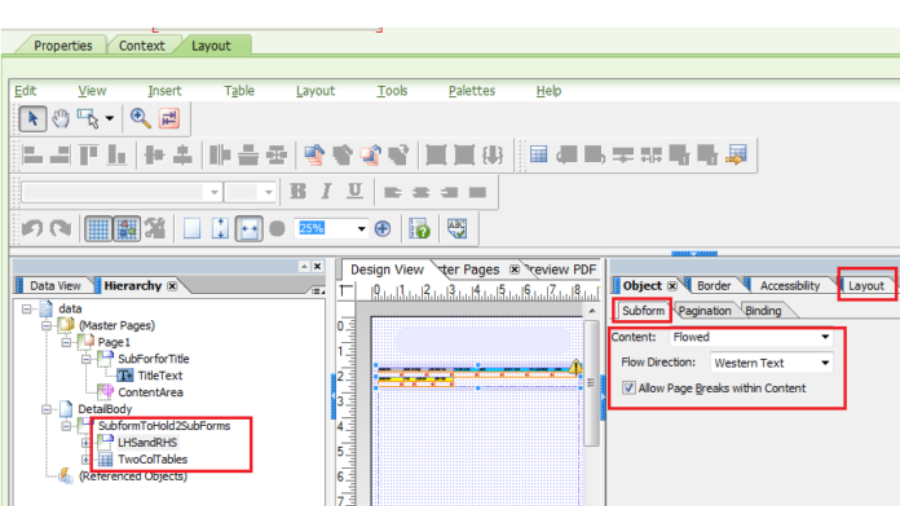
We have set the Subform Content as Streamed for Detail, LeftHandSide (LHS), RHS and all SubForms are Streamed. In any case, the design in the subsequent page is moved to left. We attempted to adjust the Stream Course Through and through to Western Text. Be that as it may, it didn’t help.
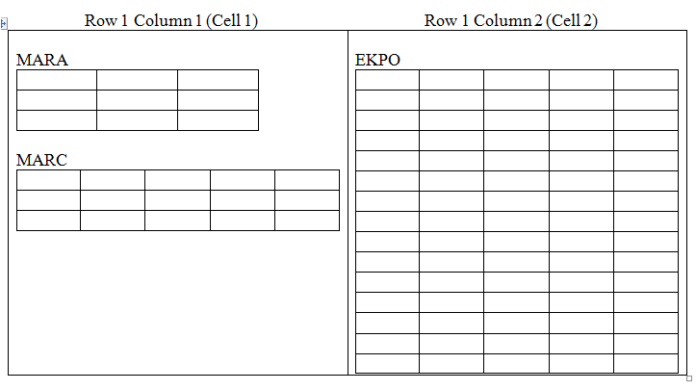
So we were constrained to attempt an alternate methodology. We will probably make a table with 1 line and 2 segments i.e it would have just 2 cells. Line 1 Segment 1 would have every one of the LHS subforms (2 tables mara and marc information) and Row1 Section 2 would have every one of the RHS subforms (1 table with ekpo information).
We want to wrap the two cells into subform and make them Streamed.
The following is a table with 2 cells and in every cell we would put subforms for our information.
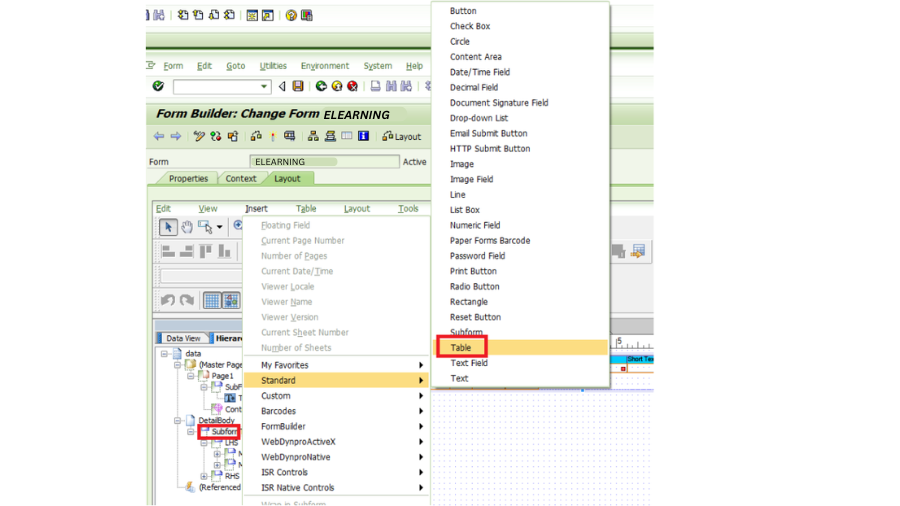
We ought to get it going. Permit us first to make a Table with one Line and two Segments.
We have renamed the table to TwoColTables. Allow us to rename Cell1 to LHS and Cell2 to RHS.
Presently right snap on Cell1 and Enclose by SubForm. Wrap Cell2 to SubForm as well.
Subsequent to wrapping and renaming, it would look like beneath.
Erase the texts LHS and RHS.
Presently drag LHS from SubformToHold2SubForms above and put into this LHS in the Row1 of the table.
Comparatively drag RHS from SubformToHold2SubForms above and put into this RHS in the Row1 of the table.
On the other hand, you can make these subforms in the LHS and RHS cell new. Yet, we are sluggish and we need to utilize what we did before.
It ought to look like beneath.
You want to have all the SubForms as Streamed expect the two Cells which were wrapped as SubForms. They should be Situated.
Positioned SubForm Cell 1 (LHS)
Positioned SubForm Cell 2 (RHS)
This is the stunt of this post. All streamed aside from the two cells which must be Situated. The two cells Content must be set as Situated in light of the fact that you would rather not permit the cells to move around openly. The width (and beginning x,y organizes) of the cells are fixed to the position you set. So when any one cell spills over to the following page, it actually is on a similar arrangement as at the main page.
How about we test now. Run the Print Program
Your table currently is streaming accurately. In the event that your left side table or right side table don’t begin from a similar level of the page or position (Y Coordinate), then, at that point, you should make them 0, 0 in the Design or some other worth you need. So both the tables start from a similar position and stream down.
I trust you found this tutorial helpful. The issue of printing two tables adjacent to each other is quite common, and the solution is also relatively straightforward. For a detailed guide on “SAP Adobe Form Tutorial Part XIII How to Print two Tables Adjacent to each other,” stay tuned as we explore this topic further.
One fine morning, your business comes to you and pleasantly suggests, “Adobe Forms are cool. We should convert our Smartforms to Adobe.” You might be unsure how to respond. Indeed, converting existing Smartforms to Adobe Forms could require significant time and effort. In SAP Adobe Form Tutorial Part XII How to Convert Smartform to Adobe Form?, we will guide you through the process of making this transition smoothly. We recommend giving it a go and exploring the benefits of Adobe Forms!
SAP has forever been ground-breaking and in reverse viable. In a similar line of reasoning, they have given a choice to switch Smartforms over completely to Adobe for certain snaps. Allow us to check. How?
Allow us first to create a basic Smartform.
Exchange: SMARTFORMS
Press the Create button
Add a Boundary in Structure Connection point
IT_VBAK TYPE VBAK_T
Add one more boundary in Worldwide Definitions
Make text under Fundamental Window in %PAGE1
WA_VBAK TYPE VBAK
Make a table under Fundamental Window
Double tap on %TABLE1
Go to the Information Tab and keep up with the Interior Table (IT_VBAK) and Work Area (WA_VBAK) Subtles.
Then, at that point, Go to Table Tab, and change line type to 2 sections.
Right Click on Header -> Create -> Table Line
Select Line Type %LTYPE1
Keep up with the Header in 2 cells by making the Messages
Right Snap on Principal Region – > Make – > Table Line
Select Line Type %LTYPE1
Keep up with the 2 factors by under the Cells Deals request (VBELN) And Deals Association (VKORG)
Check, Save, Initiate.
We are finished with making the Smartform.
Can we test now?
Yes. For this situation, we are not utilizing any driver programs. We will test remain solitary.
From the smartform screen, press the Execute (F8) button. Again, you press the Execute (F8) button. All things considered, smartform is saved as a capability module in SAP.
Enter a few information into IT_VBAK table
Press on Supplement Information button.
Then press the Execute button, select some neighborhood printer, and press Print Review.
You see a basic smartform yield.
Go to SMARTFORMS Exchange. Give your smartform name.
Go to Utilities -> Migration -> Interactive Form -> Export
Enter the necessary Adobe Structure name and press Enter.
Enter.
Select all the necessary really look at boxes
Enter. Save as a Nearby Item ($TMP) or in transport on the off chance that you have.
Presently Go to Exchange SFP
Initiate the Connection point.
Return.
Give the Adobe Structure name YRAM_ADOBE_FORM and press the Change button.
Go to Setting. Check a setting in Adobe Setting region is now replicated.
Go to Design and see the format that is duplicated from Smartform.
Check, Save, and Enact.
Presently, we can test the Adobe frame? Indeed, physically once more!!
Enter the information into IT_VBAK
.
You have just switched a Smartform over to a rich Adobe Form. I trust you find this process valuable. For more detailed instructions, refer to “SAP Adobe Form Tutorial Part XII How to Convert Smartform to Adobe Form?“ where we cover the steps and best practices for this conversion.
After more than 10 articles on SAP Adobe Form, we had to make room for this basic topic. Configuring Adobe Forms overlaps with the steps done in Smartforms and SAPScripts. But, still, we thought it would be helpful if we dedicated a short article to cover the concept here.
On a high level, we need to configure the forms in t-codes NACE, OPK8, and SPRO based on the modules you are working for.
NACE
Go to Transaction code NACE. You would find the list of all the applications in SAP.
Select the application area where you wanted to configure your Adobe Form and the Driver Program.
For example select V1 for Sales and press on Output types.
Here you can find all the output types which are related to Sales.
Select the relevant output type and press on processing routines.
Go to change mode and add your Adobe Form name beside to PDF/Smartform Form. Do not forget to change the Form type to “PDF”.
Save the change.
OPK8
If you want to configure PP or PM module related forms you need to do it in the OPK8 transaction.
Go to Transaction OPK8.
Select one of the Output Types and press on Forms.
Here you can Configure your Adobe Form.
Hit Save. You are done with the process of Configuring the Adobe Form in OPK8 Transaction.
SPRO
You can configure the QM (Quality Management) Forms in SPRO Setting. Go to transaction SPRO
Press button “SAP Reference IMG”.
Navigate list as follows
SAP Customizing Implementation Guide
Quality Management
Quality Notifications
Notification Processing
Print control
Define Shop Papers, Forms, Print Programs
Double click on Define shop papers.
Enter any application area.
Hit Enter. You can configure under the Name of the PDF-Based From.
You just completed the SPRO Configuration of Adobe Forms for Quality Management area.
Uncertainties and “buts” are an integral part of life, and Adobe Forms are no exception. You often encounter real-life scenarios where printing depends on specific conditions. In such cases, “SAP Adobe Form Tutorial Part X Alternative in Adobe Forms“ explores a feature called “Alternative” that allows you to print data conditionally based on the requirements.
Transaction Code: SFP.
Enter the connection point name and make (the connection point is compulsory for Adobe structure).
Enter the necessary short portrayal and save.
Enter the bundle name and save.
Allow us to add our own custom boundary name. Select the Import choice under the Structure Connection point (left side) and press the Make button (right side) to add a bringing-in boundary.
FLAG is for alternative. TEXT1 and TEXT2 are for printing the texts.
Save, Check, and Actuate the Connection Point.
Go to the back SFP Exchange fundamental screen. Make the structure.
Press the make button. Give the short portrayal and connection point name that you have made before.
Enter the bundle name and save.
Drag Banner, TEXT1, and TEXT2 from Point of Interaction to Setting.
Go to setting. Right-click on the YRAM_ADOBE_FORM10 under the unique circumstance and make an alternative.
Alternative:
Alternative is the option that we use for conditional printing with TRUE / FALSE option.
When it is TRUE, it will print the details, which are specified under TRUE and vice versa.
Simplified the TEXT1 under the Genuine Condition and the TEXT2 to Bogus Condition.
Make a condition for elective. Press on Alternative Conditions button.
Add a condition: FLAG = ‘X’
That’s what it intends – when you pass ‘X’ it is Valid, when Space it is Misleading.
Go to Design. Simplified the TEXT1 and TEXT2 to the design.
Save and enact the structure.
Allow us to construct the Driver program
*&---------------------------------------------------------------------* *======================================================================* * YRAM_ADOBE_FORM_PROGRAM8 * *======================================================================* * Project : SAP Adobe Forms Tutorial * * Author : varad (www.elearningsolutions.co.in) * * Description : Using Alternative in Adobe form * *======================================================================* REPORT yram_adobe_form_program10.
*======================================================================* * Selection Screen *======================================================================* PARAMETERS : p_flag TYPE char1. *======================================================================* * Data Objects *======================================================================*
DATA: gv_fm_name TYPE rs38l_fnam, " FM Name gs_fp_docparams TYPE sfpdocparams, gs_fp_outputparams TYPE sfpoutputparams, gv_text1 type char255, gv_text2 type char255.
*======================================================================* * Constants *======================================================================* CONSTANTS : gv_form_name TYPE fpname VALUE 'YRAM_ADOBE_FORM10'.
gv_text1 = 'Welcome to Adobe form tutorial'. gv_text2 = 'Welcome to SAP ABAP'. *======================================================================* * START of Calling the Form *======================================================================* *&---------------------------------------------------------------------* **&&~~ Form Processing: Call Form - Open * CALL FUNCTION 'FP_JOB_OPEN' CHANGING ie_outputparams = gs_fp_outputparams EXCEPTIONS cancel = 1 usage_error = 2 system_error = 3 internal_error = 4 OTHERS = 5. IF sy-subrc <> 0. " Suitable Error Handling ENDIF. *&---------------------------------------------------------------------* **&&~~ Get the Function module name based on Form Name * CALL FUNCTION 'FP_FUNCTION_MODULE_NAME' EXPORTING i_name = gv_form_name IMPORTING e_funcname = gv_fm_name. IF sy-subrc <> 0. " Suitable Error Handling ENDIF. *&---------------------------------------------------------------------* **&&~~ Take the FM name by execuing the form - by using Pattern- **&&~~ call that FM and replace the FM Name by gv_fm_name **&&~~ Call the Generated FM
*&---------------------------------------------------------------------* *&---- Close the spool job CALL FUNCTION 'FP_JOB_CLOSE' EXCEPTIONS usage_error = 1 system_error = 2 internal_error = 3 OTHERS = 4. IF sy-subrc <> 0. * <error handling> ENDIF.
Allow us to execute this structure and see the result.
Test 1 : Execute program YRAM_ADOBE_FORM_PROGRAM10 to test TRUE Alternative.
Pass ‘X’
Execute. Press on Print see
Test 2 : Execute program YRAM_ADOBE_FORM_PROGRAM10 to test FALSE Alternative
Pass no worth.
Execute. Press on Print see.
Trust this post was clear enough for you to comprehend. A legitimate showcase is something which we really want in each elective structures. It tends to be taken care of in more than one way however when SAP has given a shrewd Elective why not use it.
We put a lot of effort into conceptualizing, testing, and writing each article. If you could share this link with at least 5 colleagues or friends who might benefit from our post, it would be a great support to our team. We believe our articles, including “SAP Adobe Form Tutorial Part X Alternative in Adobe Forms,” should reach as many audiences as possible so that everyone can benefit and our team remains motivated, ensuring our work does not get lost in the vast expanse of the web.
Thank you kindly for visiting. Kindly leave your remarks/praises, great and no so great so we can continue to improve and giving you quality stuff.
We have previously learned how to display Text Modules t-code Smartforms and Include Texts (t-code SO10) in SAP Adobe Forms. While working with text types, we encounter three options in the drop-down menu. Today, in “SAP Adobe Interactive Form Tutorial Part IX Displaying Dynamic Text in Adobe Forms,” we will focus on the third text type, Dynamic Text. Depending on your business needs and scenarios, you can decide which text type to use.
Transaction Code: SFP.
The Point of interaction name and Make (Point of interaction is compulsory for Adobe structure).
Enter the necessary short portrayal and Save.
Enter the Bundle name and Save.
Allow us to add our own custom Boundary Name. Select the Import choice under Structure Connection point (left side) and press the Make button (right side) to add a Bringing in Boundary.
TSFTEXT is the Table Type can be used to display the dynamic text in Adobe form.
TLINE is the structure included in Table type TSFTEXT.
Allow us to add our own custom Boundary Name. Select the Import choice under Structure Connection point (left side) and press the Make button (right side) to add a Bringing in Boundary.
Save, Check and Initiate the Point of interaction.
Go to back SFP Exchange principal screen. Make the structure.
Press on create button. Provide the short description and Interface name which you have created earlier.
Enter the Package name and Save.
Drag IT_TSFTEXT Table from Interface to Context
Go to Context. Right click on the YRAM_ADOBE_FORM9 under the context and create a text
Select the Text Type drop down.
You can see 3 choices:
Text Module
Include text
Dynamic text
Right snap on the YRAM_ADOBE_FORM9 under the unique circumstance and make a message. Select the TEXT and double tap. Change the text type to Dynamic text and Enter. Enter the subtleties like beneath
Field = IT_TSFTEXT
Save and go to Design. Embed a Text and increment the size according to your prerequisite.
Map your TEXT to drifting field {TextField}.
Save and actuate the structure.
Allow us to execute this Structure and see the result. Press on Test Button (F8).
Enter the text in to IT_TSFTEXT.
Press on Insert data button.
Execute. Press on Print Review.
Thank you very much for your time! I hope you found this guide helpful. For a deeper dive into working with Adobe Forms, check out “SAP Adobe Interactive Form Tutorial Part IX Displaying Dynamic Text in Adobe Forms“
Today, we will explore another relative of the Text Module, i.e., Include Text. I like to refer to this Include Text as Standard Texts, which can be created and saved using transaction SO10. In SAP Adobe Interactive Form Tutorial Part VIII Displaying Include Texts in Adobe forms, we will dive into how to efficiently use these texts in your Adobe forms.
Allow us to make the Structure Connection point utilizing Exchange Code SFP. Enter the Connection point name and Make (Connection point is required for Adobe structure).
Enter the required short description and Save.
Click the Package name and Save.
Allow us to add our own custom Boundary Name. Select the Import choice under Structure Point of interaction (left side) and press the Make button (right side) to add a Bringing in Boundary.
IV_LANGU TYPE SY-LANGU
Save, Check and Enact the Connection point.
Go to back SFP Exchange primary screen. Make the structure.
Press on make button. Give the short depiction and Connection point name which you have made before.
Enter the Bundle name and Save.
Drag IV_LANG Field from Connection point to Setting
Go to setting. Right snap on the YRAM_ADOBE_FORM6 under the specific circumstance and make a Message.
Select the drop down. You can see 3 choices:
1. Text Module 2. Include text 3. Dynamic text
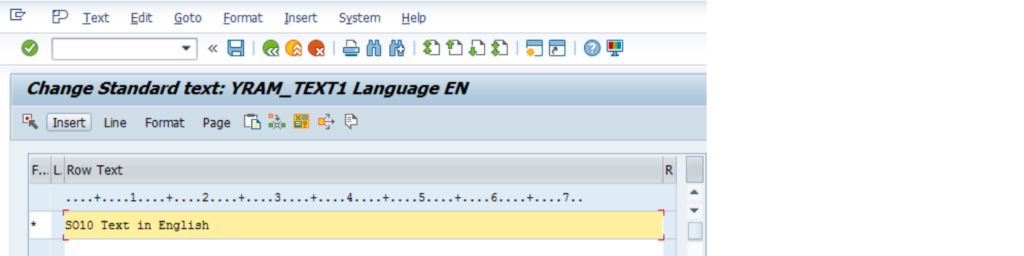
We have proactively talked about Text Module in our past article. Today we will discuss include Text. Incorporate Texts are only Standard Texts. Go to Exchange SO10 for Incorporate Text.
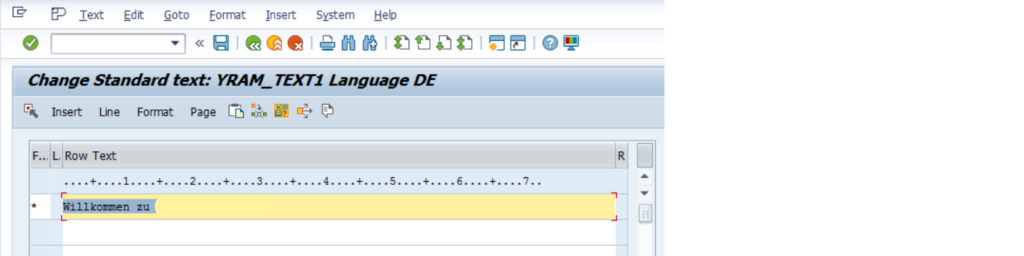
Create texts in required languages: English
Press on Make. Enter the necessary text in English and Save it.
Allow us to save some text in another dialect: German.
Press on Create. Enter the required text in German and Save it.
You can create in all available languages and use them. Right snap on the YRAM_ADOBE_FORM8 under the specific circumstance and make a Message (or change the Message made previously) Select the TEXT and double tap. Change the text type to include Text and hit Enter.
Enter the details like below Name: TEXT_FROM_SO10 Text Name: ‘YRAM_TEXT1’ Text Language: IV_LANGU No error if text not available = Check the box.
Save . Go to Layout. Go to Data View Select TEXT_FROM_SO10, drag and drop to Layout.
Save and enact the structure.
Allow us to plan the Driver program for the above structure.
*&---------------------------------------------------------------------* *======================================================================* * YRAM_ADOBE_FORM_PROGRAM8 * *======================================================================* * Project : SAP Adobe Forms Tutorial * * Author : Varad (www.elearningsolutions.co.in) * * Description : Printing SO10 Text in Adobe form * *======================================================================* REPORT yram_adobe_form_program8.
*======================================================================* * Selection Screen *======================================================================* PARAMETERS : p_langu TYPE sy-langu. *======================================================================* * Data Objects *======================================================================*
DATA: gv_fm_name TYPE rs38l_fnam, " FM Name gs_fp_docparams TYPE sfpdocparams, gs_fp_outputparams TYPE sfpoutputparams.
*======================================================================* * Constants *======================================================================* CONSTANTS : gv_form_name TYPE fpname VALUE 'YRAM_ADOBE_FORM8'.
*======================================================================* * START of Calling the Form *======================================================================* *&---------------------------------------------------------------------* **&&~~ Form Processing: Call Form - Open * CALL FUNCTION 'FP_JOB_OPEN' CHANGING ie_outputparams = gs_fp_outputparams EXCEPTIONS cancel = 1 usage_error = 2 system_error = 3 internal_error = 4 OTHERS = 5. IF sy-subrc <> 0. " Suitable Error Handling ENDIF. *&---------------------------------------------------------------------* **&&~~ Get the Function module name based on Form Name * CALL FUNCTION 'FP_FUNCTION_MODULE_NAME' EXPORTING i_name = gv_form_name IMPORTING e_funcname = gv_fm_name. IF sy-subrc <> 0. " Suitable Error Handling ENDIF.
*&---------------------------------------------------------------------* **&&~~ Take the FM name by execuing the form - by using Pattern- **&&~~ call that FM and replace the FM Name by gv_fm_name **&&~~ Call the Generated FM
*&---------------------------------------------------------------------* *&---- Close the spool job CALL FUNCTION 'FP_JOB_CLOSE' EXCEPTIONS usage_error = 1 system_error = 2 internal_error = 3 OTHERS = 4. IF sy-subrc <> 0. * <error handling> ENDIF.
In the event that your client has roll outs in two unique nations with two distinct dialects. In light of the sign on language of the SAP framework, the structure ought to print the result in that language. Incorporate/Standard Text helps in such interpretations.
The IV_LANGU field of the structure ought to preferably be populated progressively in genuine undertakings. However, for our test, we would include them as our choice screen boundary.
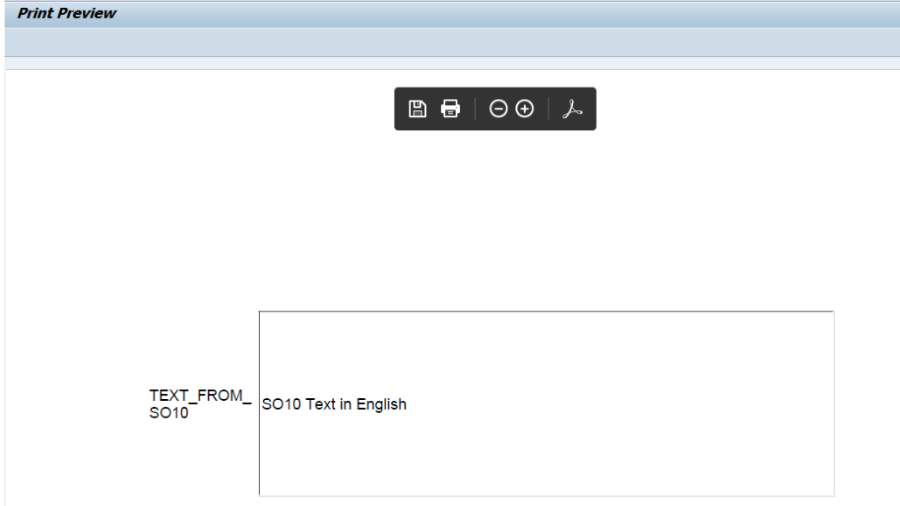
Test 1 : Run the Program : YRAM_ADOBE_FORM_PROGRAM8 Enter the Language as ‘EN’.
Press on Print preview
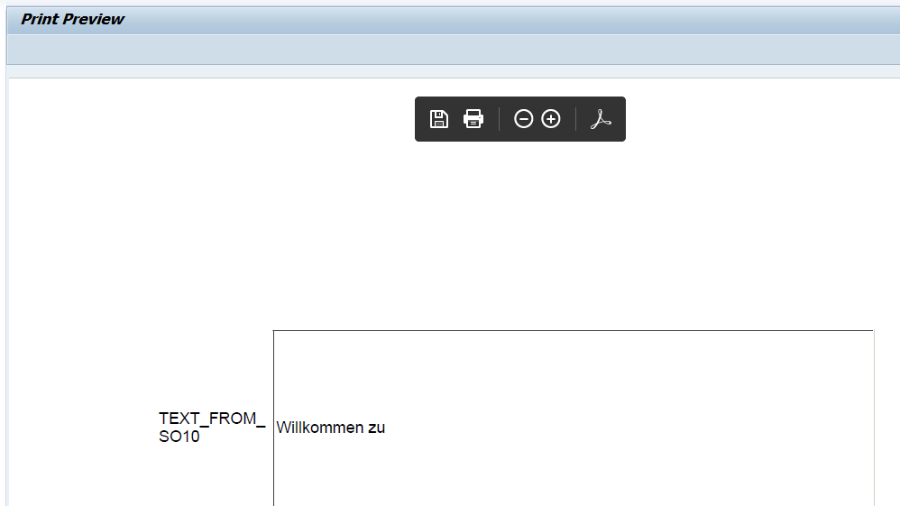
Test 2 : Run the Program : YRAM_ADOBE_FORM_PROGRAM8 Enter the Language as ‘DE’.
Press on Print preview
Thank you very much for your time! I hope you found this SAP Adobe Interactive Form Tutorial Part VIII Displaying Include Texts in Adobe forms helpful and informative.
One of our readers left us a question: “I was expecting and am still looking for a way to add an address—customer/vendor—to the Adobe Form using the ADRNR number, similar to how SMARTFORMS handled this. I thought it was managed very well in SMARTFORMS with all the options like country code, postal code, etc. Isn’t there a way to handle this in the Adobe tool as well?” In “SAP Adobe Interactive Form Tutorial Part VII Printing Address in Adobe Form,” we will explore how to achieve this in the Adobe tool with similar flexibility.
Our Response: Adobe Structure should be a move up to what we as of now have in SMARTFORMS. Consequently it requirements to acquire the elements of SMARTFORMS. Indeed, Adobe is adequately shrewd to deal with it and we would show you precisely the way that it tends to be accomplished.
Transaction Code: SFP. Enter the Interface name and Create (Interface is mandatory for Adobe form).
Click the short portrayal and Save.
Enter the Bundle name and Save.
Let us add our own custom Parameter Name. Select the Import choice under Structure Connection point (left side) and press the Make button (right side) to add a Bringing in Boundary.
IV_ADDRESS_TYPE TYPE CHAR1
IV_ADDRNUMBER   TYPE AD_ADDRNUM
IV_PERSNUMBER   TYPE AD_PERSNUM
IV_LAND1        TYPE LAND1
Save, Check and Activate the Interface.
Go to back SFP Exchange primary screen. Make the Form.
Press on make button. Give the short portrayal and Connection point name which you have made before.
Enter the Bundle name and Save. Go to Context.
Right snap on the YRAM_ADOBE_FORM7 under the Unique circumstance and make an “Address“.
Double Click on Address and enter the below details.
Save. Go to Layout.
Go to Data View. Drag and Drop the ADDRESS Context.
Increment/Change the size of the Location to account for different lines and eliminate the subtitle.
Save and Activate.
Now, let us go and create the Driver Program.
*&---------------------------------------------------------------------* *======================================================================* * YRAM_ADOBE_FORM_PROGRAM7 * *======================================================================* * Project : SAP Adobe Forms Tutorial * * Author : Varad (www.elearningsolutions.co.in) * * Description : Printing the Address in Adobe form * *======================================================================* REPORT yram_adobe_form_program7.
*======================================================================* * Selection Screen *======================================================================* PARAMETERS : p_atype TYPE char1, p_adrnr TYPE ad_addrnum, p_pernr TYPE ad_persnum, p_land1 TYPE land1.
*======================================================================* * Data Objects *======================================================================*
DATA: gv_fm_name TYPE rs38l_fnam, " FM Name gs_fp_docparams TYPE sfpdocparams, gs_fp_outputparams TYPE sfpoutputparams.
*======================================================================* * Constants *======================================================================* CONSTANTS : gv_form_name TYPE fpname VALUE 'YRAM_ADOBE_FORM7'.
*======================================================================* * START of Calling the Form *======================================================================* *&---------------------------------------------------------------------* **&&~~ Form Processing: Call Form - Open * CALL FUNCTION 'FP_JOB_OPEN' CHANGING ie_outputparams = gs_fp_outputparams EXCEPTIONS cancel = 1 usage_error = 2 system_error = 3 internal_error = 4 OTHERS = 5. IF sy-subrc <> 0. " Suitable Error Handling ENDIF. *&---------------------------------------------------------------------* **&&~~ Get the Function module name based on Form Name * CALL FUNCTION 'FP_FUNCTION_MODULE_NAME' EXPORTING i_name = gv_form_name IMPORTING e_funcname = gv_fm_name. IF sy-subrc <> 0. " Suitable Error Handling ENDIF.
*&---------------------------------------------------------------------* **&&~~ Take the FM name by executing the form - by using Pattern- **&&~~ call that FM and replace the FM Name by gv_fm_name **&&~~ Call the Generated FM CALL FUNCTION gv_fm_name “ '/1BCDWB/SM00000204' EXPORTING /1bcdwb/docparams = gs_fp_docparams iv_address_type = P_atype iv_addrnumber = p_adrnr iv_persnumber = p_pernr iv_land1 = p_land1 * IMPORTING * /1BCDWB/FORMOUTPUT = EXCEPTIONS usage_error = 1 system_error = 2 internal_error = 3 OTHERS = 4. IF sy-subrc <> 0. * Implement suitable error handling here ENDIF.
*&---------------------------------------------------------------------* *&---- Close the spool job CALL FUNCTION 'FP_JOB_CLOSE' EXCEPTIONS usage_error = 1 system_error = 2 internal_error = 3 OTHERS = 4. IF sy-subrc <> 0. * <error handling> ENDIF.
Allow us to test this Adobe improvement to check our Location populated utilizing simply the Location Number.Run Program : YRAM_ADOBE_FORM_PROGRAM7.
Press on Print Preview. Please design your Form better than this.
This is the confirmation from ADRC (Address) table.
The Location is printed accurately.
I trust that next time you need to print an address in your Adobe form, you’ll know exactly what to do after following the SAP Adobe Interactive Form Tutorial Part VII: Printing Address in Adobe Form. This guide will help streamline the process for you.
Today, we will explore another frequently used feature of any printing technology (SAPScript, Smartform, and Adobe). Just like displaying the standard texts maintained in the SO10 t-code is a very common requirement in forms, displaying the texts maintained in the text modules in the SMARTFORMS t-code is another common business need. In this SAP Adobe Interactive Form Tutorial Part VI, Displaying Text Module Texts in Adobe Forms, we will walk you through how to achieve this efficiently.
Allow us to figure out how to show text modules in SAP Adobe Structures.
Transaction Code: SFP. Enter the Interface name and Create (Interface is mandatory for Adobe form).
Enter the expected short portrayal and Save. Click the Bundle name and Save.
Allow us to add our own custom Boundary Name. Select the Import choice under Structure Point of interaction (left side) and press the Make button (right side) to add a Bringing in Boundary.
IV_LANGU TYPE SY-LANGU Save, Check and Activate the Interface.
Go to back SFP Transaction main screen. Create the Form.
Press on make button. Give the short depiction and Connection point name which you have made before.
Enter the Bundle name and Save.
Drag IV_LANG Field from Interface to Context.
Go to context Right click on the YRAM_ADOBE_FORM6 under the Context and create a Text.
Select the drop down.
You can see 3 options: 1. Text Module 2. Include Text 3. Dynamic Text
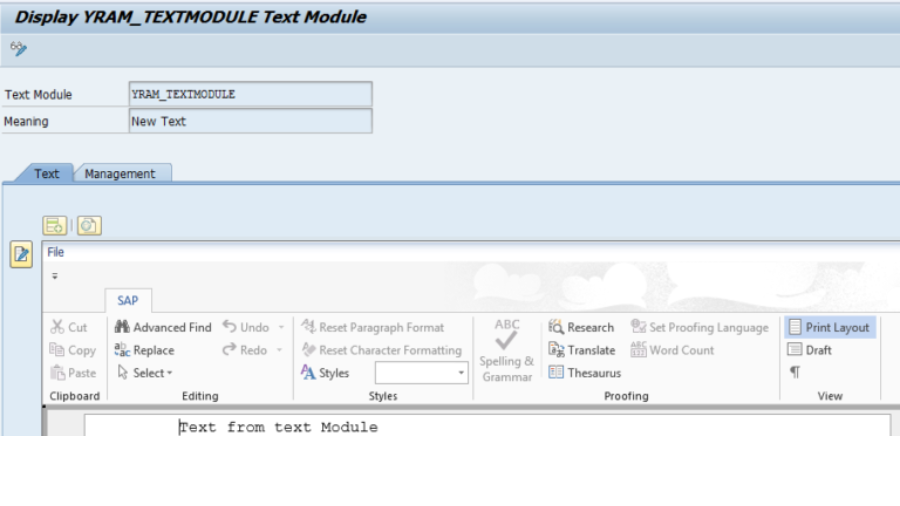
Text Module: Text modules can be made in exchange SMARTFORMS.
Go to Transaction: SMARTFORMS.
Press On Make and enter the necessary text – you can utilize existing text modules moreover.
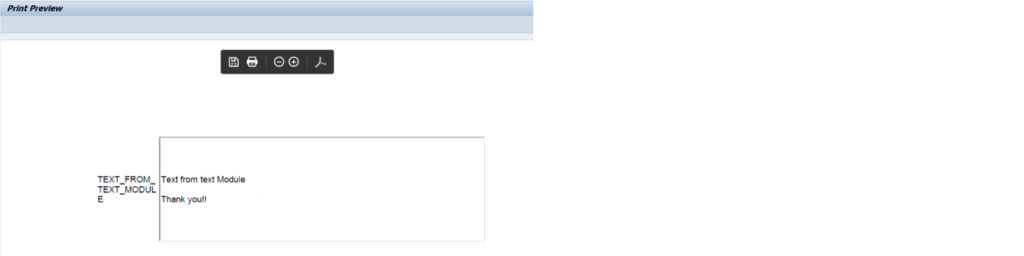
Save in a Bundle. Back. Return to your SFP Context. Select the TEXT and double tap. Change the Text Type to Text Module and hit Enter. Enter the subtleties like underneath: Name: TEXT_FROM_TEXT_MODULE Text Name: ‘YRAM_TEXTMODULE’ Text Language: IV_LANGU No error if text not available = Check the box.
Save.
Go to design. Simplified the “TEXT_FROM_THE_TEXT_MODULE” Field to the Layout.
Increment the size of the showcase field according to your prerequisite. Do we have to likewise say, you can change the Subtitle ‘TEXT_FROM_TEXT_MODULE’ too? We are getting apathetic today. We will keep it all things considered.
Check, Save and Activate.
You can approve the result, by executing the Structure independent. However, preferably, it ought to be tried from a driver program. Kindly check the driver program from past articles in the series. We have not composed it for you this time. Treat it as a hand-on home work for you.
Execute
Press on Print review. Whatever was saved in the Text Module is printed.
I trust this information helps you in some real-world projects. Hardcoding data that can change is not a good approach in any printing method. That’s why Text Modules and Standard Texts hold their own importance. In “SAP Adobe Interactive Form Tutorial Part VI Displaying Text Module Texts in Adobe forms,” we will explore how to effectively display text modules in Adobe forms, ensuring flexibility and reducing the need for hardcoded values.